

somewhereinusa
-
Content Count
44 -
Joined
-
Last visited
Posts posted by somewhereinusa
-
-
On 4/21/2022 at 8:31 PM, dennis@portofwinlock.com said:Has anyone ever put the condensor on the roof?
I've seen them mounted high, I believe there is a problem if they are too high above the evaporator. The condenser does need to stand up that would put the top quite high.
-
Random Acts of Camping’s First All-In-One Rally.
We are inviting all antique, vintage, converted, home built campers, skoolies, vans and buses to join us for a family friendly event.
Enjoy a long weekend of camping with people who think “random” is the norm.
This rally is for everyone, Registration is now open

Primitive camping at tractor show-grounds in Nappanee, IN (grass lot parking)
-
Shower house/bathrooms available (on-site)
-
Generators permitted
-
Genturi/generator exhaust venting system preferred, but not required
-
-
Grills and raised fire pits are permitted
Pet friendly. Must be on a leash, and please clean up after them.
Kid friendly. Must be on a leash, and please clean up after them. Just kidding!
-
Seriously, we love kids and they are welcome, but please clean up after them.
Many will have open house on Saturday.
Thursday, September 22
Arrival - Gates open at 8am
Meet and greet
Community campfire
Friday, September 23
Donuts and coffee
Miniature train rides - 12pm and 4pm
Visit/open house for attendees
Carry-in dinner - 6pm
Community campfire
Saturday, September 24
The public will be invited to view units on this date
Open house is optional.
Donuts and coffee
Open house for the public - 10am-5pm
Community campfire
Sunday, September 25
Send-off
-
-
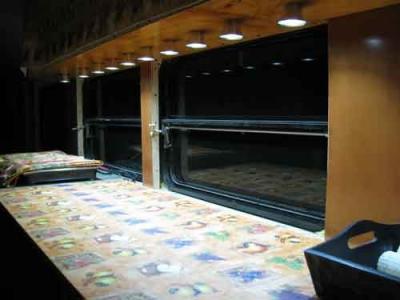
Many years ago, about 10, I installed lights for the entry step. I finally got around to hooking them up. I used a reed switch with magnet to activate them to turn on when I open the door. In the same general theme of not doing anything simple I put a new clock above the door that I could see while driving. Then to further complicate things I added a light under that to also light up the entrance. As I get older I found that, in the dark, I used the cabinet above the passenger seat to steady myself. Soooo I added a grab handle to the bottom of the cabinet. Still not content with leaving things alone I made the grab handle a touch sensor to turn on the light so I could descend the steps with light. While I was at that, I made the reading light just installed to also touch to turn on.
Here's the wiring diagram.
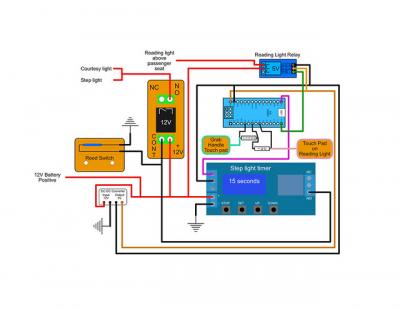
As usual the coding gave me a bit of problem but, I was able to figure it out by myself. Is it bad code if it does what you want it to?
-
Finally got the step lights that I built 10 years ago hooked up with a switch that turns them on when I open the door. Got the indirect lights installed in the kitchen and LR. Currently working on turning on the step light when you touch the assist handle.
-
Seriously, if anyone is in the area and need a place to stop for a couple of days you are welcome. I can help with small projects.
-
4 hours ago, wayne77590 said:I want to park next to you. There are a few things I'd like done,🤡
Driveway is available most of the time. 😄
-
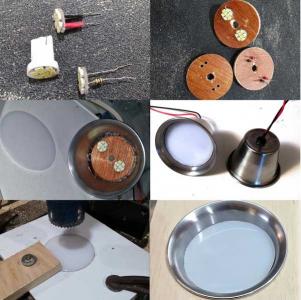
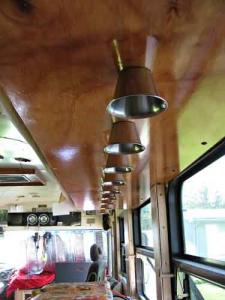
Finally got all of the ceiling panels up, it's only been 10 years, never rush into anything. Needed a new dome light, made this out of an old glassm bus dome light, Cut afixture out of walnut and converted it to LED.

-
Just curious, if the CAC is completely plugged, why is the engine not overheating? The air that cools the engine passes through the CAC.
-
Why is this conversion taking so long? It's only been about ten years. I seem to take time to learn new skills because I want to build something. Too cheap/broke to buy them. I spent the winter milling lumber. My woodworking skills have improved a great deal. I'm now using walnut and ash for the interior. Here's a video of what I did to get some walnut trim pieces.
-
I gave this a bit of thought when I first started building my tow setup. I decided there just wasn't a need. This is a fairly good presentation of my setup. A couple of notes.
My towed is old so, rock chips in the paint are a minor consideration
I have a pusher bus, rear bumper is 24 inches above the ground. My tires are 38" in diameter. Towed is a Ford Ranger so, hood is pretty high.
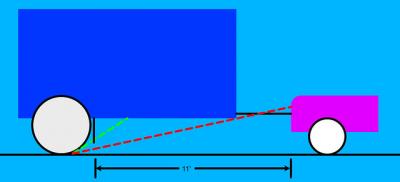
There are so many variables such as vehicle speed, wind, surface to make any kind of prediction. I couldn't really find any graphics of this. This is only what I think.
Red line is the path something would have to take to hit front of vehicle. I don't think this is the likely path anything would take unless you were to spin the tires of your MH. 😁 This shows no drop of any kind.
Green path is what I think is much more likely for anything coming of of a tire.
-
On 8/20/2020 at 12:01 PM, OBIWAN_CANOLI said:Though I like the idea of Bluetooth, I'd planned to install the controller in place of the previous model, and it appears to be about 3X the size! Further, I prefer something with a display on the controller for convenience... but I suppose it's not absolutely necessary the unit have a display, seems to me it would also be convenient...
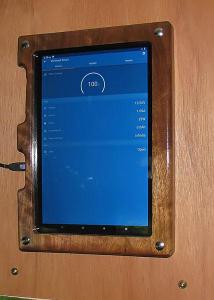
I have Victron and like the idea of using with my phone. I also wanted a coach mounted display. I bought a cheap tablet with bluetooth and, with a voltage reducer, mounted it in the living area. I also have bluetooth light and awning controls as well as information from my home built BMS for my lithium batteries. I can monitor everything from one unit. As an added bonus I can send data to my computer from the tablet.

-
Technically an LED will work on AC voltage if you get the voltage right. Since it is a diode it only lights on every other cycle.
The 12v strip LED's are available in both water proof and non waterproof strips. They make connectors that snap on but, I've had better luck just soldering a wire to the copper pad. Many of the fixtures I have made use one of the led boards made to replace automotive lights. One example.
They already have the resistors needed to make it work with 12V. Just remove the plastic plug and solder wires on.
-
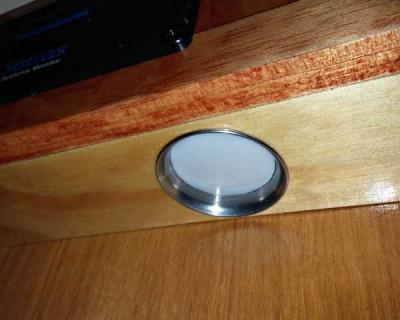
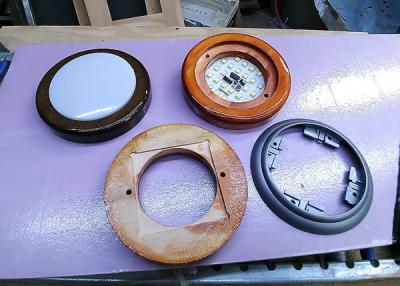
Made some new LED light fixtures.
Top left is walnut, right is pine, bottom right is cheap plastic original fixture.
-
49 minutes ago, rossboyer said:Did you modify a 120vac fixture to be 12vdc? If so, please detail the specifications of the fixture and steps to modify.
These aren't fluorescent, they are aluminum channels about 1 inch wide that you put an led strip in.
-
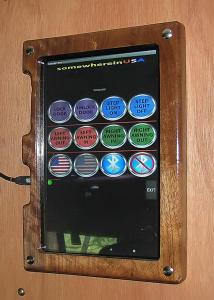
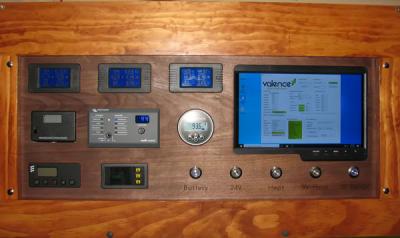
I just finished the control/information panel made of solid walnut. Monitors solar, LiFePo batteries, boiler control, as well as switches.
-
I'm pretty excited. I got everything wired and working yesterday. About noon I turned on the AC in the bedroom. At about 6PM the panels were still producing more than the AC was using. (Northern Indiana, slightly cloudy, some overcast).
I left the AC on all night set on 75°. This is what the state of charge was this morning at 6AM
- 12,000 BTU inverter type mini-split
- 6 255W solar panels
- 6 138 Ah Valence LiFePo4 12V batteries
- Home built safety for battery shutdown along with Valence cell balencing
All of this started about a year ago when I saw an ad for some used Valence batteries. At that time I knew nothing about lithium batteries or solar. Rough cost $5000 including batteries, solar panels and Victron inverter/charger and solar controller.
-
Another step closer. My son came and helped to mount the solar panels. The original luggage rack was exactly the right width. It was two rails tall and with a little cutting and welding the top rail went forward to mount the front two panels.
I did repaint the roof after I took this photo.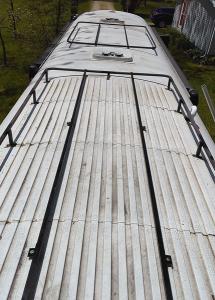
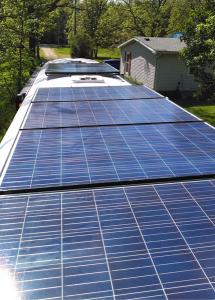
1530W, still have to finish the wiring but, this is the part I couldn't do by myself.__________________ -
I also have a ReadyBrake and like it a lot. Much nicer than the old system that had a vacuum pump that sat on the floor. If all you are concerned about is break away safety the ReadyBrake break away system would do it with nothing else to purchase. ReadyBrake break away
-
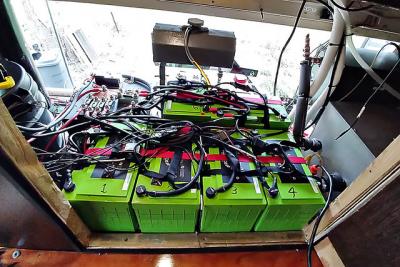
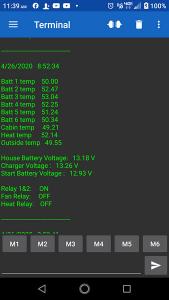
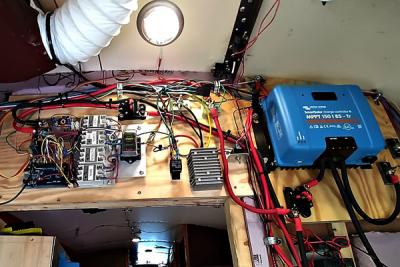
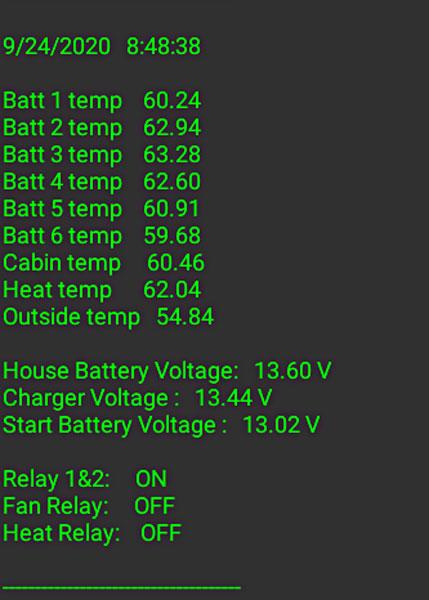
This is all done and installed for testing except for actually hooking up the main relay. It has changed a bit since my first post. I've added a temperature sensor inside of each battery. It logs to a memory card and sends data to my phone via bluetooth. I was surprised to find that I can get the data from inside the house.:smile: Unfortunately, now that it's spring I can't test the cold weather part but, I did thoroughly bench test it.
Overview of system.
1. Arduino Mega
2. Voltage regulator
3. 9 DS18B20 temp sensors
4. Switchdoc labs INA3221 voltage sensor
5. 4 SS relaysRelay 1----Main Disconnect
Relay 2----Victron Charge controller
Relay 3----Cabin cooling fan
Relay 4----Battery heatTemp sensor 1 Battery #1
Temp sensor 2 Battery #2
Temp sensor 3 Battery #3
Temp sensor 4 Battery #4
Temp sensor 5 Battery #5
Temp sensor 6 Battery #6
Temp sensor 7 Cabin temp
Temp sensor 8 Battery heat temp
Temp sensor 9 Outside temp
Relay 1 disconnects battery bank from everything *
Relay 2 turns solar controller ON/OFF *
Relay 3 turns ON/OFF compartment cooling fan
Relay 4 turns ON/OFF battery heating
*In all cases relay 1 turns on before relay 2 and relay 2 turns off before relay 1.voltage < 9.5 open relay 1&2
voltage > 15 open relay 1&2
any batt temp 1-6 > 175° F open relay 1&2
any batt temp 1-6< 40° F open relay 1&2
temp sensor 7> 90° F close relay 3
temp sensor 8< 45° F close relay 4
temp sensor 8> 50° F open relay 4
Sends data via bluetooth to phone.
Used real time clock to keep track of date and time.
Saves data to memory card. Every ten minutes. If something triggers relay 1 and 2 logs every 10 seconds.Overall system.This is mounted on back side of bedroom wall. Everything on left side of picture.
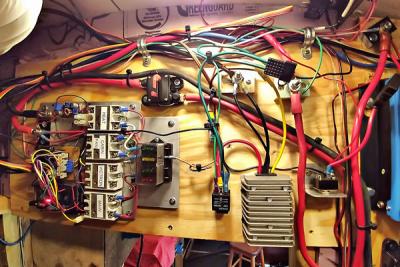
The batteries on floor of same area.
Screenshot of data on phone.
Another view of the control panel.
-
Since the lithium batteries I'm using (Valence) don't have any protection built in (only cell balancing), I've designed a protection system. It will totally disconnect the battery bank from everything if things go awry. It will also turn on a compartment cooling fan or turn on a heat pad if called for.
I have it bread boarded and the code written. For you coders out there mine is probably a bit clunky but, it works. Not really necessary but nice for a bit of bling I'm working on a screen to see what temps and voltages are. Also working on a data logger to see what triggered an event.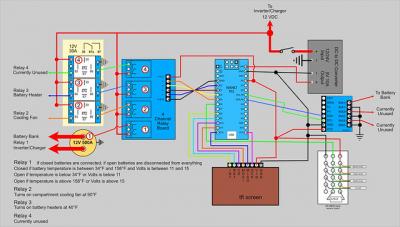
-
One: Richard Bruner
Two: USN
Three: 4 years 1967-1971.
Four: PO2 (E5)
Five: Naval Air ground support mechanic/electritian.
Six: NAS Memphis,NAS Key West, USS Constellation (CVA-64)
-
The Battleborn liths, more or less, use the same charger parameters as AGMs, if your charger/controller works with AGMs it will work with liths. Check with Battleborn.
You DO NOT want to charge lithium batteries when they are below freezing. I believe Battleborns have an internal BMS that prevents this. I have installed a heating pad under mine.
Check the dimensions, as others have said two in parallel would probably more than double your usable amp hours. Any kind of bracket/cradle would be quite easy as long as the new batteries are equal to or same as your current batteries. There is tons of info available about the Battleborns.
-
I was never really happy with my lead acid house bank. 400 Ah of which I could only use 50%. I recently came across a really good deal on some Valence U27-12XP 12volt 138Ah
batteries. They are used but, after getting the information from the internal BMS I find than none have 200 complete cycles of the 2000 or so available. So I now have 80% of 552 Ah. I've only had them operational for a couple of weeks but, I'm VERY pleased.At about the same time my inverter/charger died so I installed a Victron multiplus hybrid inverter and, I'm thrilled with it. It's fully programmable and the hybrid part works great. I often go to a place where I get 15A of questionable AC I had to be very careful of what I turned on or voltage would drop below 108. I was at the site for over a week and, within reason, I could turn on what I wanted. When the shore power is too low the inverter simply adds what is needed. When the power requirement drops it goes back to charging. Not even a flicker in the computers.
I also got a good deal on 6 255 watt solar panels but, haven't gotten them installed yet.
More to come.
-
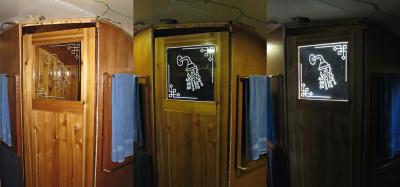
After 4 years I finally have a shower door. 😎 It also serves as a night light.


Old Bus, RV, Camper Rally
in General Discussion
Posted · Report reply
Oops, thought I did. It's there now.