Search the Community
Showing results for tags 'diy'.
Found 4 results
-
All, I'm evaluating replacing the RV fresh water tank. It is the original and ~20yrs old. The tank's drain fitting has a minor leak, (see pic, lower right) that I've repaired once, sealing with SikaFlex 221, having some success, and not completed fixing. The tank is ~45"long x 22"tall x 21"deep, and I expect this is ~80gals+. the standard tanks are available online and YouTube videos illustrate how to insert and seal the fitting outlets. This tank needs 4 outlets, a drain, water pump connection, fill port and air vent. I am interested in anyone having taken this DIY approach and understanding the work effort and the reliability of these outlet seals. Another approach is to go to a plastic "welder" providing the dimensions and port/outlet locations. I understand these plastic "welder" will then custom build the new tank. This new tank would basically "pop-in" and I would only need to make the necessary connections, water pump, etc. Alternatively, I could take the coach to the plastic "welders" and they would build and install. Again, I'm interested in folks that have taken this custom build approach and your overall cost and success. Please advise any recommendations/suggestions and overall experience. Thank you.
-
 When we bought our Newmar Northern Star three years ago I decided that I was going to add some cabinetry, a television lift, and an electric fireplace. The idea was to get this portion of the project installed then eliminate the head banger TV and cabinet at the front of the coach. This is the first phase of that project. The couch on the left side of the photo below is what we removed. When we left our sticks and bricks home we had a very nice 42" TV that we brought along for this project. I just needed to purchase and install a television lift, electric fireplace, cabinetry, and countertop. Piece of cake right? So, I ordered the lift which is a model "30003 Valueline" Touchstone lift and a 30" Touchstone Electric Fireplace. I got two 12"X12"X30" unfinished base cabinets from Menards and the necessary lumber to build the rest of the cabinetry. This is the lift and cabinetry build in the early stages of the installation. We opted for this arrangement so that we could utilize our window in an unobstructed fashion when the TV was not being used. The framing and support for the counter top was fabricated from 1"X4"'s . The counter top itself was fabricated from 1/2" clear plywood. We were very fortunate to find a plastic laminate that almost matched our Corian counter tops in the galley. This is the project just prior to staining the cabinets and installing the finished counter top. Installation of the countertop. It is glued and screwed to the newly installed cabinetry Finally the finished project (I still need to re-staing the baseboard with another coat of brown stain)
 -
From the album: Boogey Lights
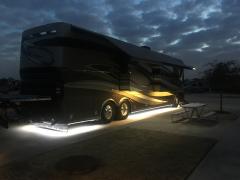
76 Linear feet, approx. 1470 LEDs. Installation included use of aluminum channel extrusions and light diffusers together with HDM7 RF controller which features multi-function light patterns and dimming capability. Single color only - soft white to align with pre-existing OEM LEDs installed on both passenger slide bottoms and Girard Canopy Awnings. -
Sharing photos of my recent DIY installation of Boogey Lights "Under Glow" surround ground effects LED lighting. As shown, the LEDs were installed beneath the motor coach on all sides (F&R, Driver and Passenger sides including underneath the entrance door steps). Installation is relatively simple and easy to do but does require some pre-planning in terms of placement and wiring. I choose to direct wire my LEDs to the coach' 12vDC circuitry which is Boogey Lights recommended practice (in lieu of using a 110vAC converter which are available). Located the main junction box and LED controller inside the passenger/door side basement compartment just ahead of my wet tank basement and then ran a single 14-AWG power (Pos +) wire to my electrical bay located on the driver's side and connected to a spare fuse terminal on the main 12vDC fuse panel together with the use of a 20-amp fuse. Materials required for the installation included 1) Boogey Lights (basic) RV Under Glow kit (which includes 2-ea 16' pre-measured LED lighting strips, a controller and wiring accessory kit) together with additional pre-measured LED light strips in 8', 4' and 3' sections along with their optional HD-M7 RF controller, aluminum channel extrusions (for mounting the LEDs strips as well as the light diffusers panels which "snap on" to the aluminum channel housing the LEDs), 2) additional materials and supplies used for my DIY installation which included 16 AWG wire, tie-wraps, #8 self tapping screws, black RVT silicone, some 3/4" x 3/4" x 8ft aluminum angle extrusions as well as some 1/4" x 1" x 8 ft. aluminum flat bar) along with other misc. parts and supplies. As shown, I particularly selected Boogey Lights single color "soft white" LEDs while they do offer a multi-color version (basically R,B,G which along with their optional controllers can be "tuned" to produce millions of color variations if so desired and can also be controlled by their cell phone app). I also upgraded to their HD-M& RF controller that includes a dimming feature (as well as other lighting control features) which further allows me to adjust the LED lighting illumination to align/match with my existing OEM installed LEDs located beneath the 2-two passenger side slides as well as on my 3 Girard Canopy Awnings. Used with discretion, these LEDs provide both lighting accent to the coach while at the same time offer increased safety when moving about the outside perimeter at night such as when needing to access the wet or electrical bays. Expectation is we will not "always" use these but on occasion do so while respecting the privacy of our fellow RV neighbors when in commercial parks. Additional information and photos of the actual installation can be found in at IRV2.com under RV Forums > RV Systems and Tech > Gear Discussions; http://www.irv2.com/forums/f52/diy-installation-of-ground-effects-led-lighting-374831.html I'd like to also mention and recommend Boogey Lights if your interested or contemplating a similar installation yourself. Boogey Lights Inc. is widely recognized as a supplier of high quality (and not the cheapest) LEDs particularly for recreational use applications, i.e. Automobiles, Motorcycles, Boats & RVs. The material composition and quality of their lights are apparent when you see them and even more so when you install and use them. They also offer the best warranty in terms of the lights themselves and are available to provide assistance (by phone or email) when it comes to planning or actually installing them. Don''t second guess yourself - you can easily "do it yourself (DIY)". No rocket science involved but does require that you do some "pre-planning" as to (a) where you want to install them, (b) what type of lights you want (single or multi-color), (c) the lengths of LED lighting you'll need or want, (d) where you will mount your controller (e) and whether you want to do direct 12vDC or use a 110v AC adapter - then its all a matter of labor from that point forward. On a coach the size of mine (45' DP) it was some what a labor of love that lasted more than 10-days to complete (albeit when I work for myself, I tend to call it a day and come and go as I please), hence the installation could have been quicker, I just wanted to take my time and work on them when I felt like it. Why DIY one might ask (vs. having them done for you)?, Well I obtained numerous quotes that ranged from $3,700 to as much as $4,500 for the supply and installation of the LEDs. By doing it myself I have calculated that my total cost (excluding my personal labor) was <$1,000 (which included the LEDs and supplied materials purchased from Boogey Lights at a total cost off $589.00). Hope you enjoy the photos.