


RVerOnTheMove
-
Content Count
487 -
Joined
-
Last visited
-
Days Won
4
Posts posted by RVerOnTheMove
-
-
A Simba? That's the name of our cat (named after the young cat in the Lion King). What could possibly be wrong with a Simba!

-
You bet. No problem.
-
I've heard of it but I thought it had AlreadyBeenCancelled!

-
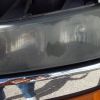
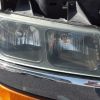
I was completely blown away with the results when I did it. I never believed it would work but at $300 a piece to replace the headlight fixtures I thought it would at least be worth a shot. I watched the video and laughed....yeah, right, that's what it's going to look like with me behind the drill. I think the very first process is the most important and I had to buy to kits to do both headlights as there just wasn't enough sandpaper to do a good first sanding on the second fixture. You have to get rid of everything that looks different during the first sanding. No gloss, just a perfect, evenly sanded, finish with no apparent blemishes (scary at this point as you are certain you have ruined your lights). The next steps is a bit more subtle but noticeable different. The wet sand begins to make you believe you could be headed in the right direction and the rubbing compound results will make you all warm and fuzzy about all the work you put into the previous steps.
The lens will still continue to degrade with time but I am hopeful that once or twice a year I will be able to either just use the rubbing compound or maybe the 3000 grit wet sand and the compound as I these pieces are still in excellent shape. Some places say that you should now "seal" the lens with another restoration product but I am going to hang in there and see what happens. I did the restoration in March and today it looks just like it did then (2 months later at this point).
-
This is not a "cleaner". The 3M kit has you sand the lens with 500 grit and then 800. This is followed by a 3000 wet polishing wheel and then rubbing compound.
I meant to post this link to the how-to video.
-
If you have not tried the 3M headlight restoration kit (and you have a drill and a couple of hours) you might want to give it a try. I did the lights on my 8 year old van and while they don't have the crystal appearance of the new lights, it took all of the haze and yellow away and they look really, really good.
I am hoping to attach the before and after pics.
-
The ones they sell at the conventions will not work if you plug them into a GFCI circuit due to the neutral and ground issues.
The "thing" you say you made could no have the necessary safety connections made or it would not work as you describe. It sounds like you have come up with something unique that is similar to having 2 separate plugs connected to 2 separate outlets without the common connections. If you don't mind, I would like to see the wiring diagram of the unit you built.
-
I didn't answer anything so I would very much appreciate a response. A combiner combines the 2 circuits. If you have setup some kind of a thing that lets you take a 20 amp and feed it separately from the 30 amp I would very much like to know how you are doing this. It's not something that is currently available on the market so I am most interested in what you are using.
-
I am not aware of any 50amp cheater box that will work with a GFCI in the circuit at the campground box. What are you using to combine these circuits?
Additionally, it's important to understand that adding a 30 amp circuit and a 20 amp circuit through a cheater box does not create a 50 amp circuit.
What you have with this setup is one leg with 30 amps available and another leg with 20 amps (or less) available.
With an actual 50 amp plug you have 50 amps on one leg plus 50 amps on the other leg available or a total of 100 amps.
Diesel Air Filter
in Engines
Posted · Report reply
Have you only traveled 8,000 in the last 2 years? Did you have no oil change from year to year or is the oil really only a year old with 4,000 miles on it?
When you say you had a good report, what is the oil analays testing for? Dirt? Fuel? Anti-freeze? I would suspect that a bad filter used for one year and 4,000 miles would likely not show any issues related to the air filter no matter what. However, what do I know!