

Rewillia
-
Content Count
124 -
Joined
-
Last visited
Posts posted by Rewillia
-
-
5 hours ago, manholt said:Rick. Did you get 50A?
Yes. And I suppose as with most large rally's pump out and fresh water re-supply services are/will be available. Again, haven't gotten the Rally Package yet which I am sure will have lots of info in it.
-
On January 26, 2018 at 5:28 AM, hermanmullins said:Rick,
Will you be in Perry? Would like to see your setup up close.
Herman
Herman,
We actually registered for Perry last night and now plan to attend. That being stated, we will plan to try and arrive 1-2 days before the start of the Rally and may have to leave a day earlier, i.e. on the 17th as we have a new baby grand-daughter that is due to arrive on the 21st of March and want to be back home for that event. That lil' gal will be the first girl borne on my side of the family in 3 generations!
This will be our 1st attendance to a FMCA rally so any insight you and Carl can give me will be helpful i.e. are early arrivals accepted? and if yes, what do we need to do in order to schedule an early arrival? Our attendee package is being mailed to us so I'm presently unaware of what is possible. I'm now searching out stopovers on the route to Perry and factoring 3-days to get there as we typically don't like to drive more than 250-300 miles per day. Any particular route you planning to take? Advice is always welcomed. Same goes for you Carl (knowing you'll be seeing this post).
Will be nice to meet both of you in person.
Regards,
Rick
-
4 hours ago, manholt said:Rick.
I'm still amazed that Newmar did not do that kind of fit and finish on their High End Coach to begin with! You used some good imagination to come up with this solution, it's apparent that Newmar needs Engineer's for their potty system!
Job well done! I think I would go one step further and add a piece of metal as a heat shield between the exterior piping and Oasis exhaust...It also will help in debris management.
Carl,
Yes, I agree and Newmar did apologize for what was somewhat of a manufacturing/production oversight on my particular coach (as other '17 KA, EX and LAs received changes that incorporate better dump hose management). Newmar did also agree to retro-fit mine but I felt that would be time consuming to undertake such wherein they paid to have a 3" hole drilled through the drip pan & belly pan per my specification and owing to my plan to affix the exterior dump line drain connection.
As to your comment on heat, the distance between the two is actually enough that I suspect residual heat from the Oasis exhaust pipe will never become an issue. (It's likely 14-16" just doesn't look that far by the photos besides the Oasis only fires intermittenly and thus does not run continuously). The issue of exhaust heat from the Oasis is far more concerning with potential effect upon the sewer hose itself in than one has to be careful when routing it out and away from the coach. All the more reason my having a 2nd (optional) sanicon 1-1/2" discharge hose that will now quick connect and allow me the additional length if and when needed. Still behooves me how some parks/campgrounds including newer ones still tend to place their ground level sewer dump cap connections on individual pads at the far ends nearer to the corners instead of something midway. Also, the extended reach will be good for rally type parking as well (as i recently had to run out and buy a 3rd section of 3" hose when attending the Newmar Intl. Rally in Sedalia due to the distance. (I already had two lengths and that still wasn't enough).
Herman,
We're still working our 2018 Spring/Summer travel plans & schedule but at the moment it remains uncertain if we'll make it to Perry in March. If it comes about we will attend, I'll be certain to get in touch beforehand.
Regards, Rick
-
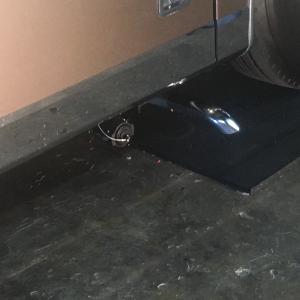
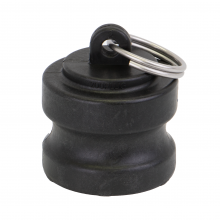
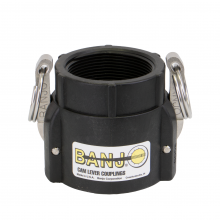
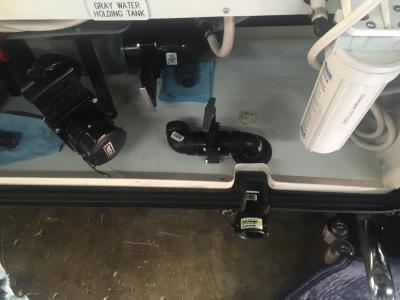
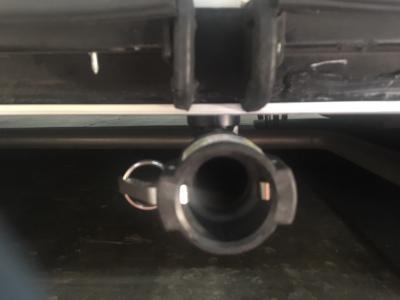
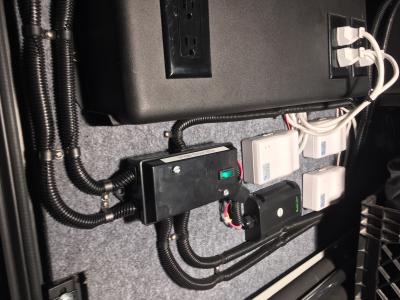
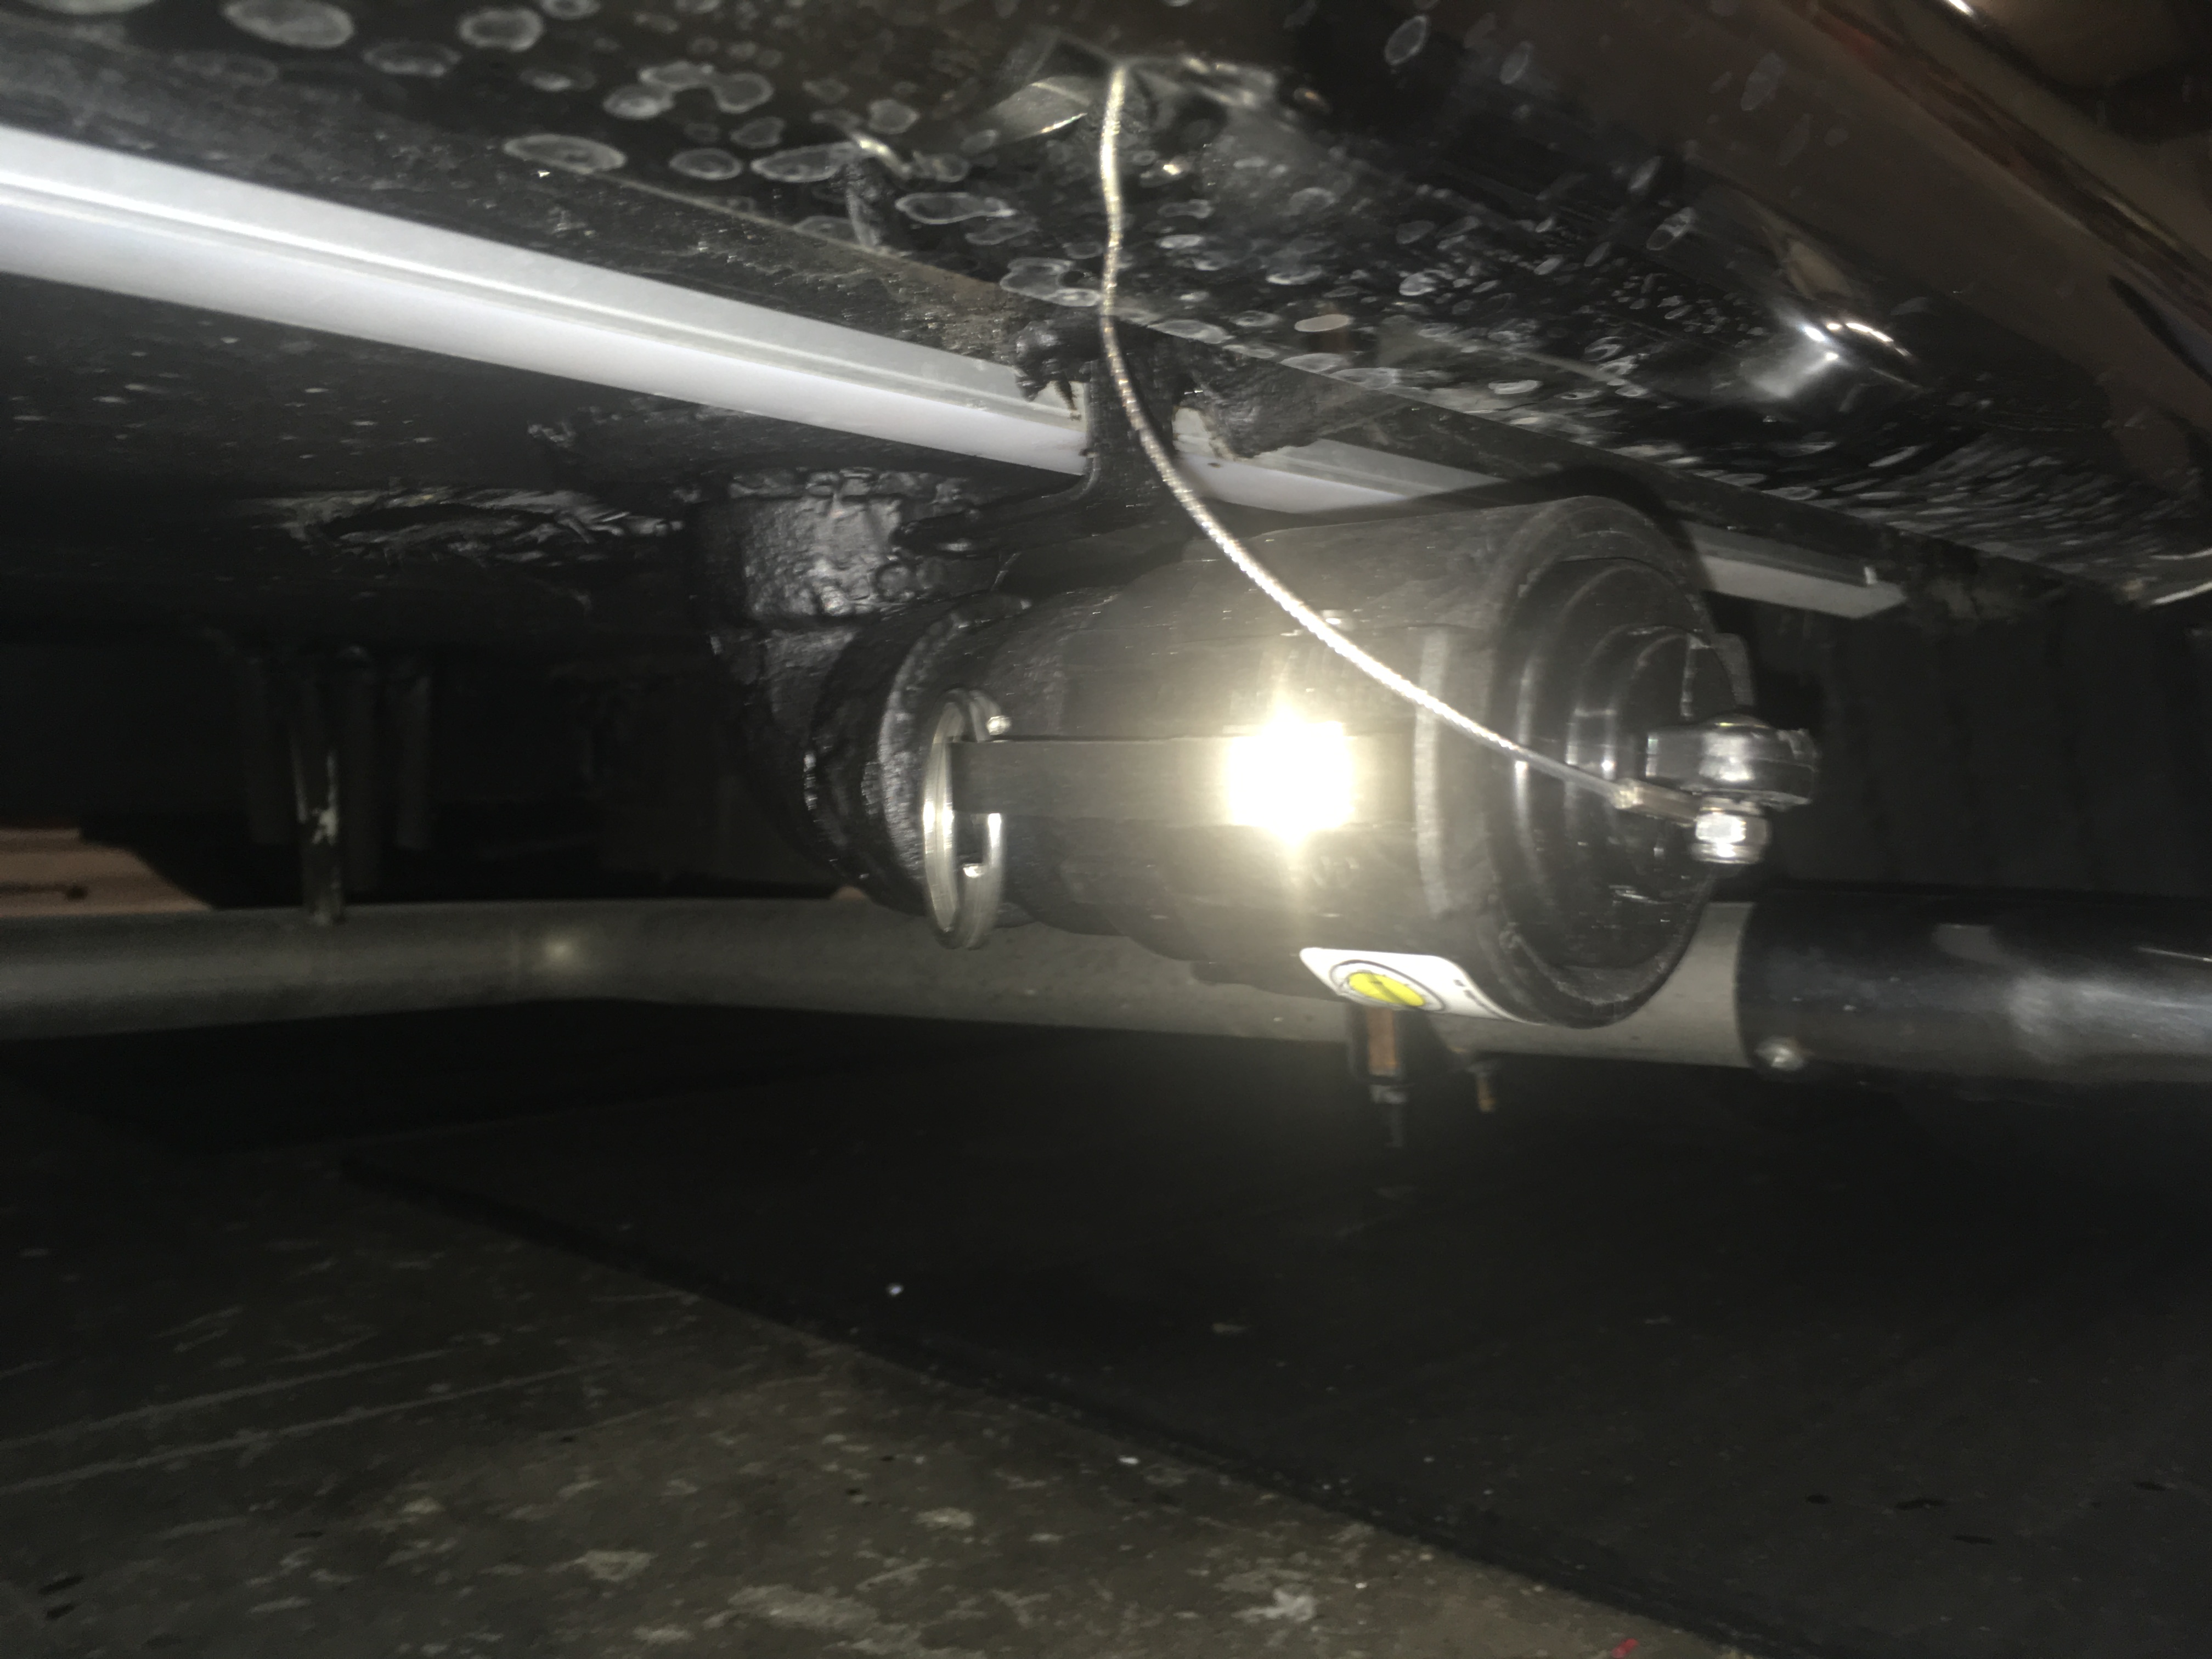
Failed to state the obvious; Upon completion I sealed the rubber flange gasket on the bottom of the belly pan with some RVT then applied some 3M Undercoating to the piping (section exiting the belly pan) as additional protection against road debris. Also still need to install a 2" caddy clamp on the flange of the 90° elbow to the small bracket as can be seen for additional stability. At normal ride height the bottom of the female cam lever coupler is approx. 9" off the ground (as can be witnessed by comparison to my Oasis exhaust pipe). The small stainless cable is just to tether the male plug when the system is in use.
All in, I figure the project cost was <$150 including the purchase of an additional 21' section of the sanicon discharge hose which I can now add to the existing hose easily by using the M/F cam lever couplings allowing me to extend my sewer dump line hose up to 42 ft. when needed.
And, as any wise man would do, I still carry 2 sections of conventional 3" dump line flex hose in my separate hose storage compartment in the event I'll ever need it.
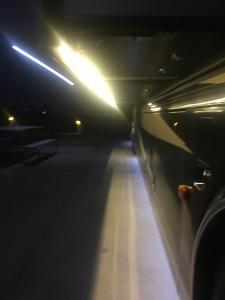
Note: the white channel seen running horizontally along the base of the belly pan is part of my recently installed full surround Under Glow LEDs which as you can see are shielded by use of the aluminum extrusion channel and diffuser panels.
-
Project completed.

-
We have the Sleep Number King rounded corner RV mattress which we found to be "somewhat" comfortable in it's original state and considered changing it until we purchased and added Sleep Number's 2" CoolFit Gel Topper pad which made it much more comfortable and such that we have no desire to replace now, i.e. It's a "perfect sleeper" now. Note: we did choose to take the Gel Pad to an upholstery shop and have them round the bottom corners (foot) to align with the RV mattress but that was a small additional price to pay for it fitting properly ($35).
-
On December 23, 2017 at 1:37 PM, Rewillia said:Photos attached. More to come now that the hurdle of getting wire run from the chassis battery compartment to a cargo bay ahead of the rear axles and wet tank bay compartment is completed.

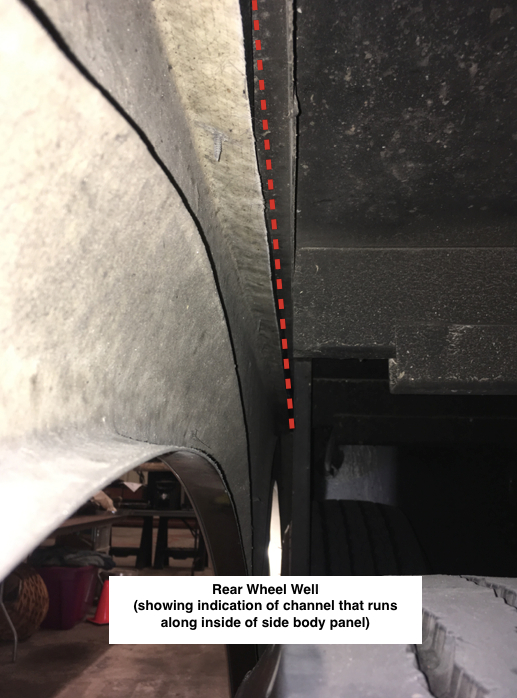
For whatever reason if nothing more than to communicate how I completed this portion of my project using the open 3-sided channel found on the upper inside of the rear wheel well to run my wiring; In completing this project, I returned to the subject area and used some aerosol spray expanding foam insulation to fill the channel and thus encapsulate the 1/2" split loom. By doing this and using the spray foam, the 1/2" loom is now fully secured in place inside the channel and further protected from wheel wash from the drive or tag axle. Once I allowed the foam to harden in place, I went back with a long edged razor knife trimmed off the excess foam (that had seeped out from the channel after drying) and then followed up by covering it all with some 3M spray undercoating. The wire loom is now fully secure and concealed along with being protected. This was the easiest way to secure the loom without having to pull both rear tires (drive & tag) in order to be able to get to the inside of the wheel well area. By attaching a 2 ft. extension of 3/8" plastic tubing to the expanding form aerosol can, I was able to reach inside of the wheel well (from outside of the coach) above the tires and direct the flow of the foam down and along the channel opening providing a uniform and full end to end gap fill. The under coating I applied after which was likely not needed but will serve as additional strengthening and security for the wire loom. It also provided a nice clean finish to the rough edges of the dried spray foam.
Hope all of this helps anyone considering a similar LED lighting installation project.
-
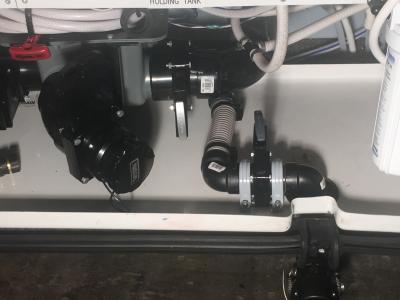
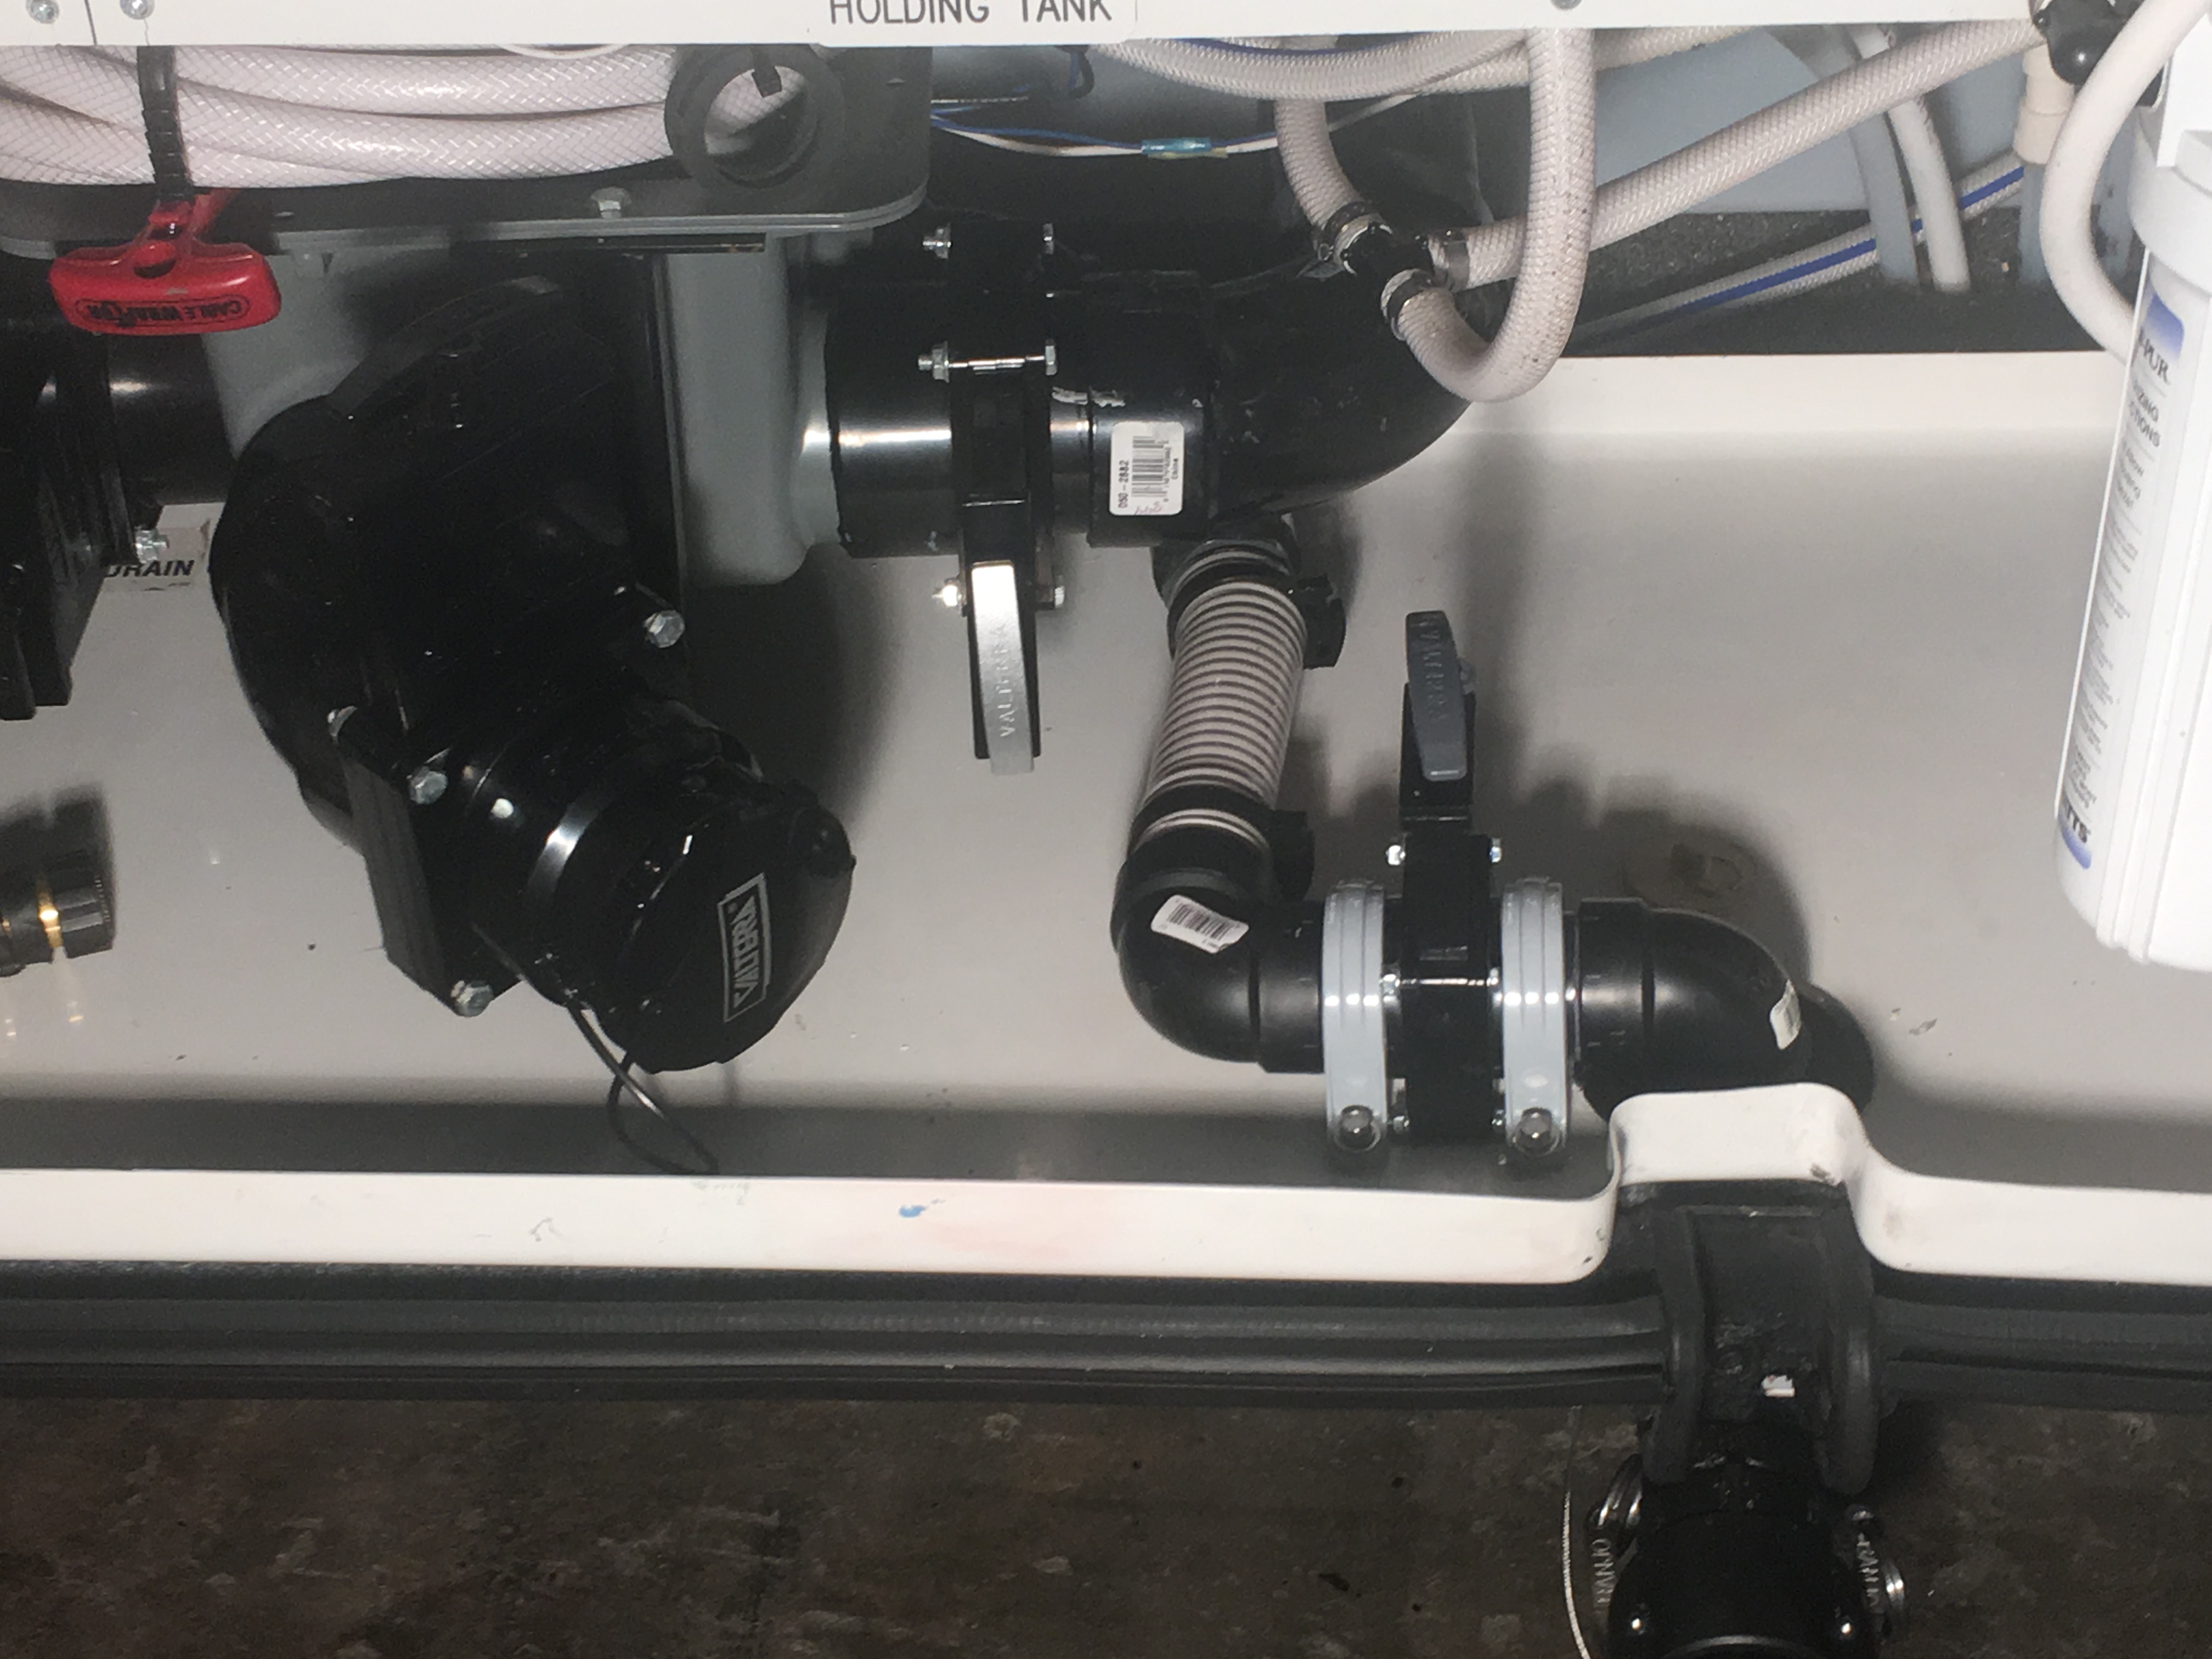
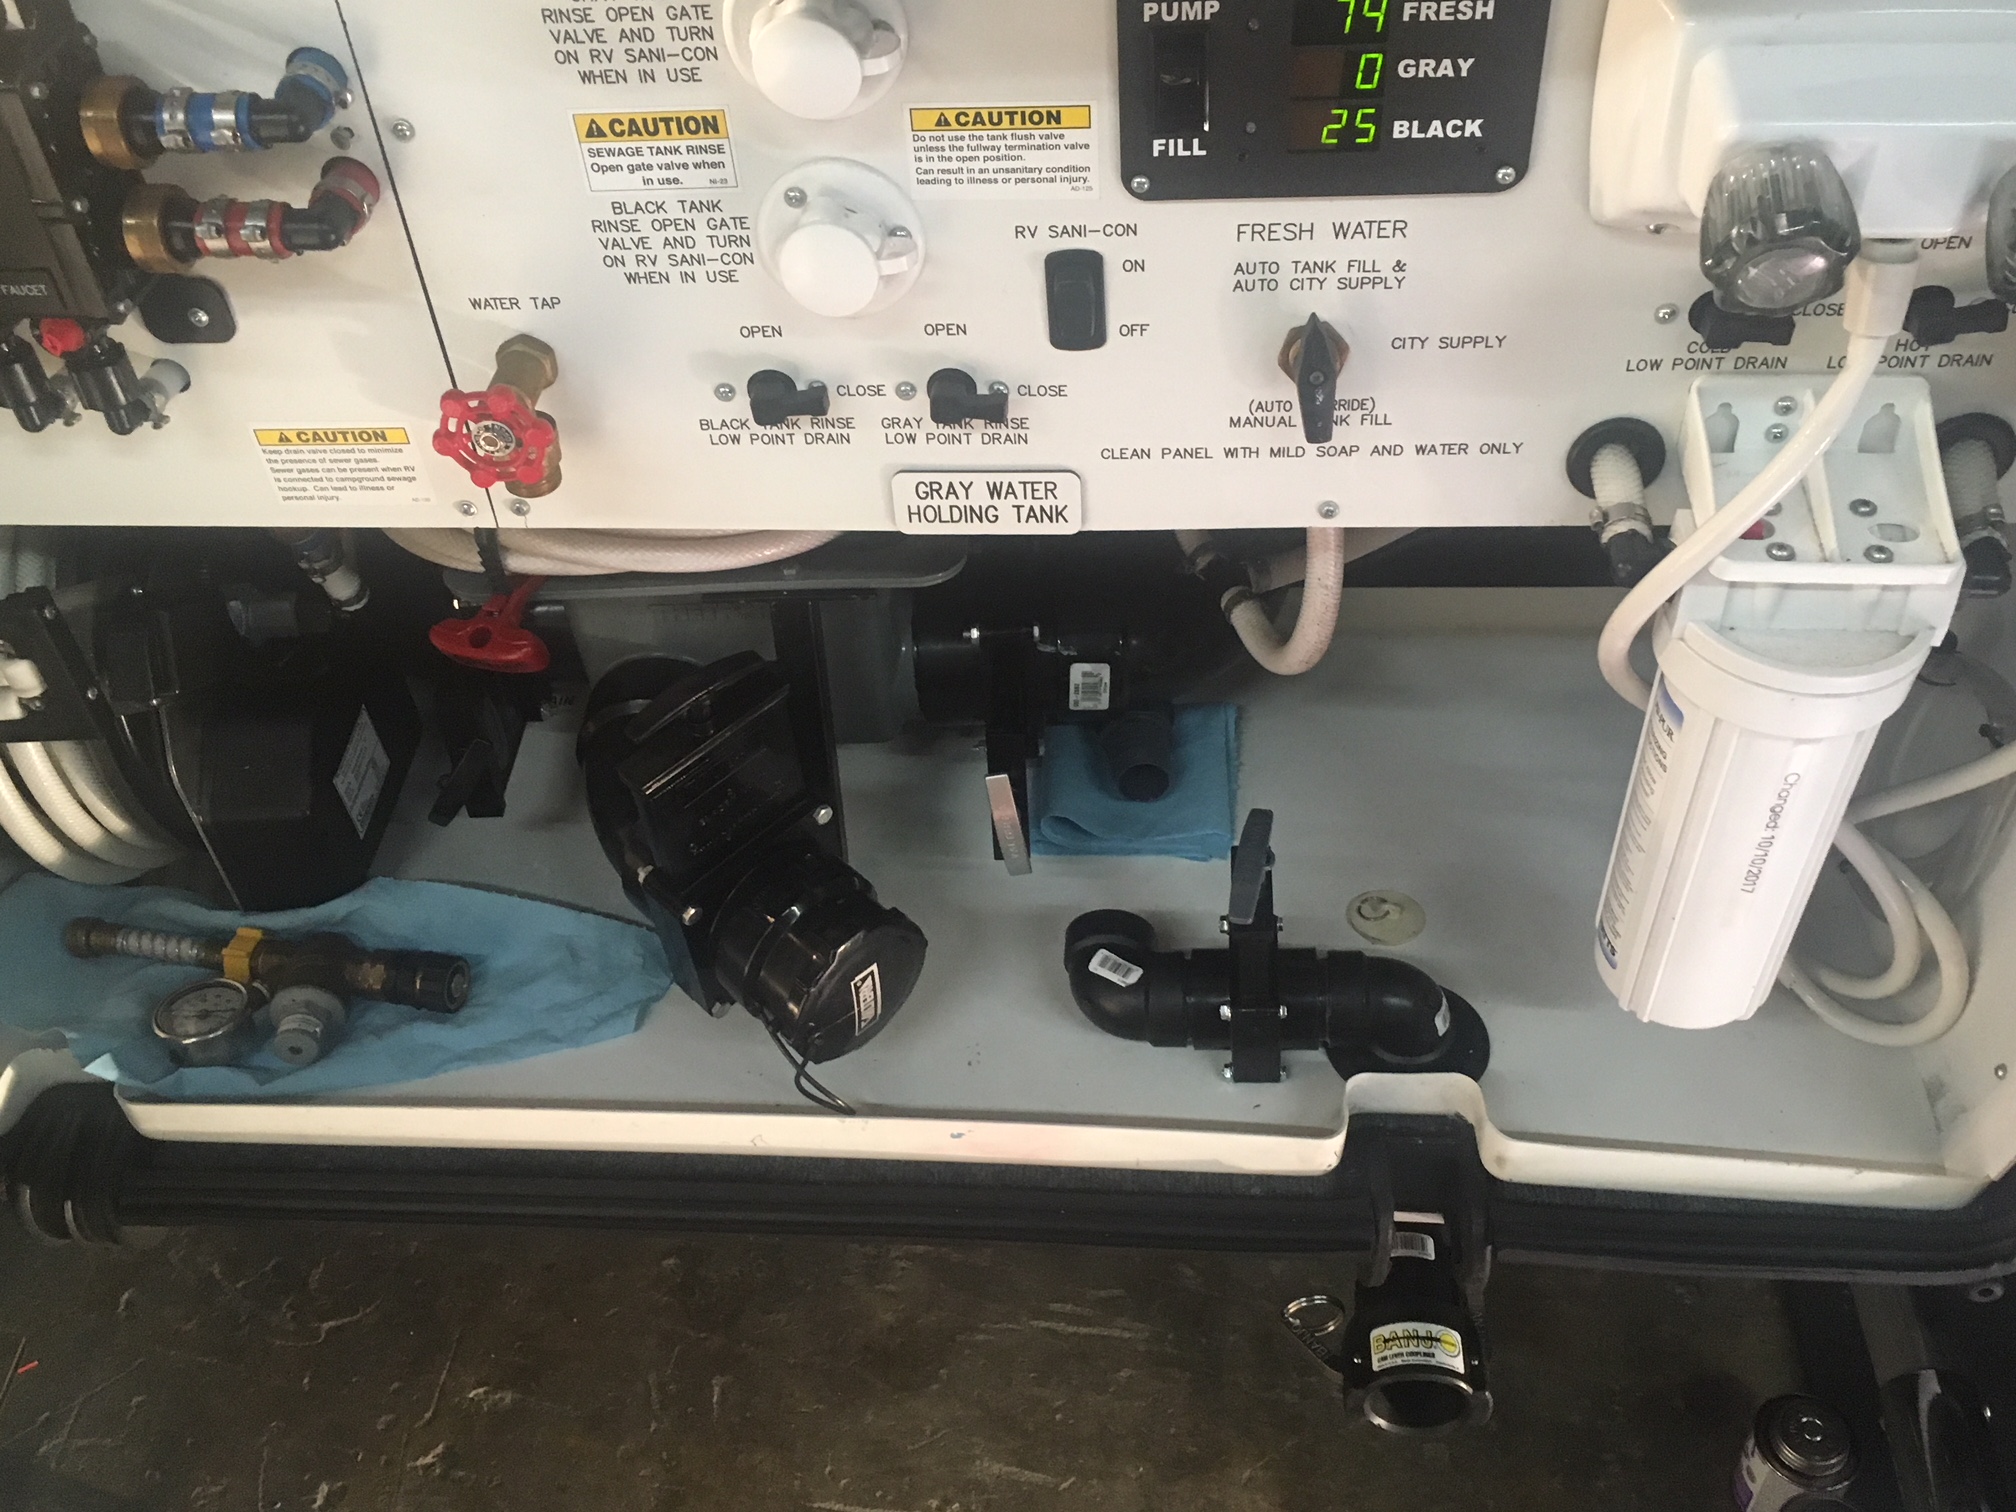
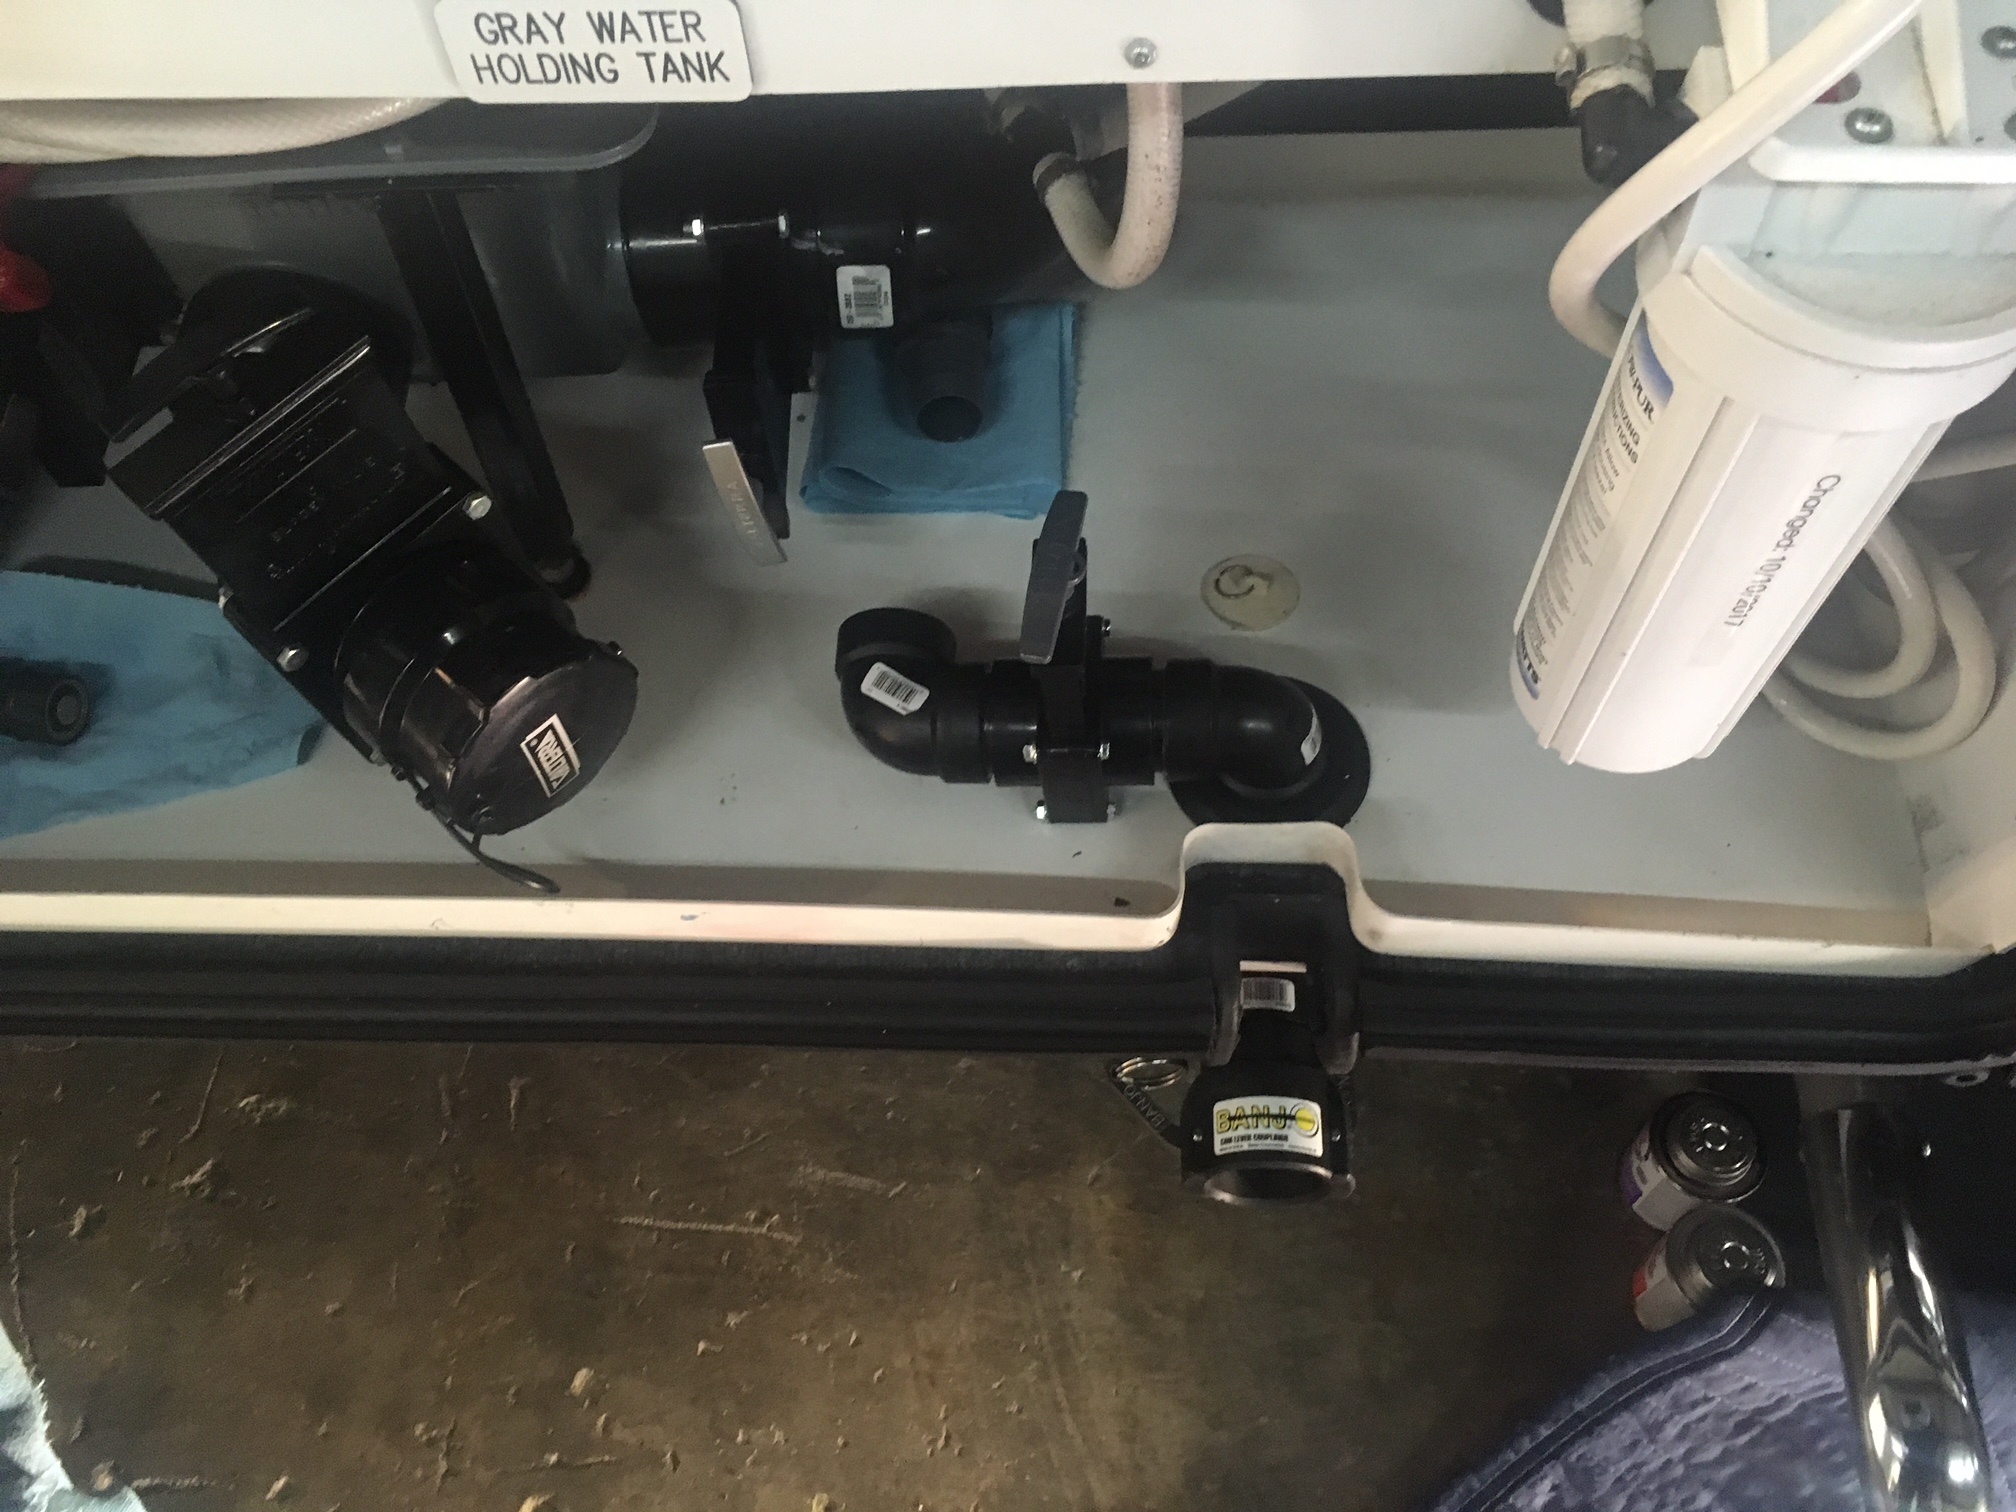
Just sharing my latest project which is to hard-plumb/pipe my Thetford Sanicon Sewer discharge dump line from inside my wet bay to the exterior/underside of my 45' DP for anyone interested in such a project.
This project came about owing to a number of factors,
1) For whatever reason (yet to be explained by Newmar), my coach was supplied with a 1-1/2" wide channel exit profile on the outward face of the wet bay basement door apparently intended as a space for the Sanicon hose to exit the bay while allowing the bay door to be closed. When doing so, I found that the profile was too narrow and often resulted in pinching, thus breaking, the hose requiring me to replace it. In addition (and again yet to be explained by Newmar), my coach was not provided with a sewer compartment floor access hatch for routing either the conventional/standard 3"OD or the Sanicon 1-1/2" OD sewer dump hose(s) through.
2) On occasions, I have needed to extend the length of the Sanicon hose in order to reach camp site dump receptacles. This was not easily done and often had me switch back to using my conventional 3" sewer dump system. This modification will enable doing so by using a 2nd section of the Sanicon hose with male/female cam lever coupling fittings attached.
3) When "camped" it is my desire to be able to fully close my wet bay compartment door including such times when the gray water dump valve remains in the open position. Prior to this mod, such was not possible due to closing of the door would result in the pinching off or crimping of either size dump hose.
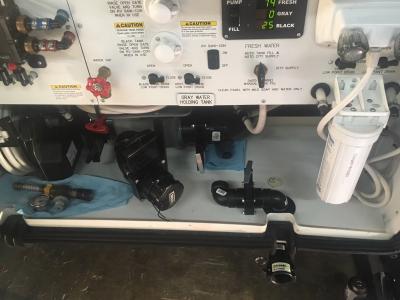
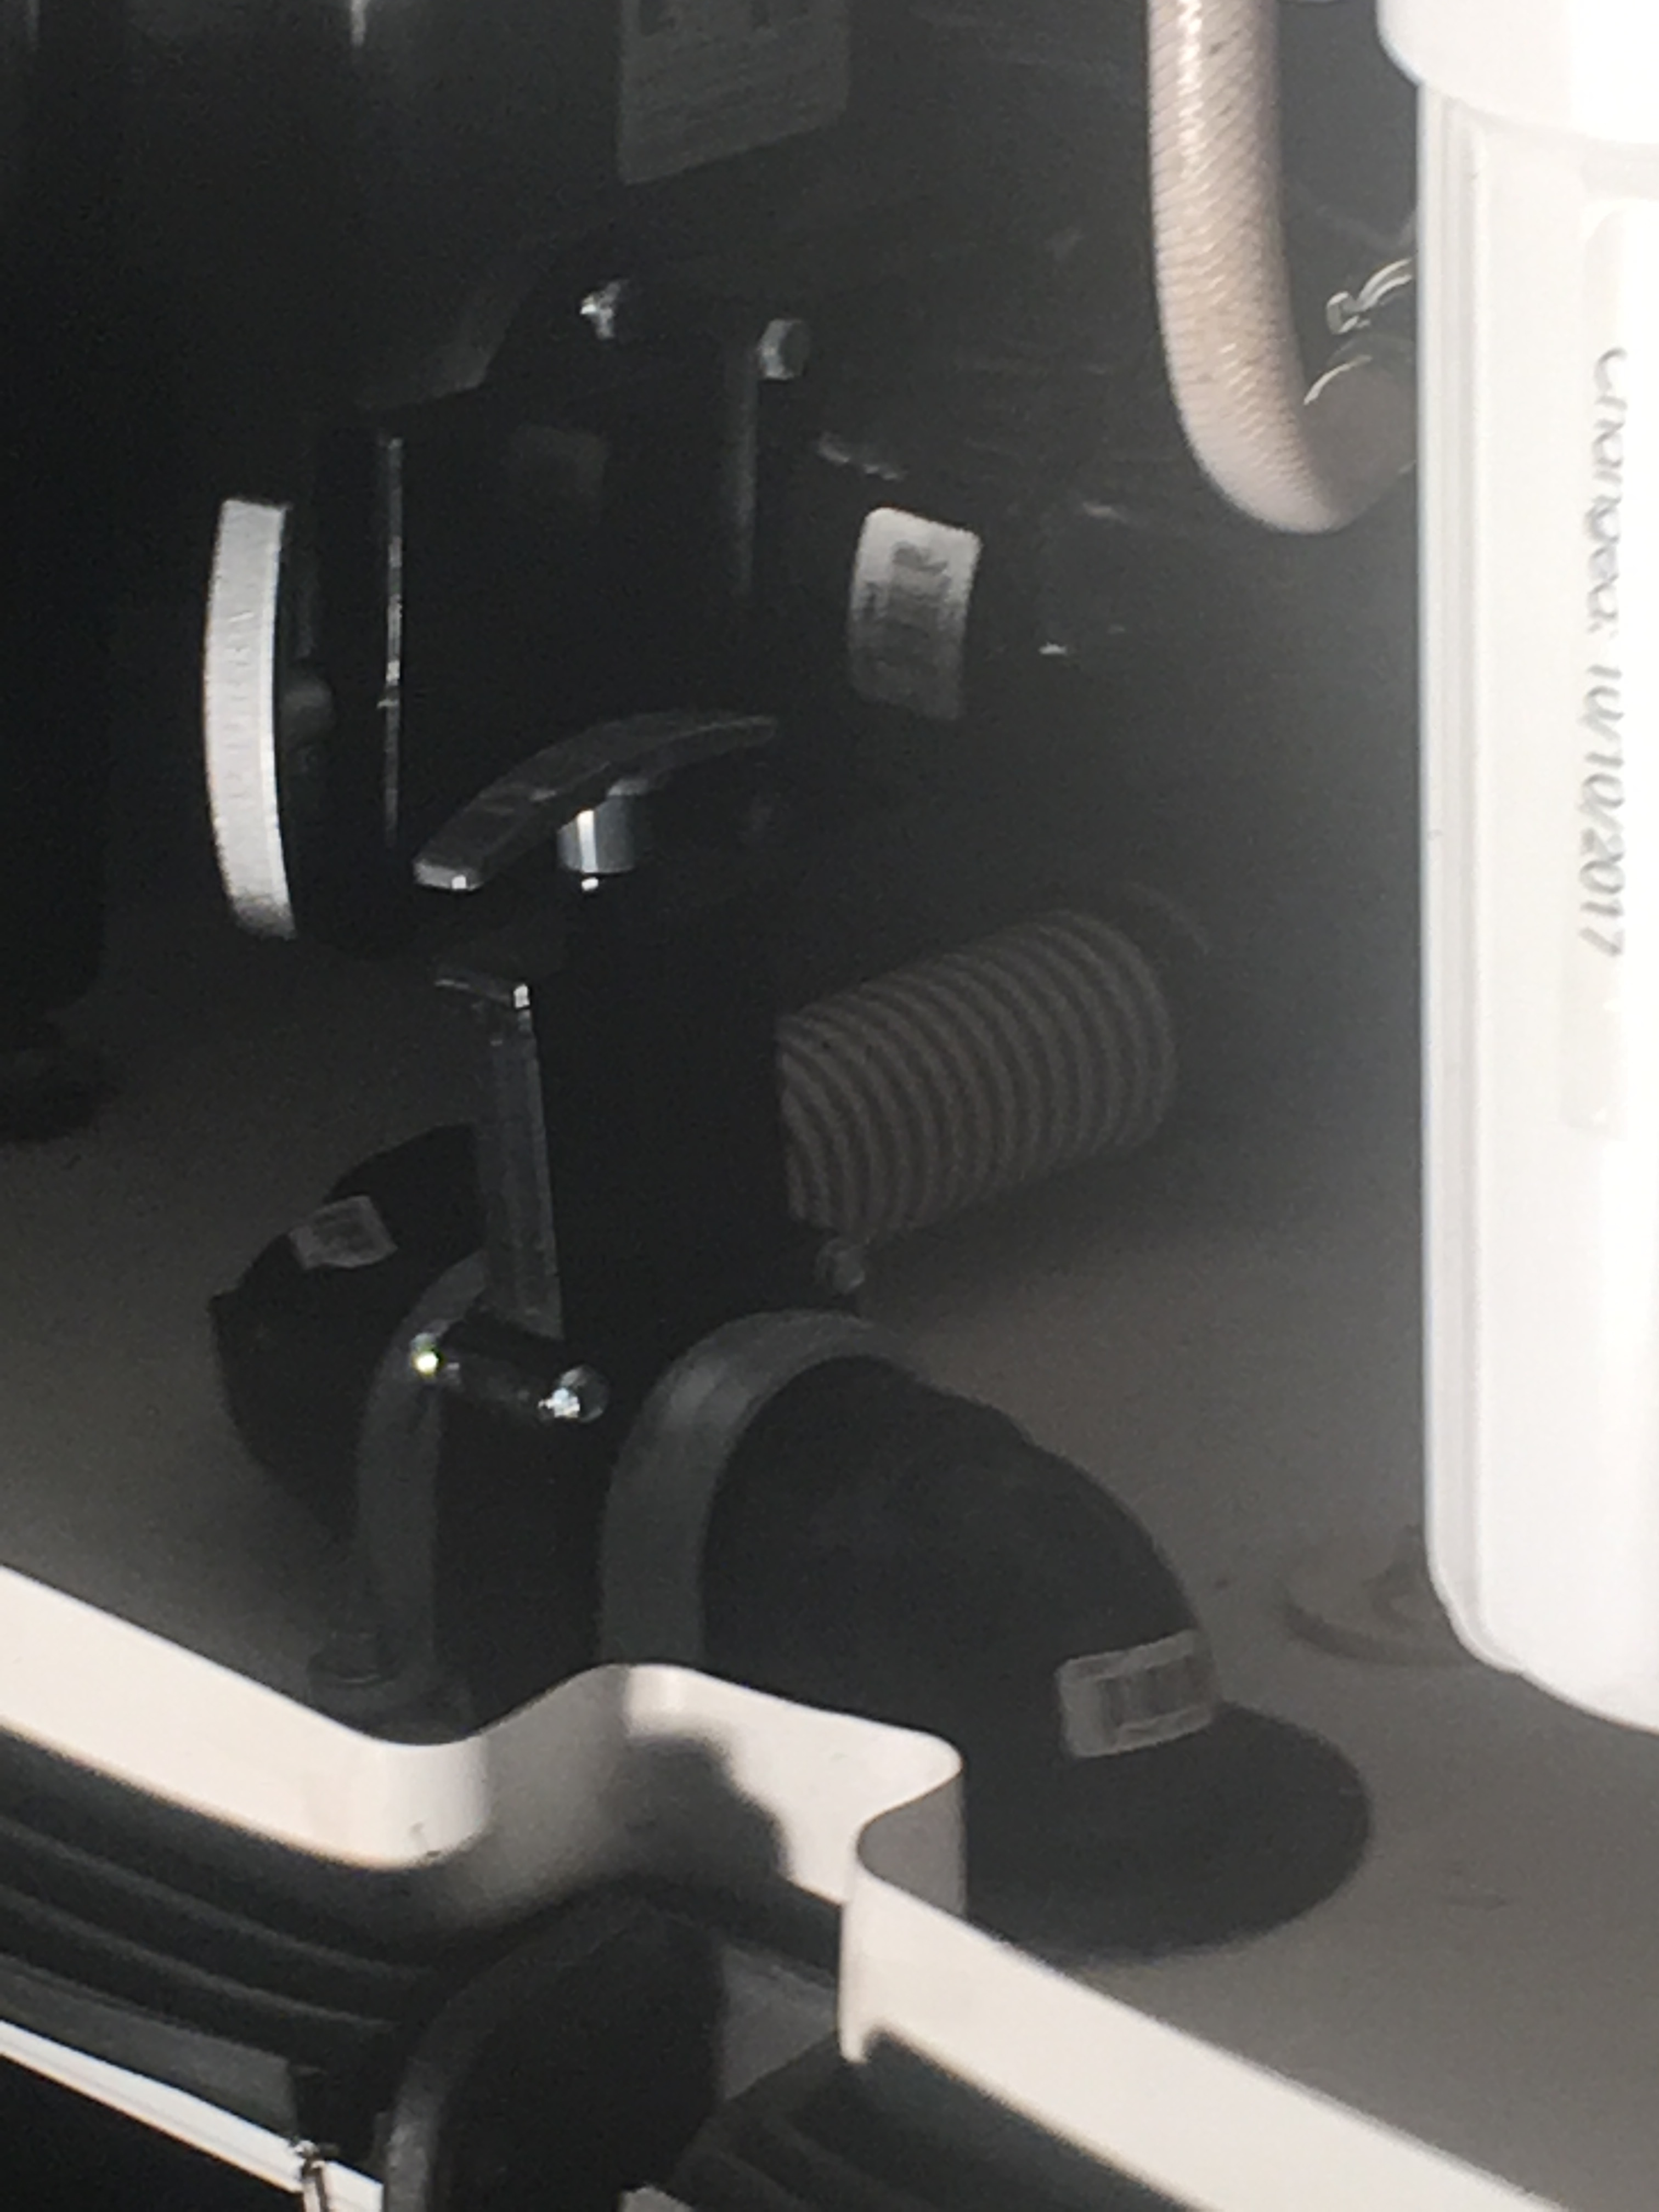
A work in still in progress i'm now awaiting delivery of special ordered PVC fittings and clamp/hangers to connect a clear section of hose to (between Sanicon drain outlet and new Valterra slip gate valve) as well as some strap/clamps I plan to use to secure the piping and cam lever coupler in place. Completion of this project will include making up a separate/spare section of the 1-1/2" Sanicon hose with male/female Cam Lever connections that will permit me to add an additional length up to 21ft when needed. The purpose of the small section of 1-1/2" clear spiral hose is to enable me to witness when dumping is completed (be evidence of clear water).
Noteworthy of adding, the Sanicon hose is normally "wet" (retains some fluid likely due to a small amount of internal bypass) so adding the slip gate valve downstream of it is intended to allow my connecting the dump hose by means of the cam-lever couplings without coming into contact with the waste water. It is also being positioned in such a way that appropriate road clearance will be maintained.
Meanwhile, here are a few photos of this project....

-
Curious what others here do in terms of maintaining their slide seals (rubber extrusions that are attached to and seat between slide and coach body).
Do you periodically apply something to your slide seals? if yes, what product do you use and how frequently do you use it?
-
3 minutes ago, elkhartjim said:Sorry, I didn't read the post so I missed that statement.
Thanks for turning them off when not in use.
Jim, no worries. I (we, my wife & I) are duly respectful RV enthusiasts and equally have our expectations when it comes to personal privacy and peacefulness. Same topic equally applies to loud music or worse, the ever increasing and annoying volume of human speech when induced by alcohol consumption - both of which are "put offs" for us.
-
4 hours ago, hermanmullins said:Rick,
It looks really nice. However if you have just driven 250 to 300 miles in the rain and your coach is really dirty
 , I would not turn them on till I washed the coach.
 ")
Carl what might help would for you to purchase a New 2018 Newell P50. I understand that they have push buttons to open the bay doors and open and close the slides.

We are sitting at 7 degrees here in Whitewright. High today is only supposed to reach only 21. I know lots of places are colder then here but that doesn't help to stay any warmer. BRRRRRRRR!
I read that there is a place in Russia where it was 86 degrees below zero. Now that is cold. It said that the region had a population of over 3 million. I guess there are that many stupid people in this world, just didn't know they were all in one place.
Herman
Herman,
Thanks again. My next planned addition will be the auto self-washing spray nozzles and automated squeegees that will mount on the roof top and wash my coach as I drive down the road so no worrying
 .
.
As to the temps. well that's a bit unexpected weather when comparing our winter this year to the last one. It was 14℉ here in Lake Charles, LA this morning. I also recall we had one cold week-end in Jan. of 2017 and that pretty much took care of winter in the great States of Texas & Louisiana. On the same topic, prior to retiring from ExxonMobil in 2016 (after 37 1/2 years), I was living in Anchorage (where the temp today is 35℉), and made a few business trips to our project site up on the North Slope. During one of those visits in December, I called my wife and was speaking with her when we determined there was a 100℉ difference in the temperature between where she was (in Houston,TX @ 57℉ above) and where I was (Point Thomson, AK @ -57℉ below). I can attest to the fact that once it gets -50℉ below, anything lower doesn't matter. Rule of Thumb for our construction workers on the N. Slope during such temps, was 20-minutes outside + 40 mins. inside - not to mention the time it takes to suit up in all that Arctic Gear.
-
5 hours ago, elkhartjim said:It looks nice if that's your thing but to me it's just more light pollution in the campground. I appreciate places like Big Bend National Park were I can still see the stars.
I hope you enjoy your lights.
I feel no need to further justify my personal choice to install the ground effects LEDS other than to point to my comment (below) which is stated in the original post.
[Used with discretion, these LEDs provide both lighting accent to the coach while at the same time offer increased safety when moving about the outside perimeter at night such as when needing to access the wet or electrical bays. Expectation is we will not "always" use these but on occasion do so while respecting the privacy of our fellow RV neighbors when in commercial parks.]
-
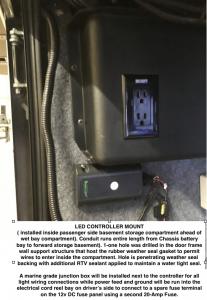
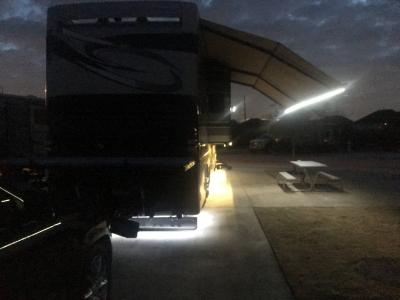
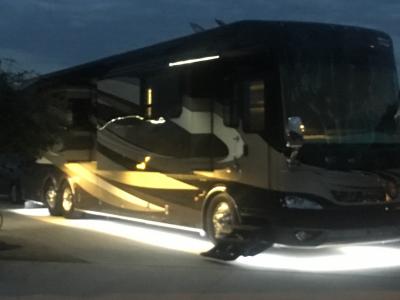
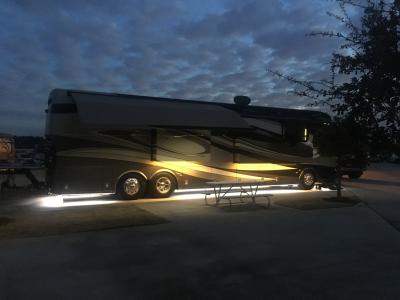
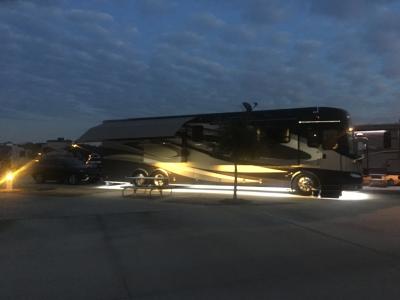
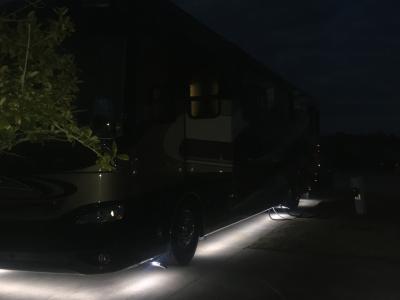
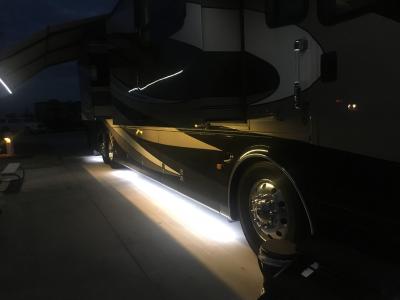
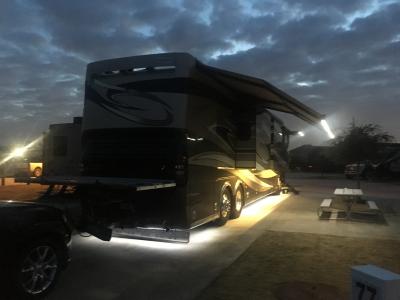
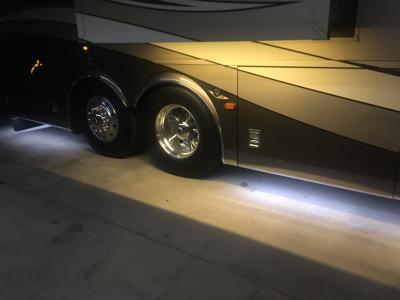
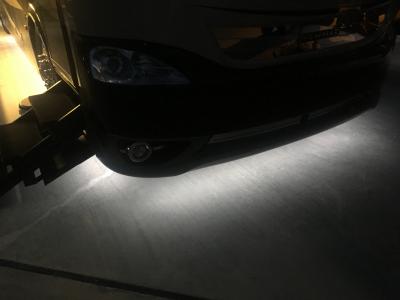
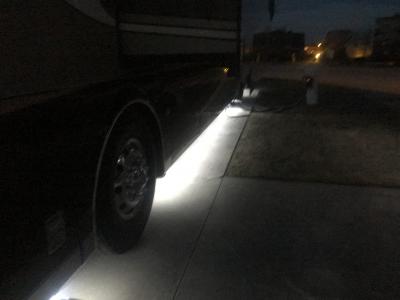
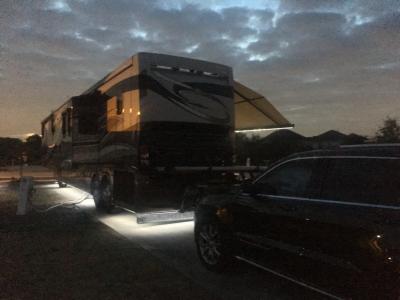
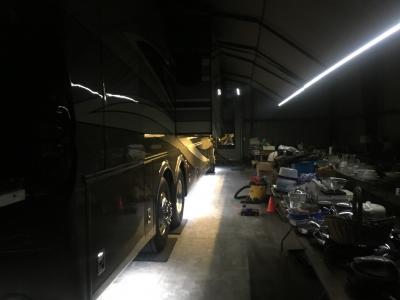
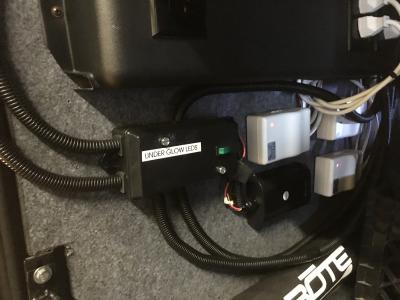
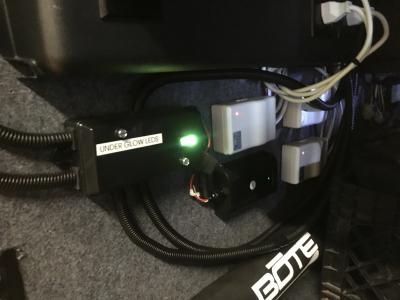
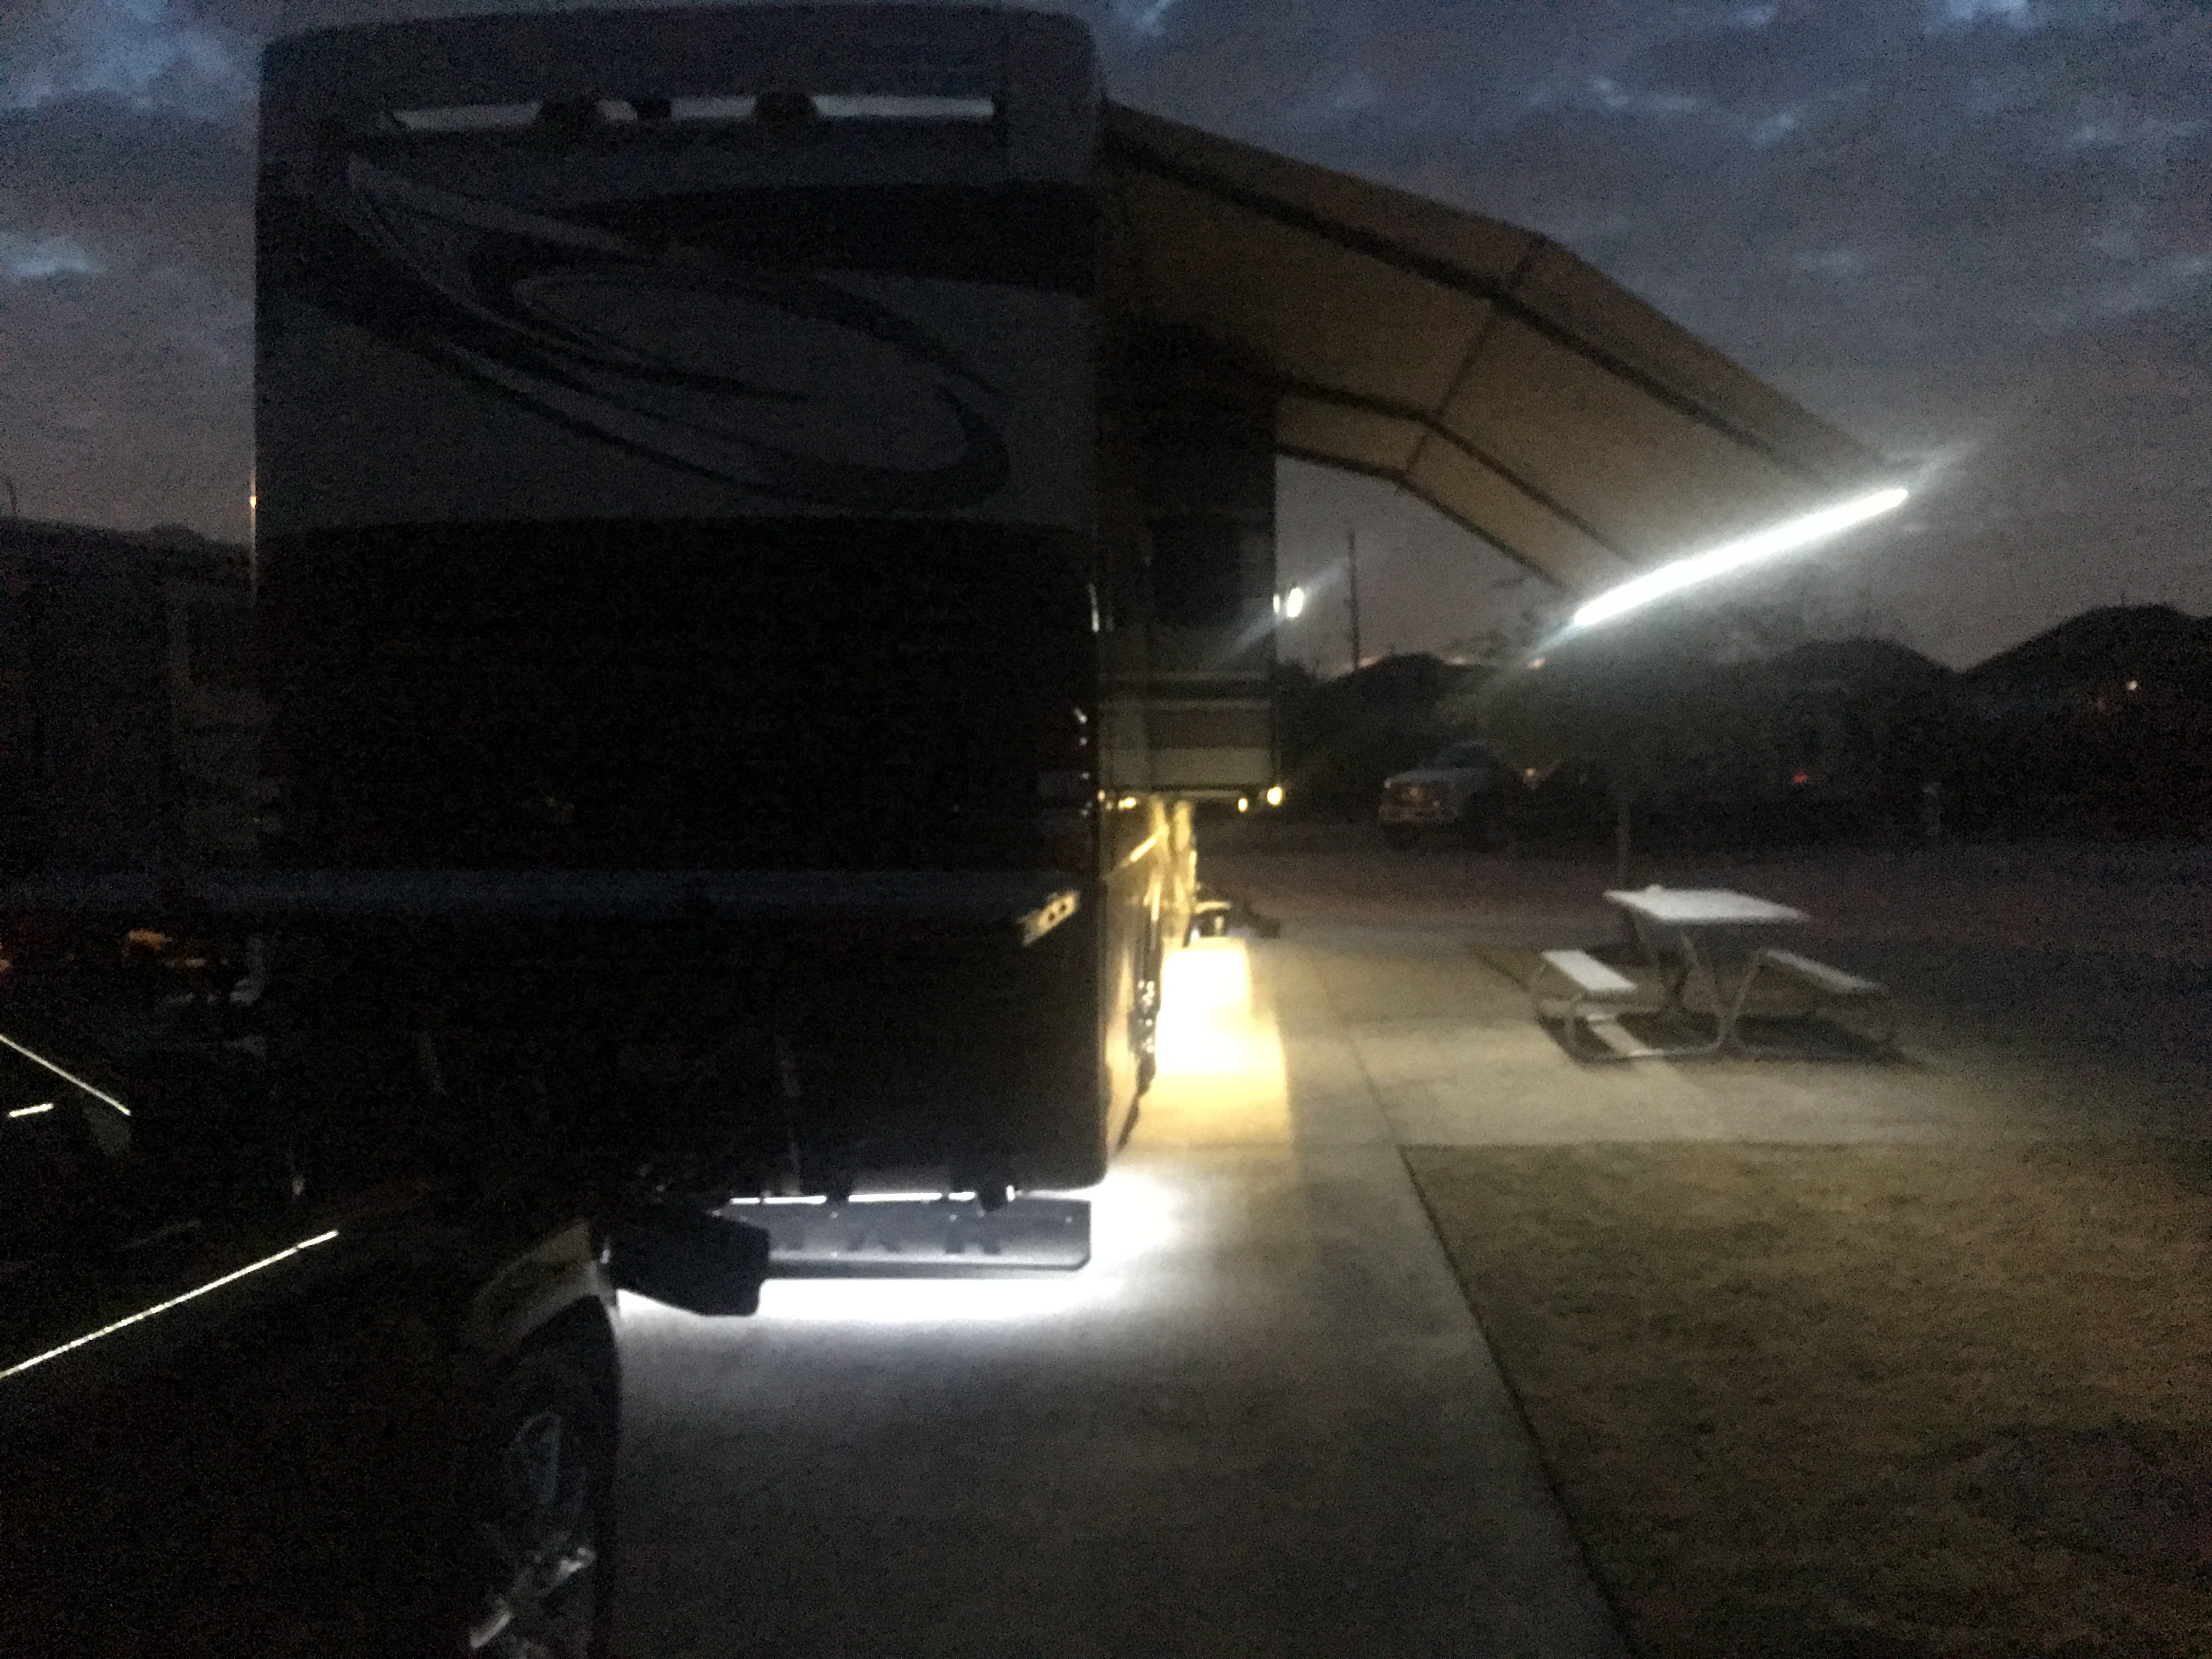
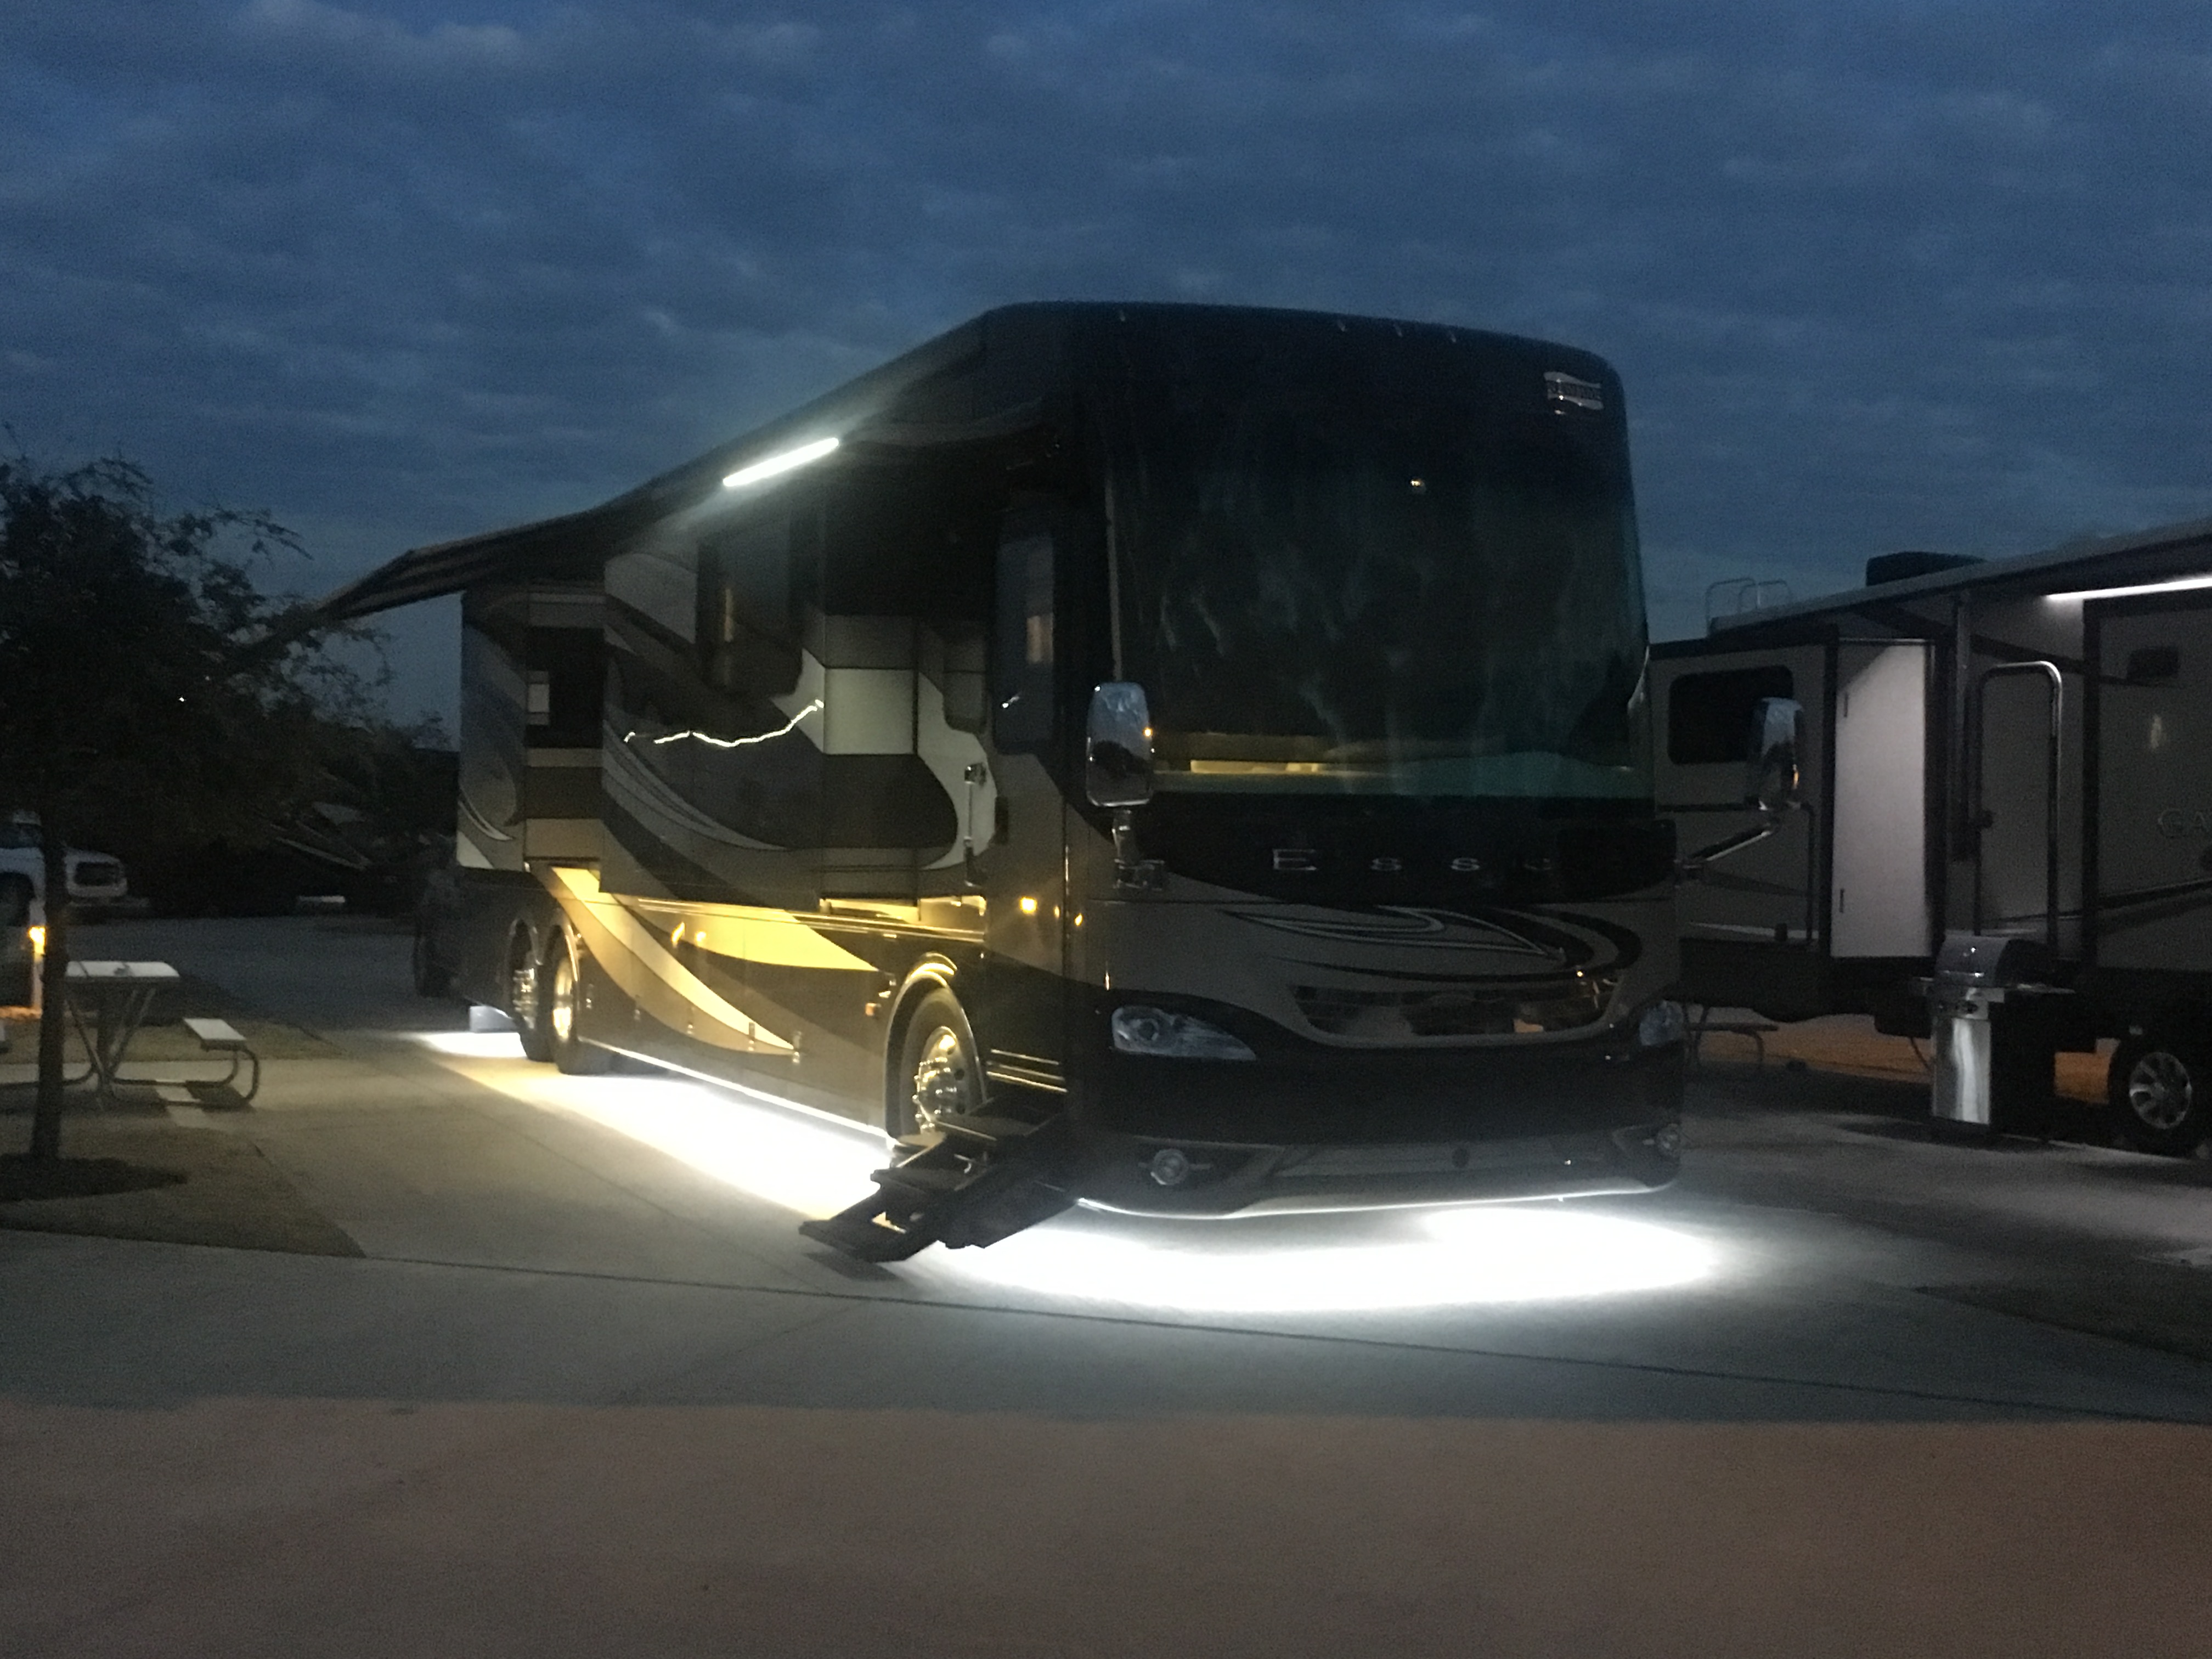
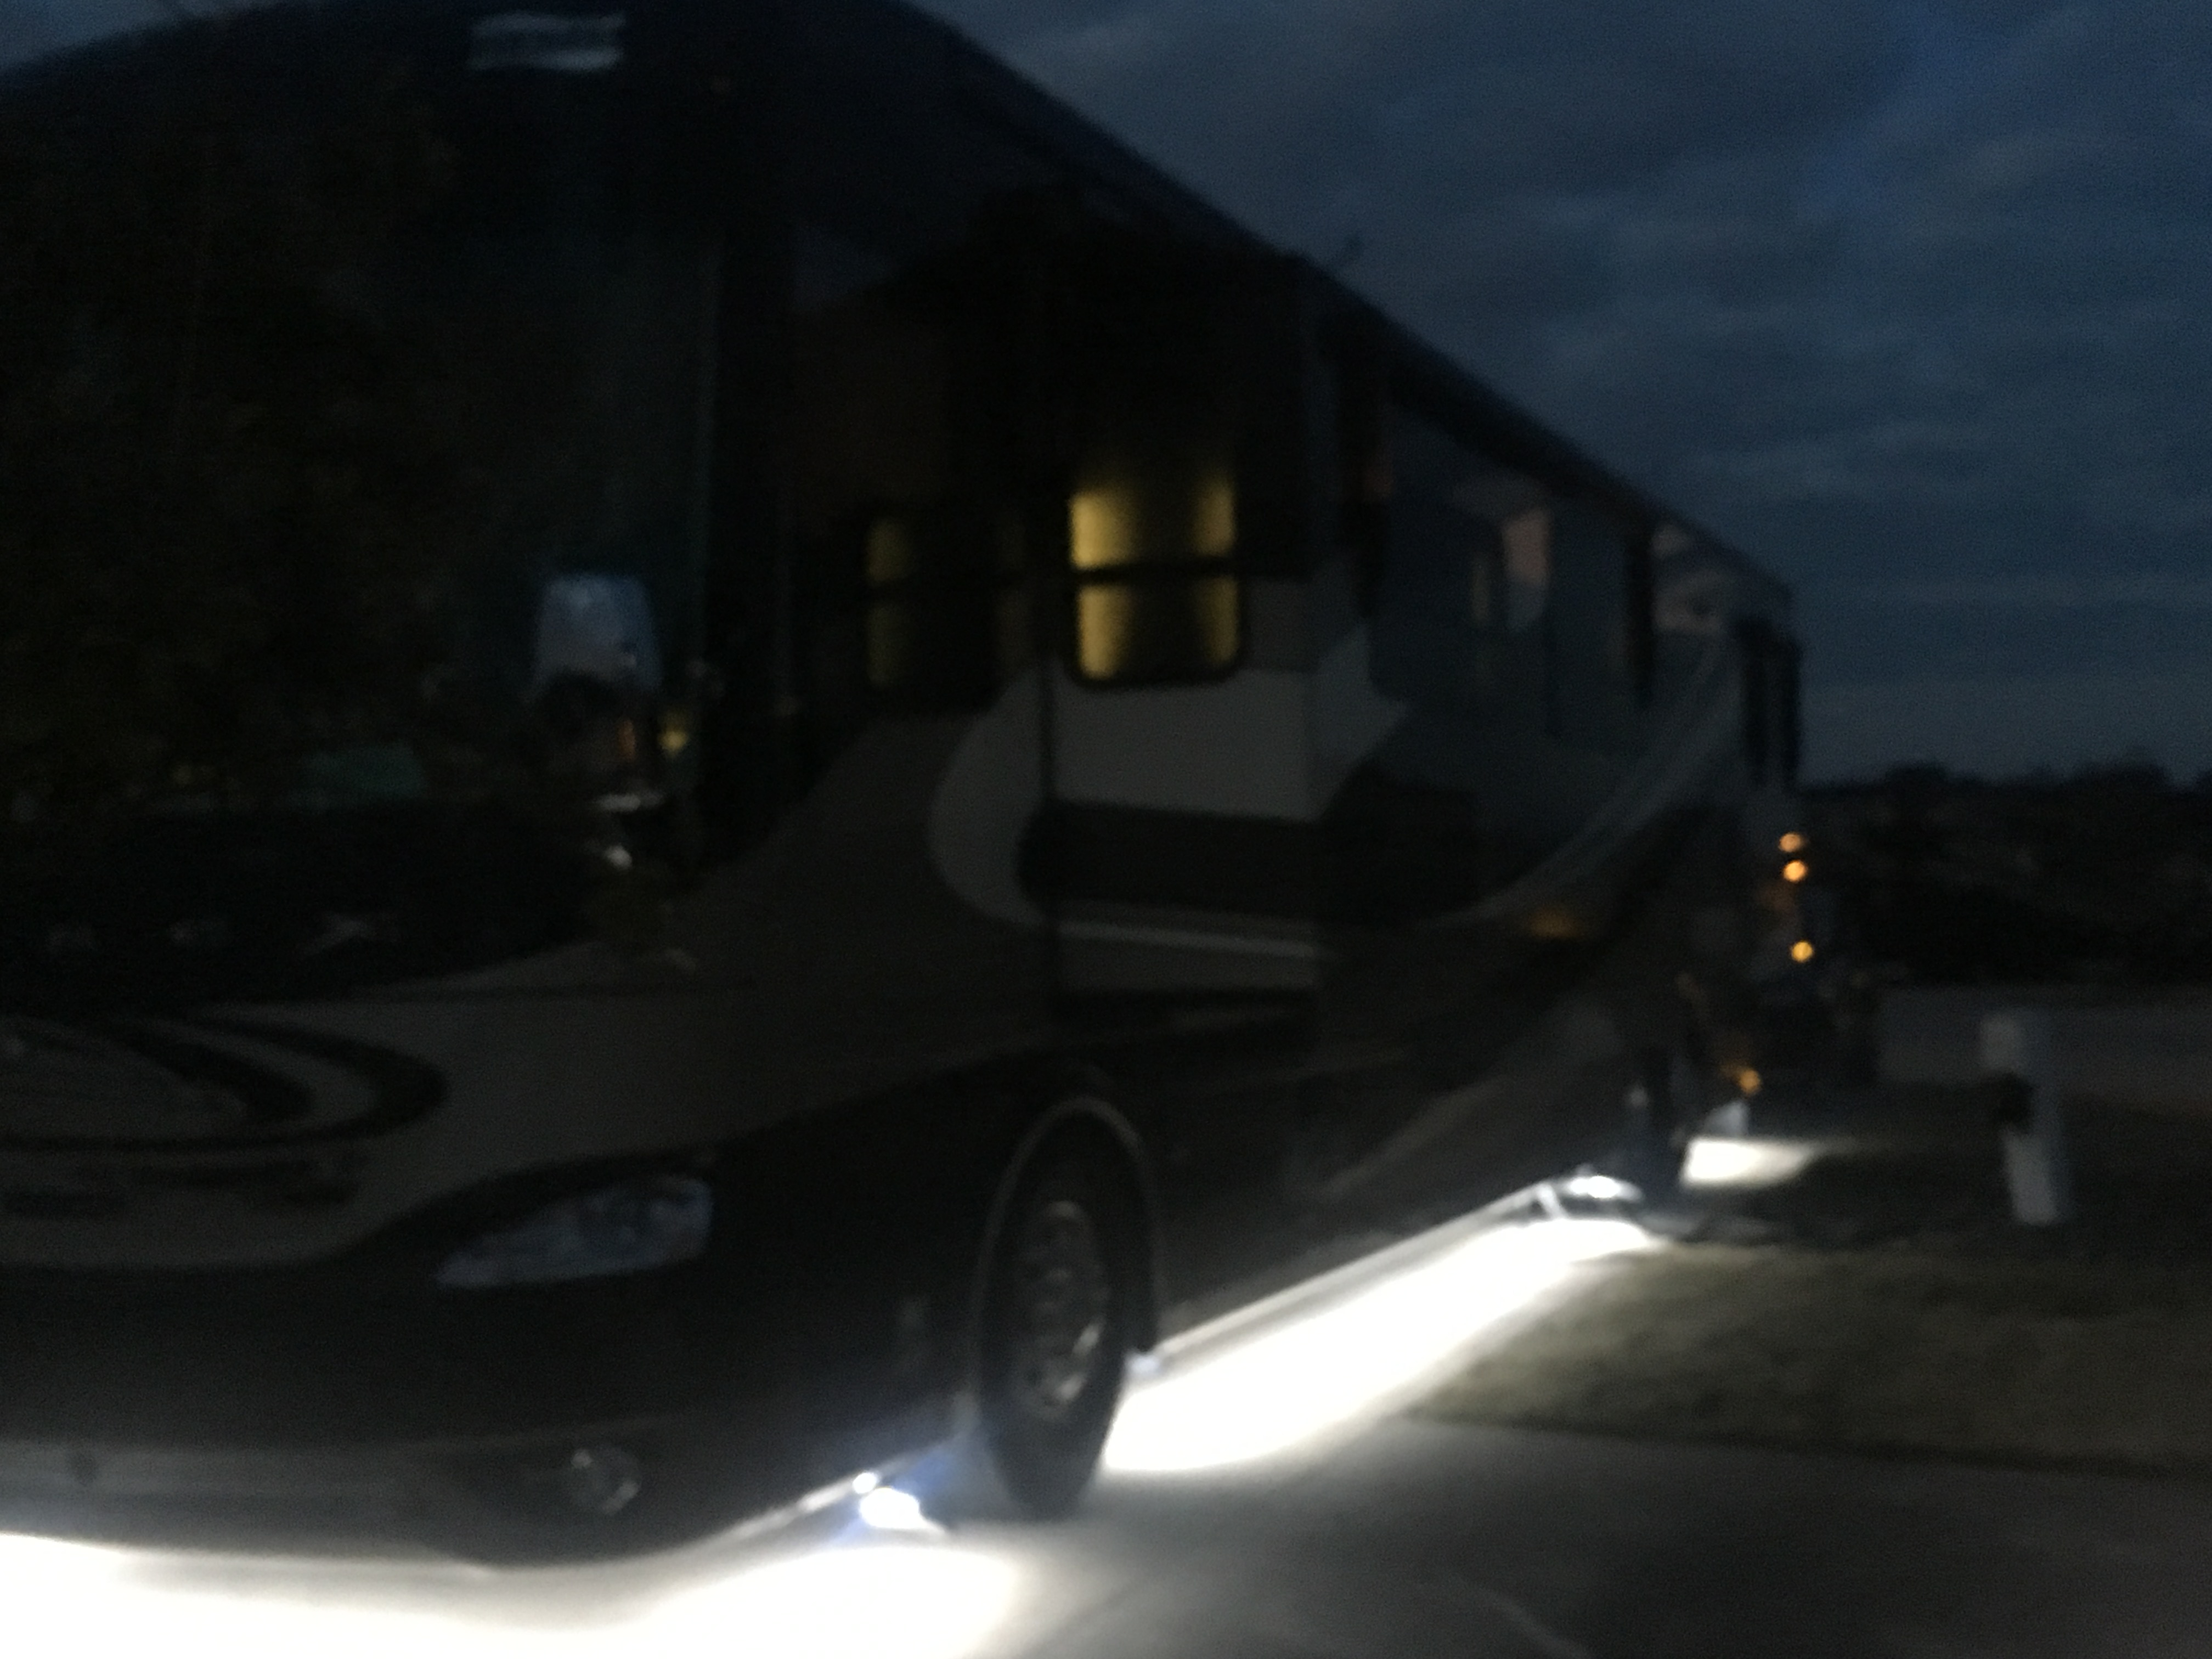
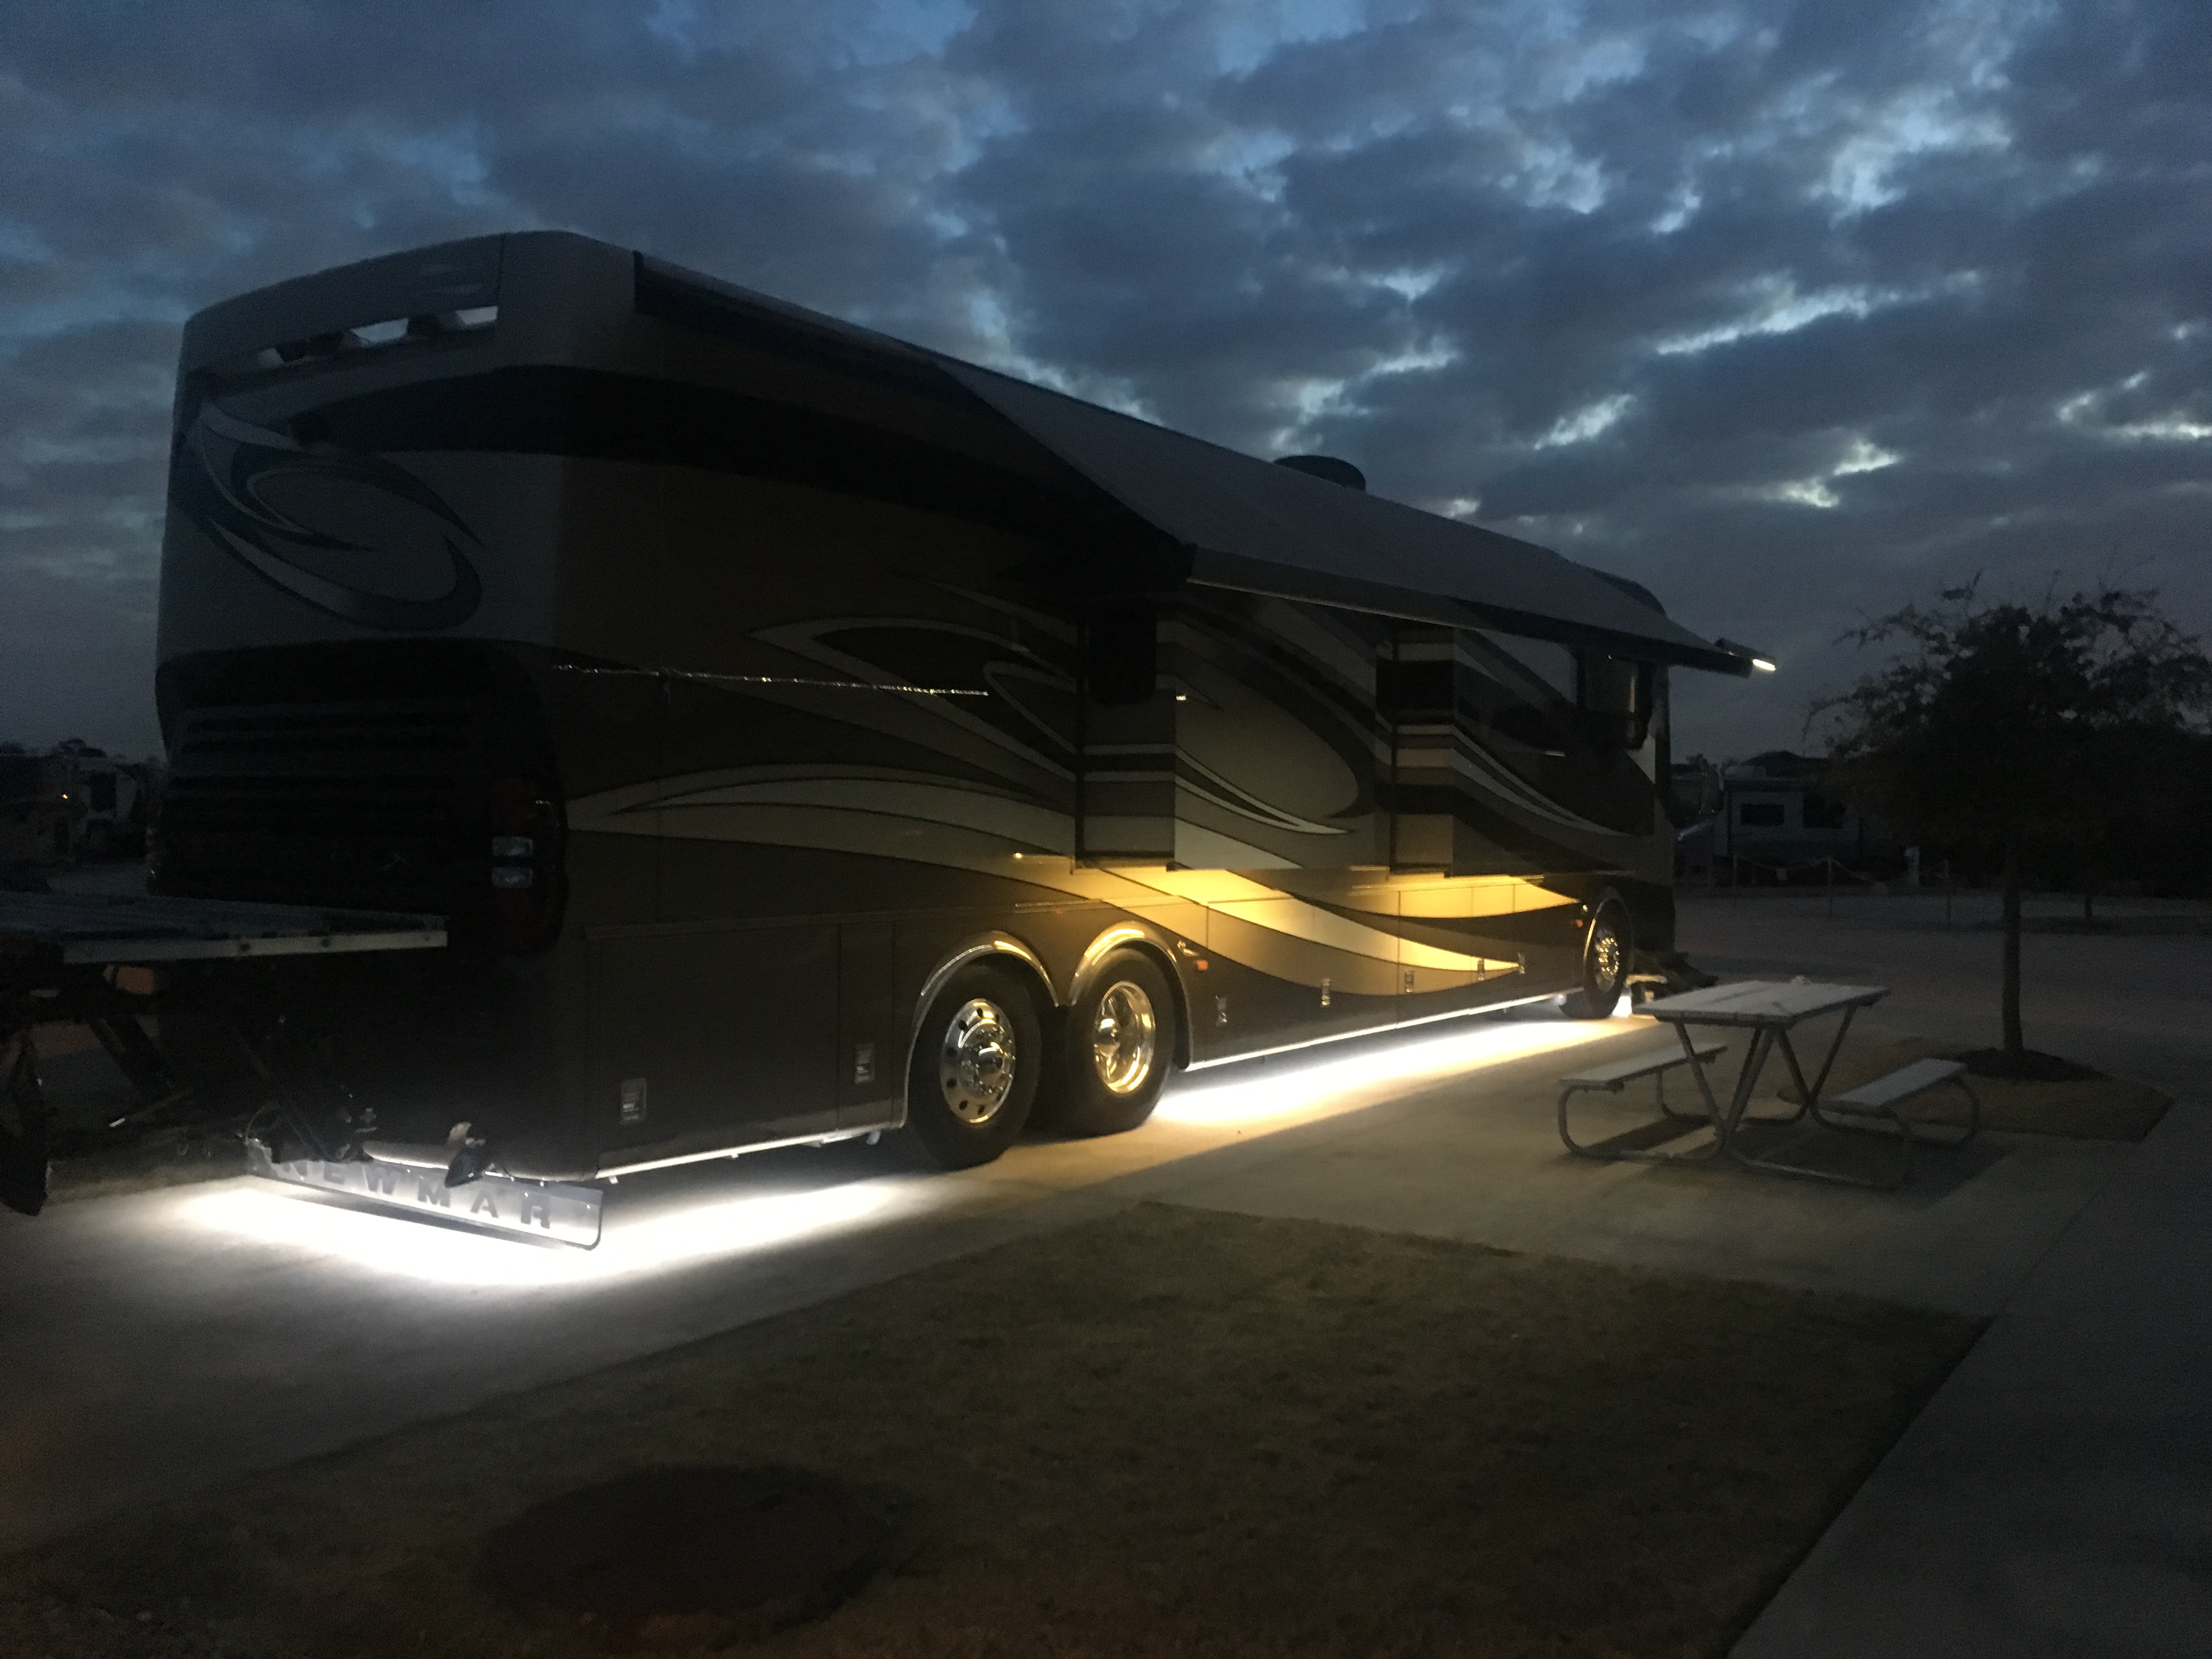
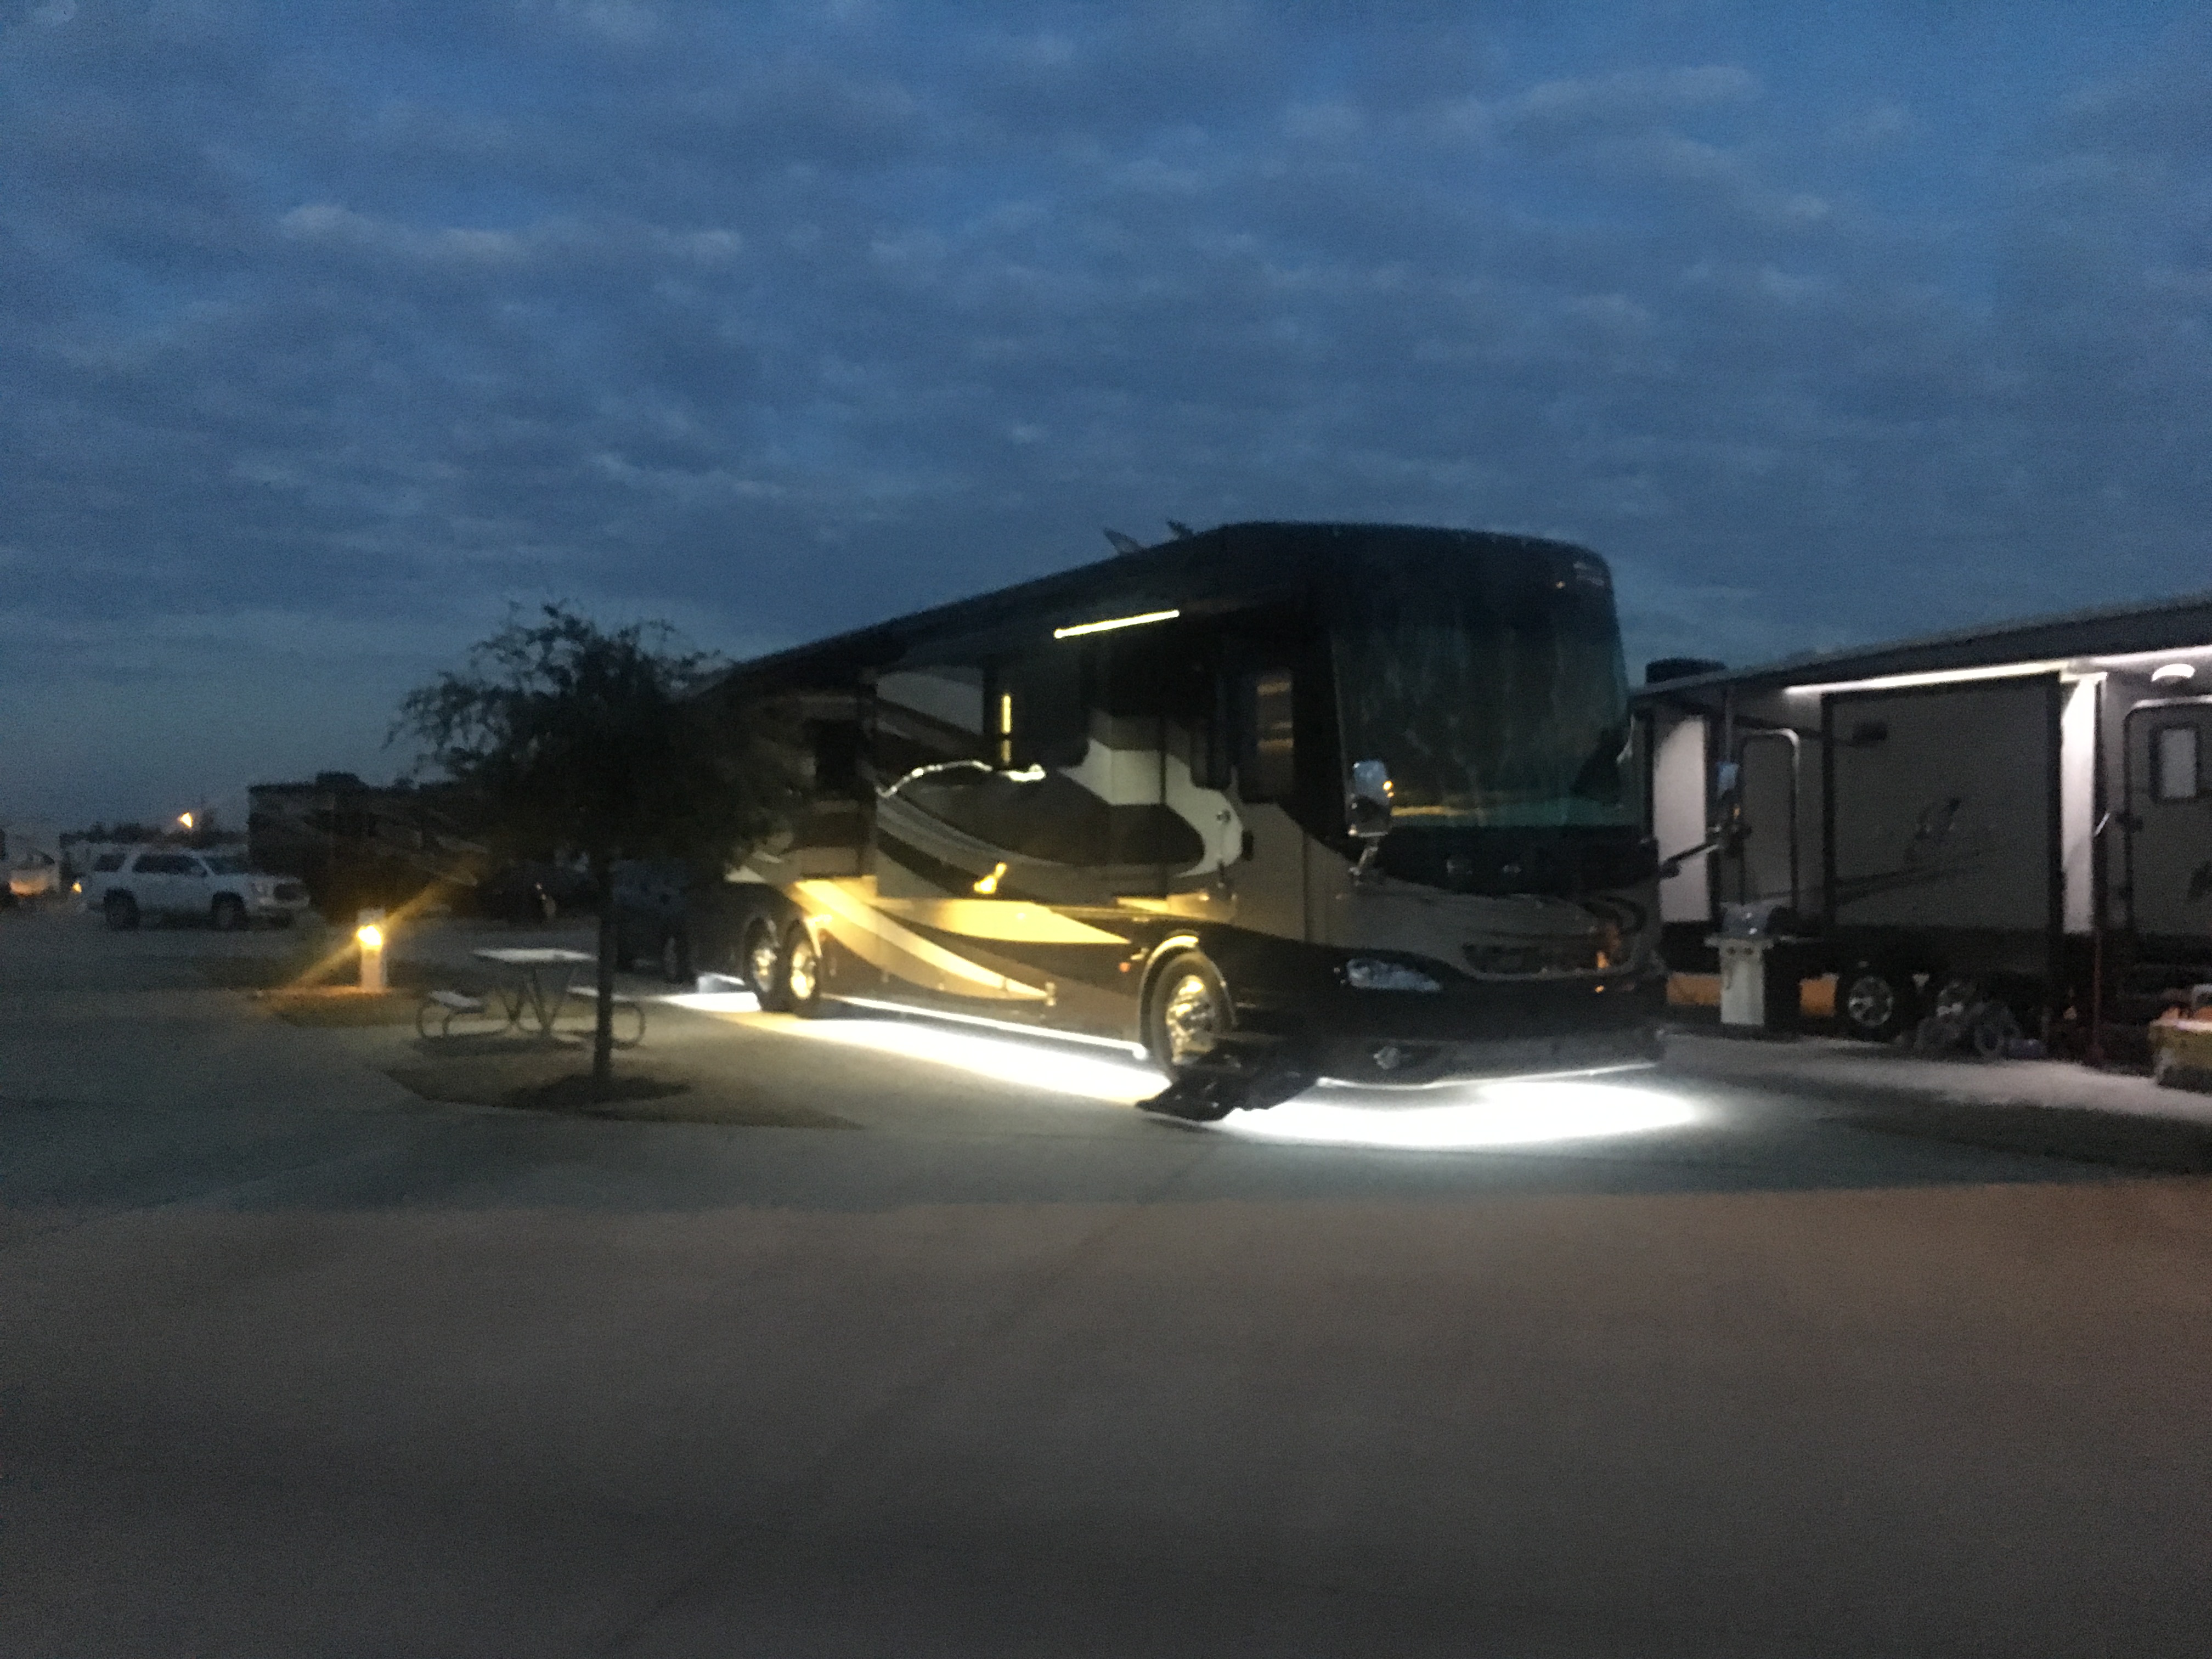
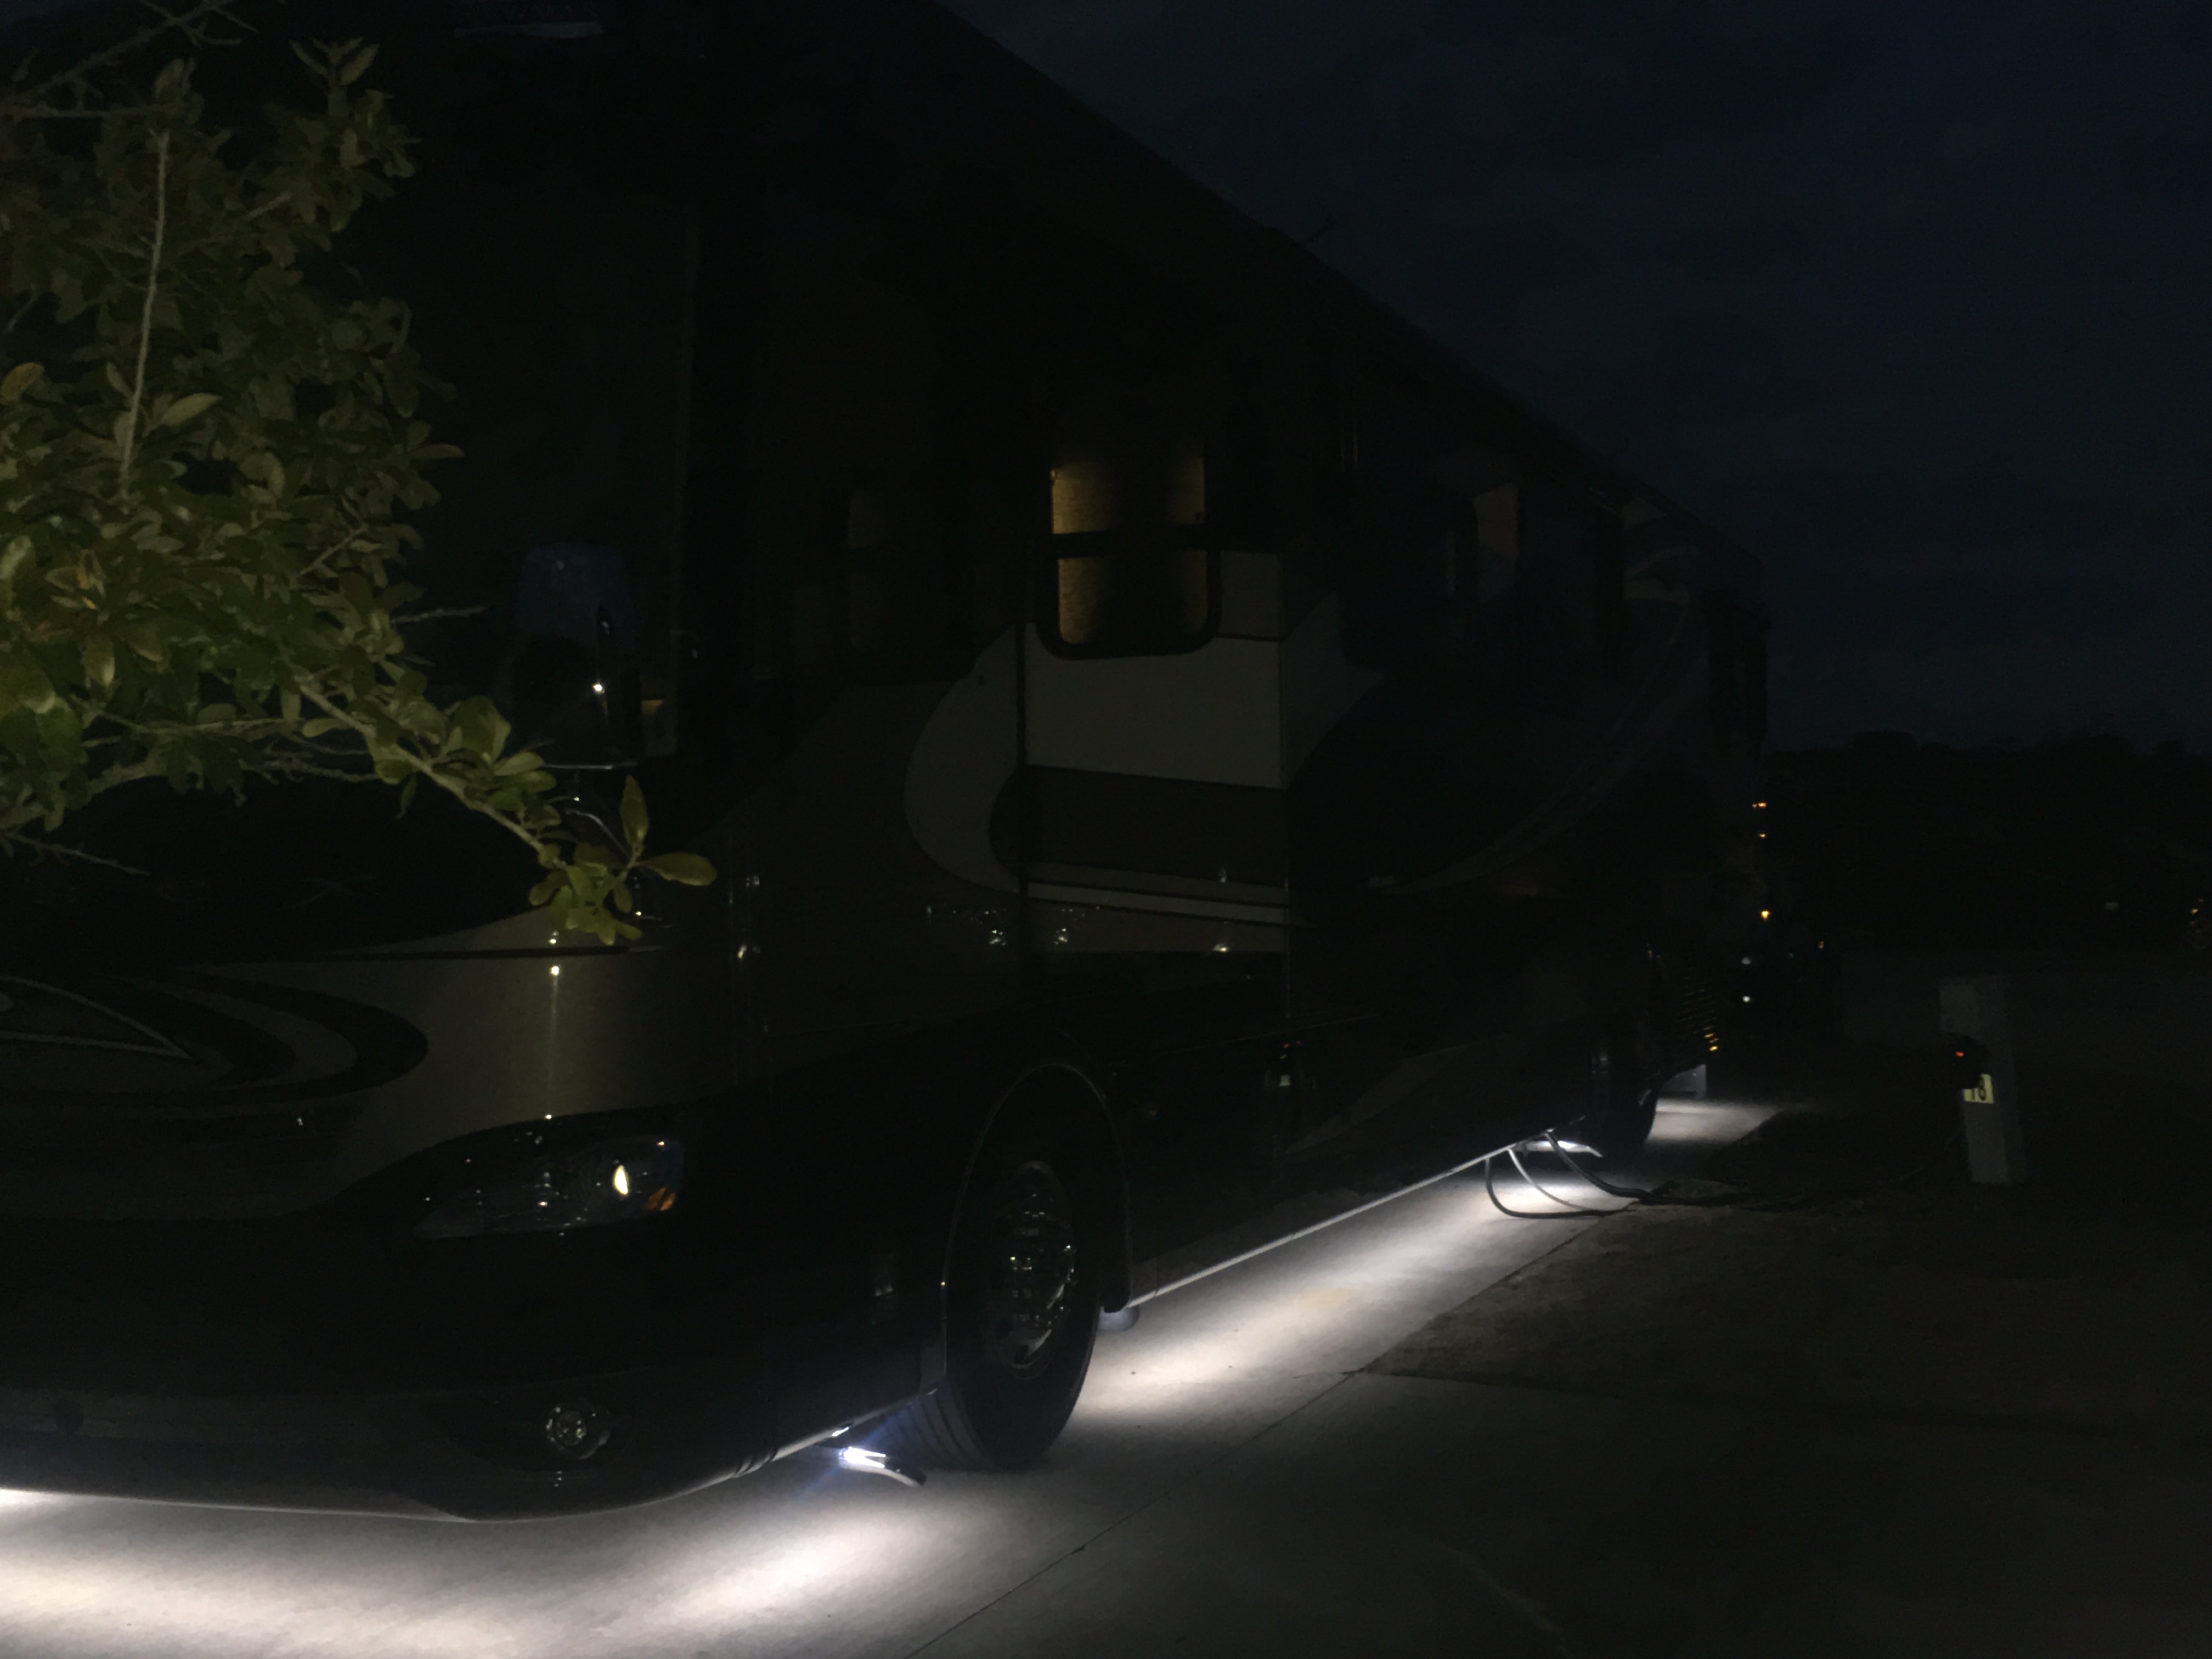
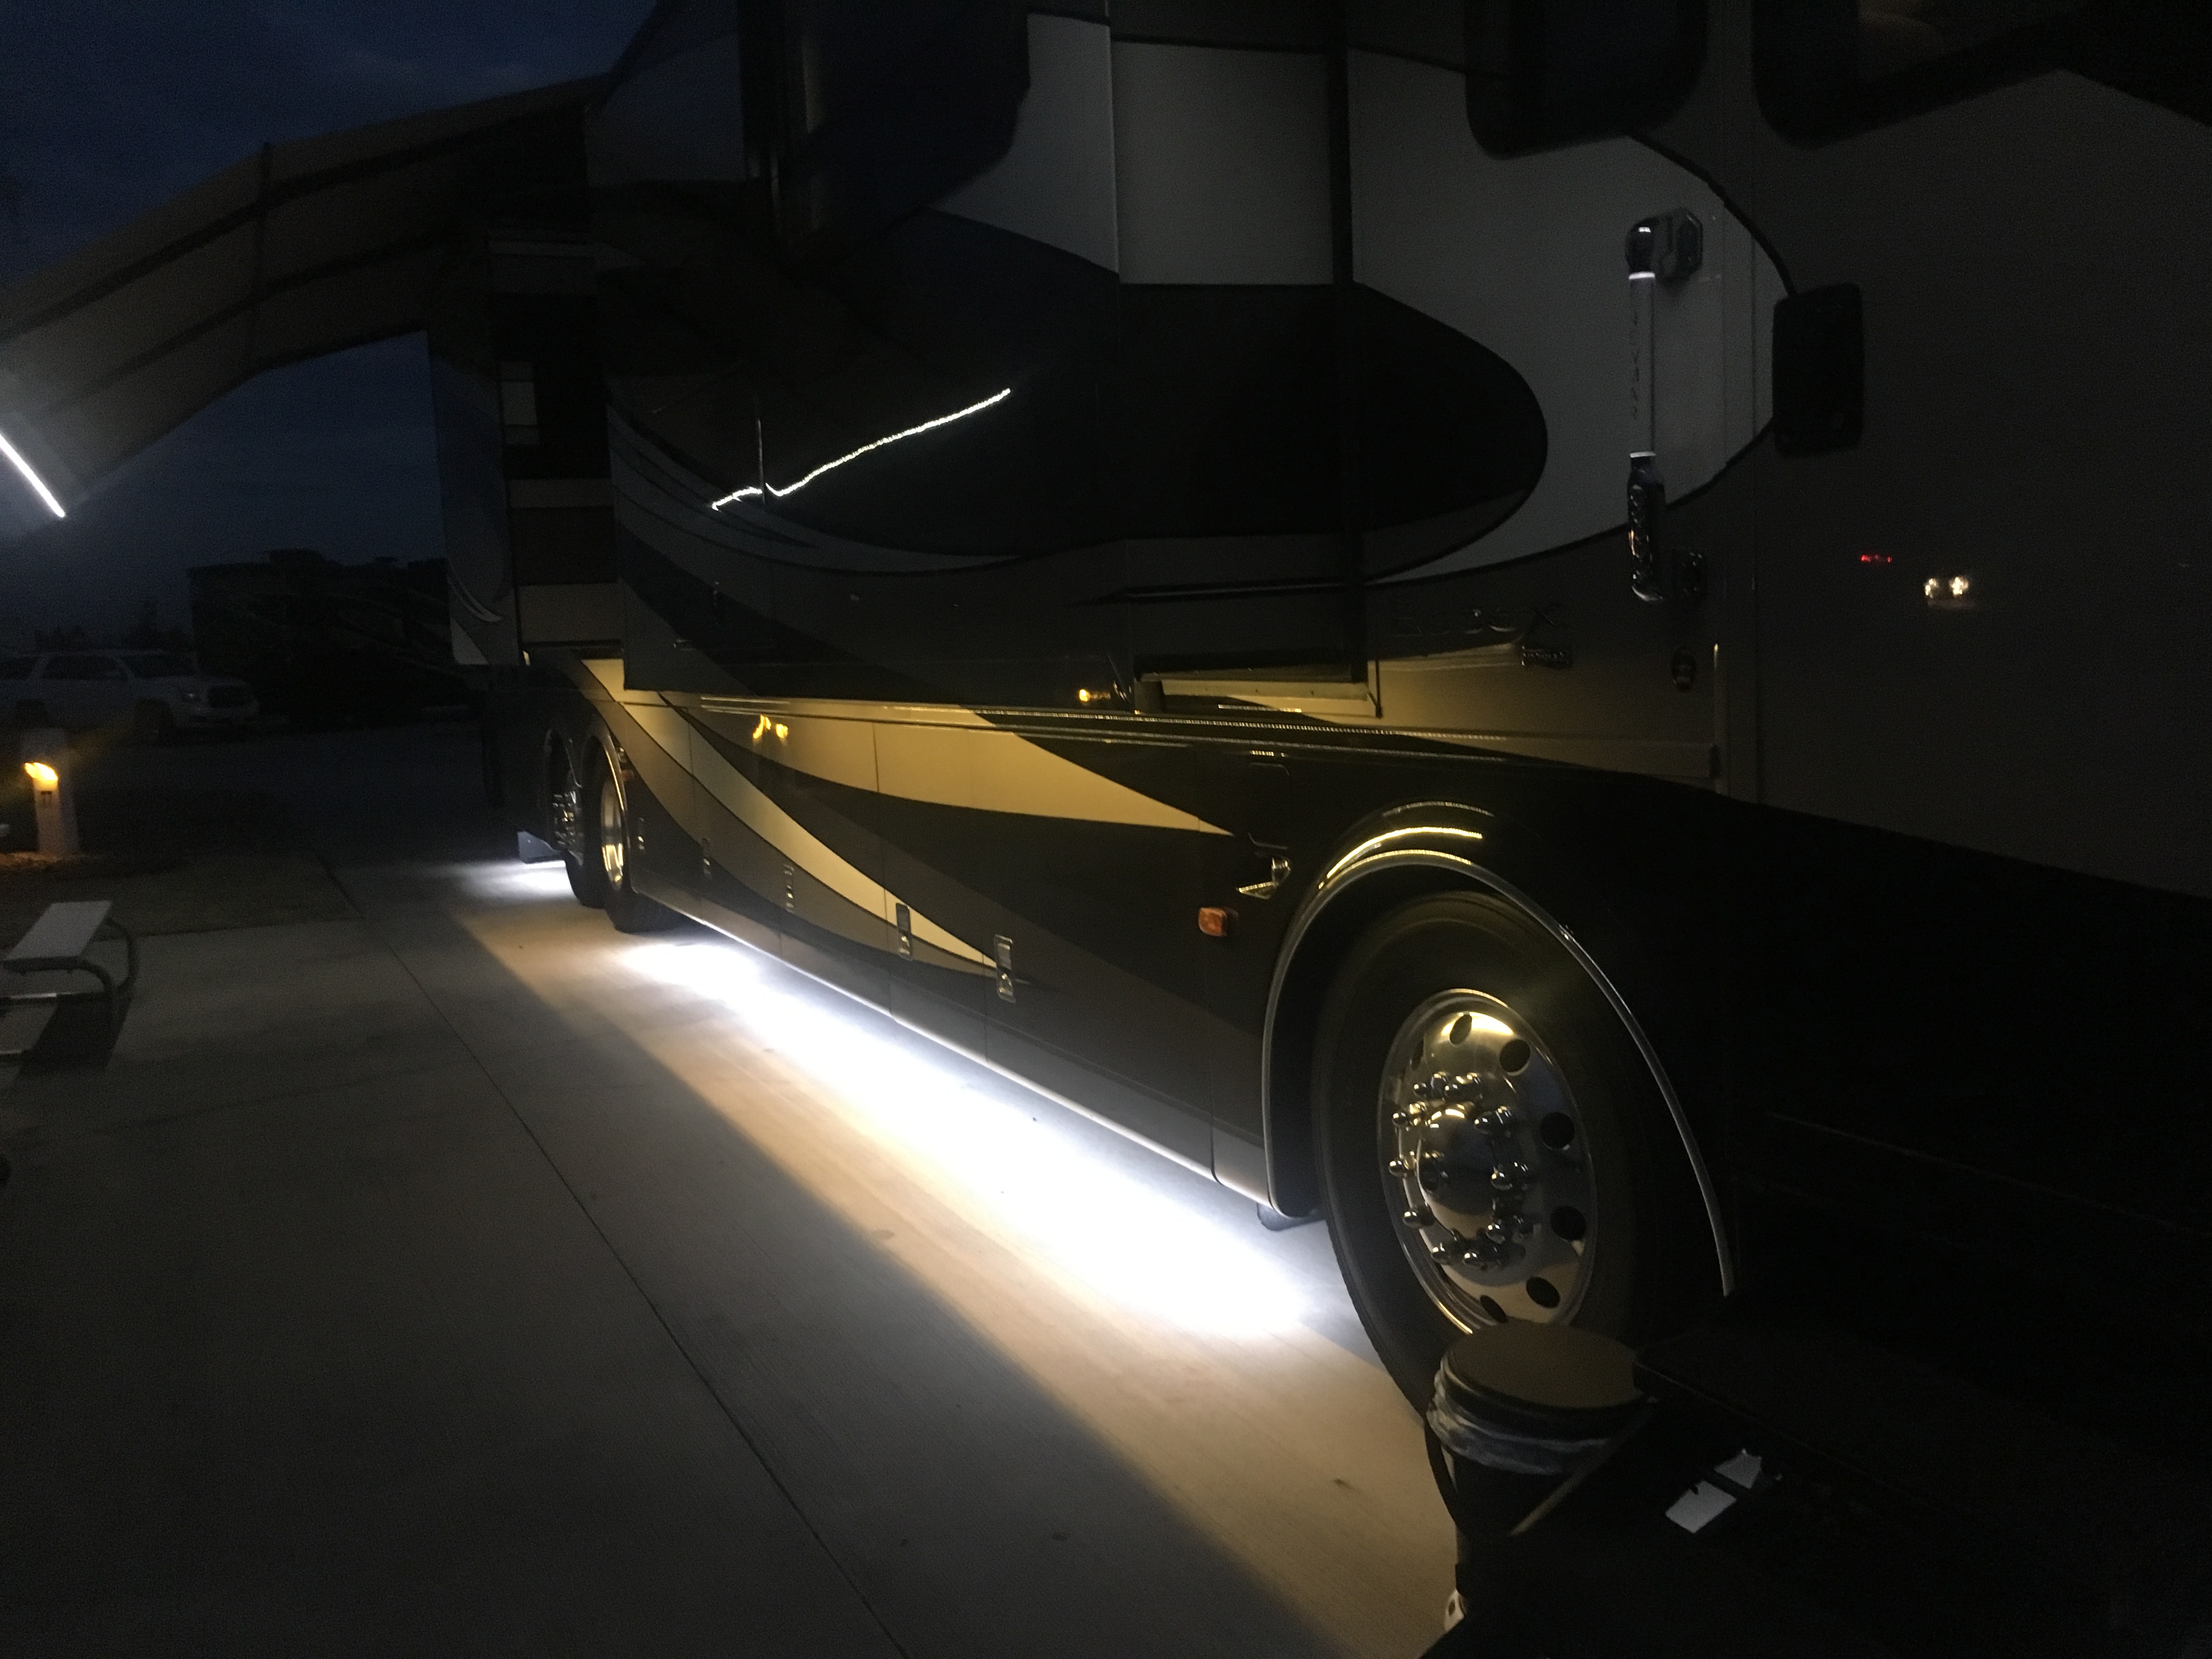
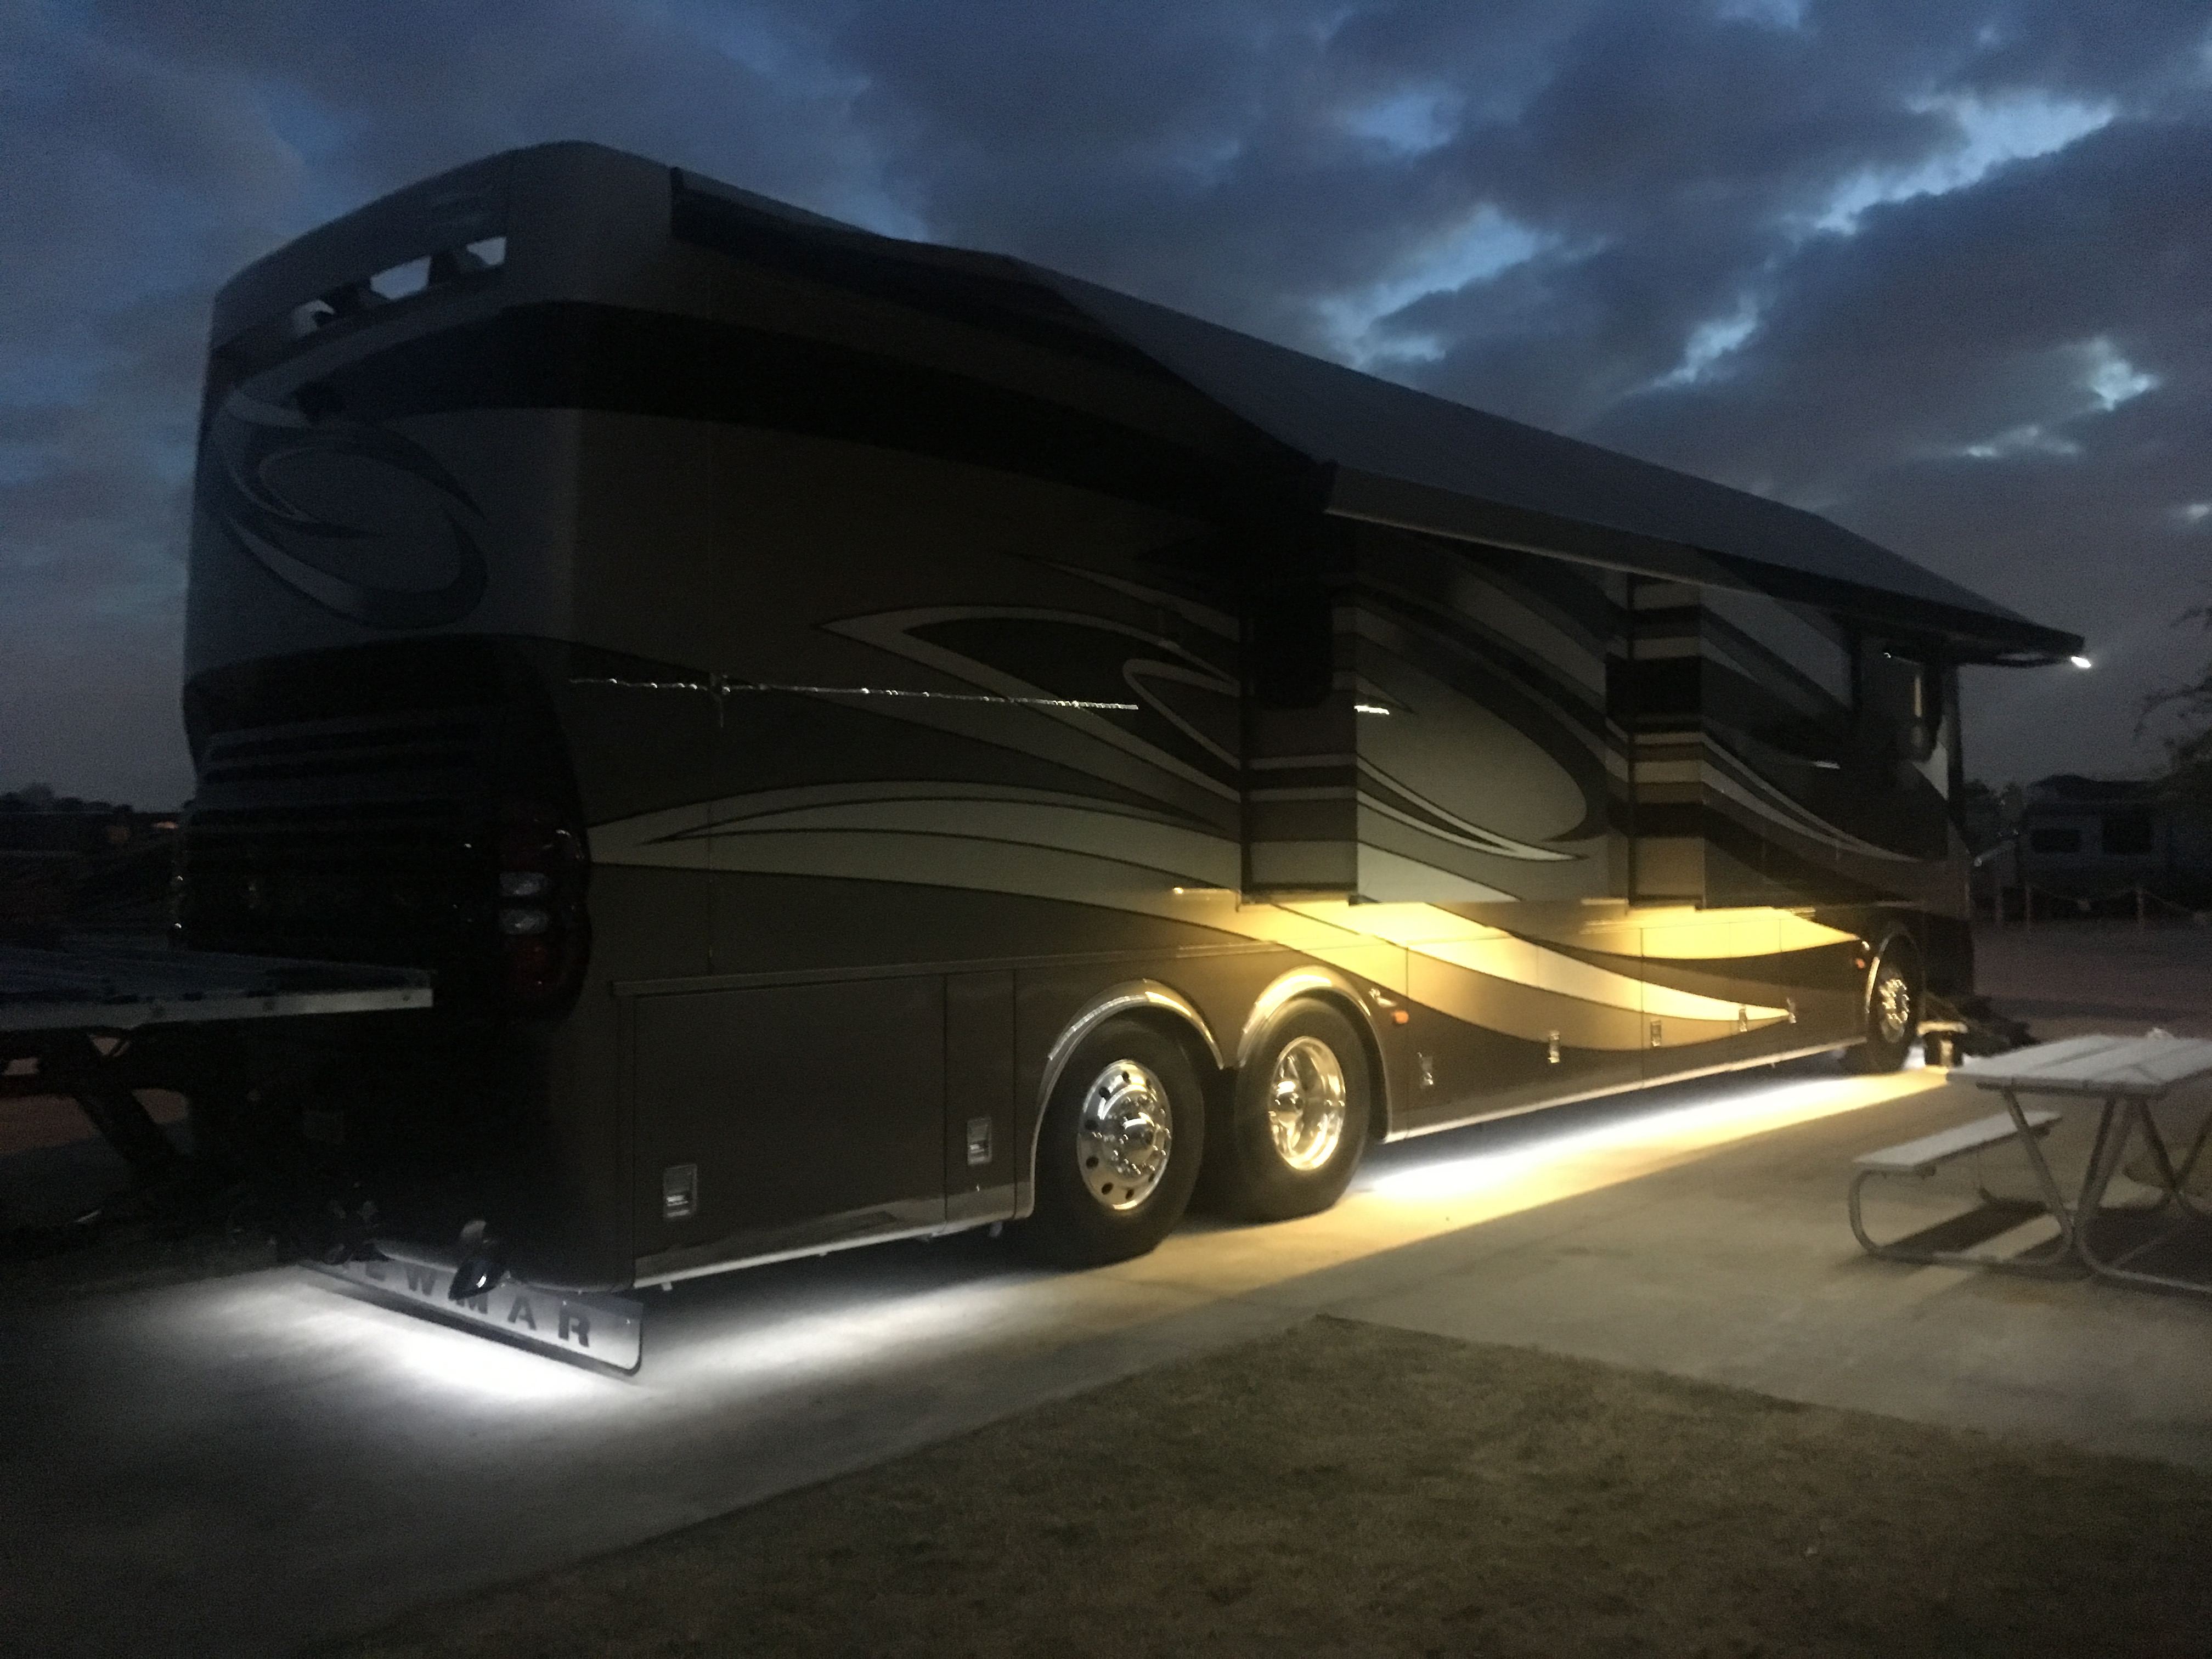
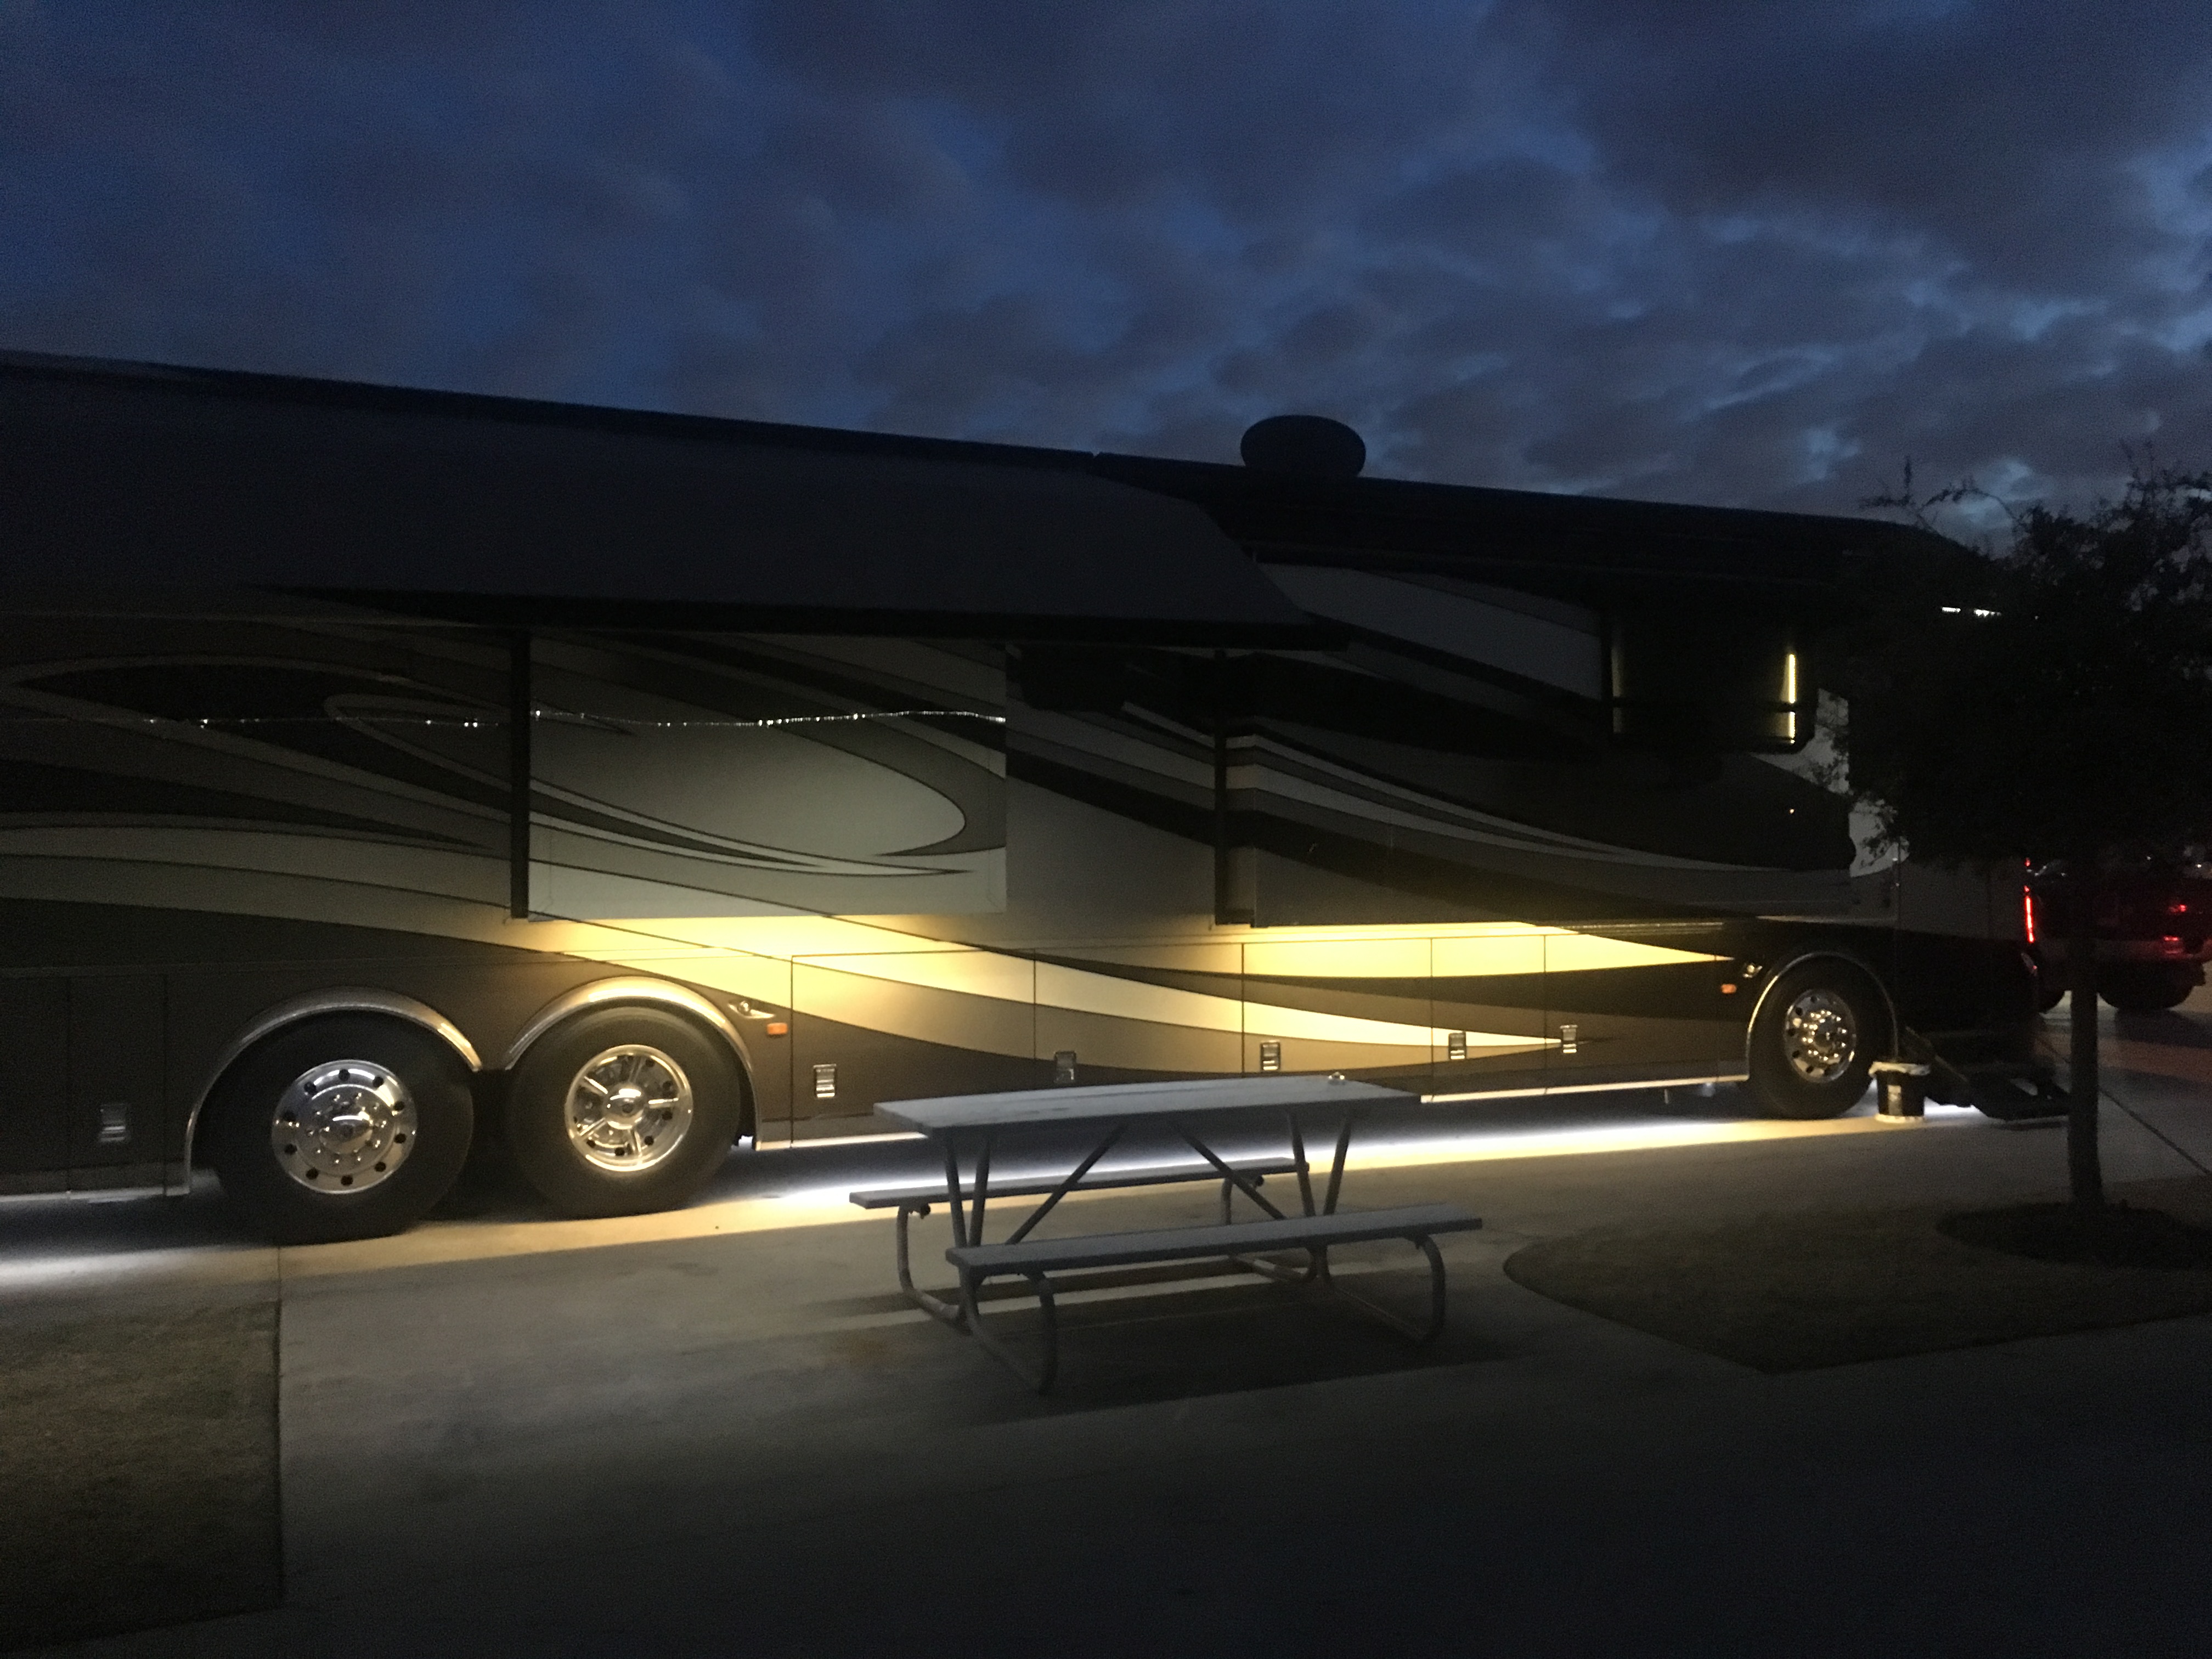
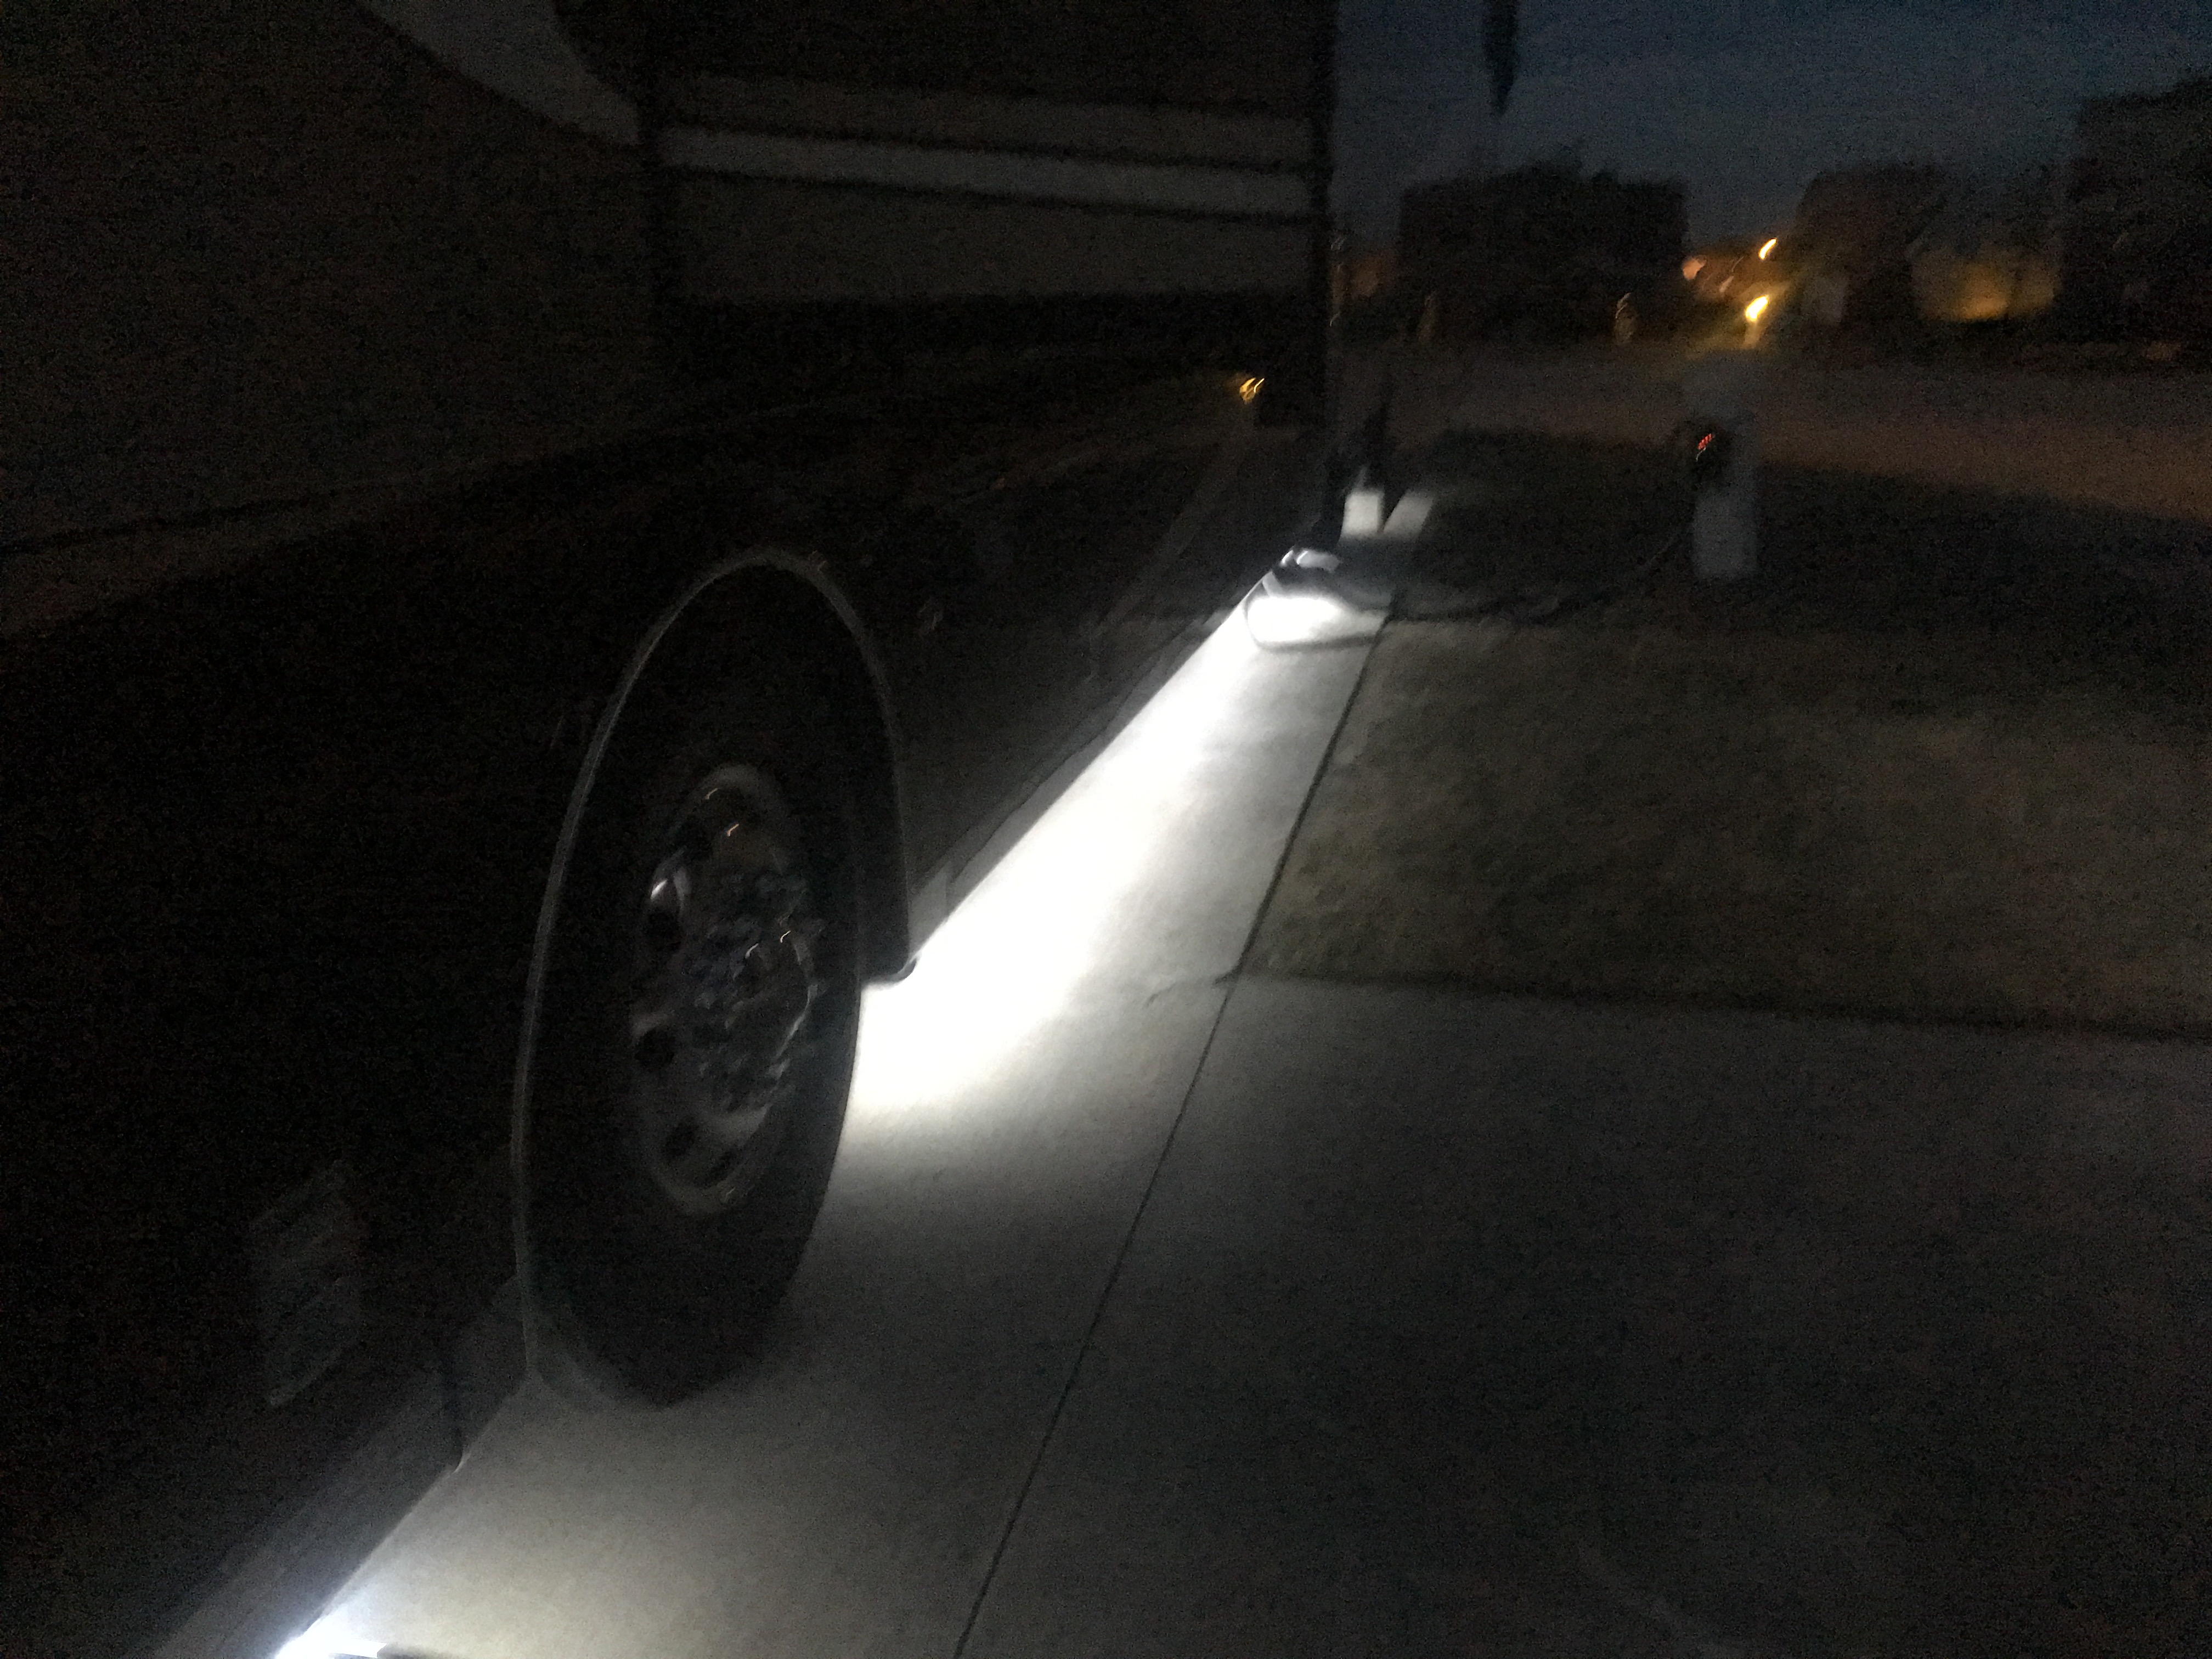
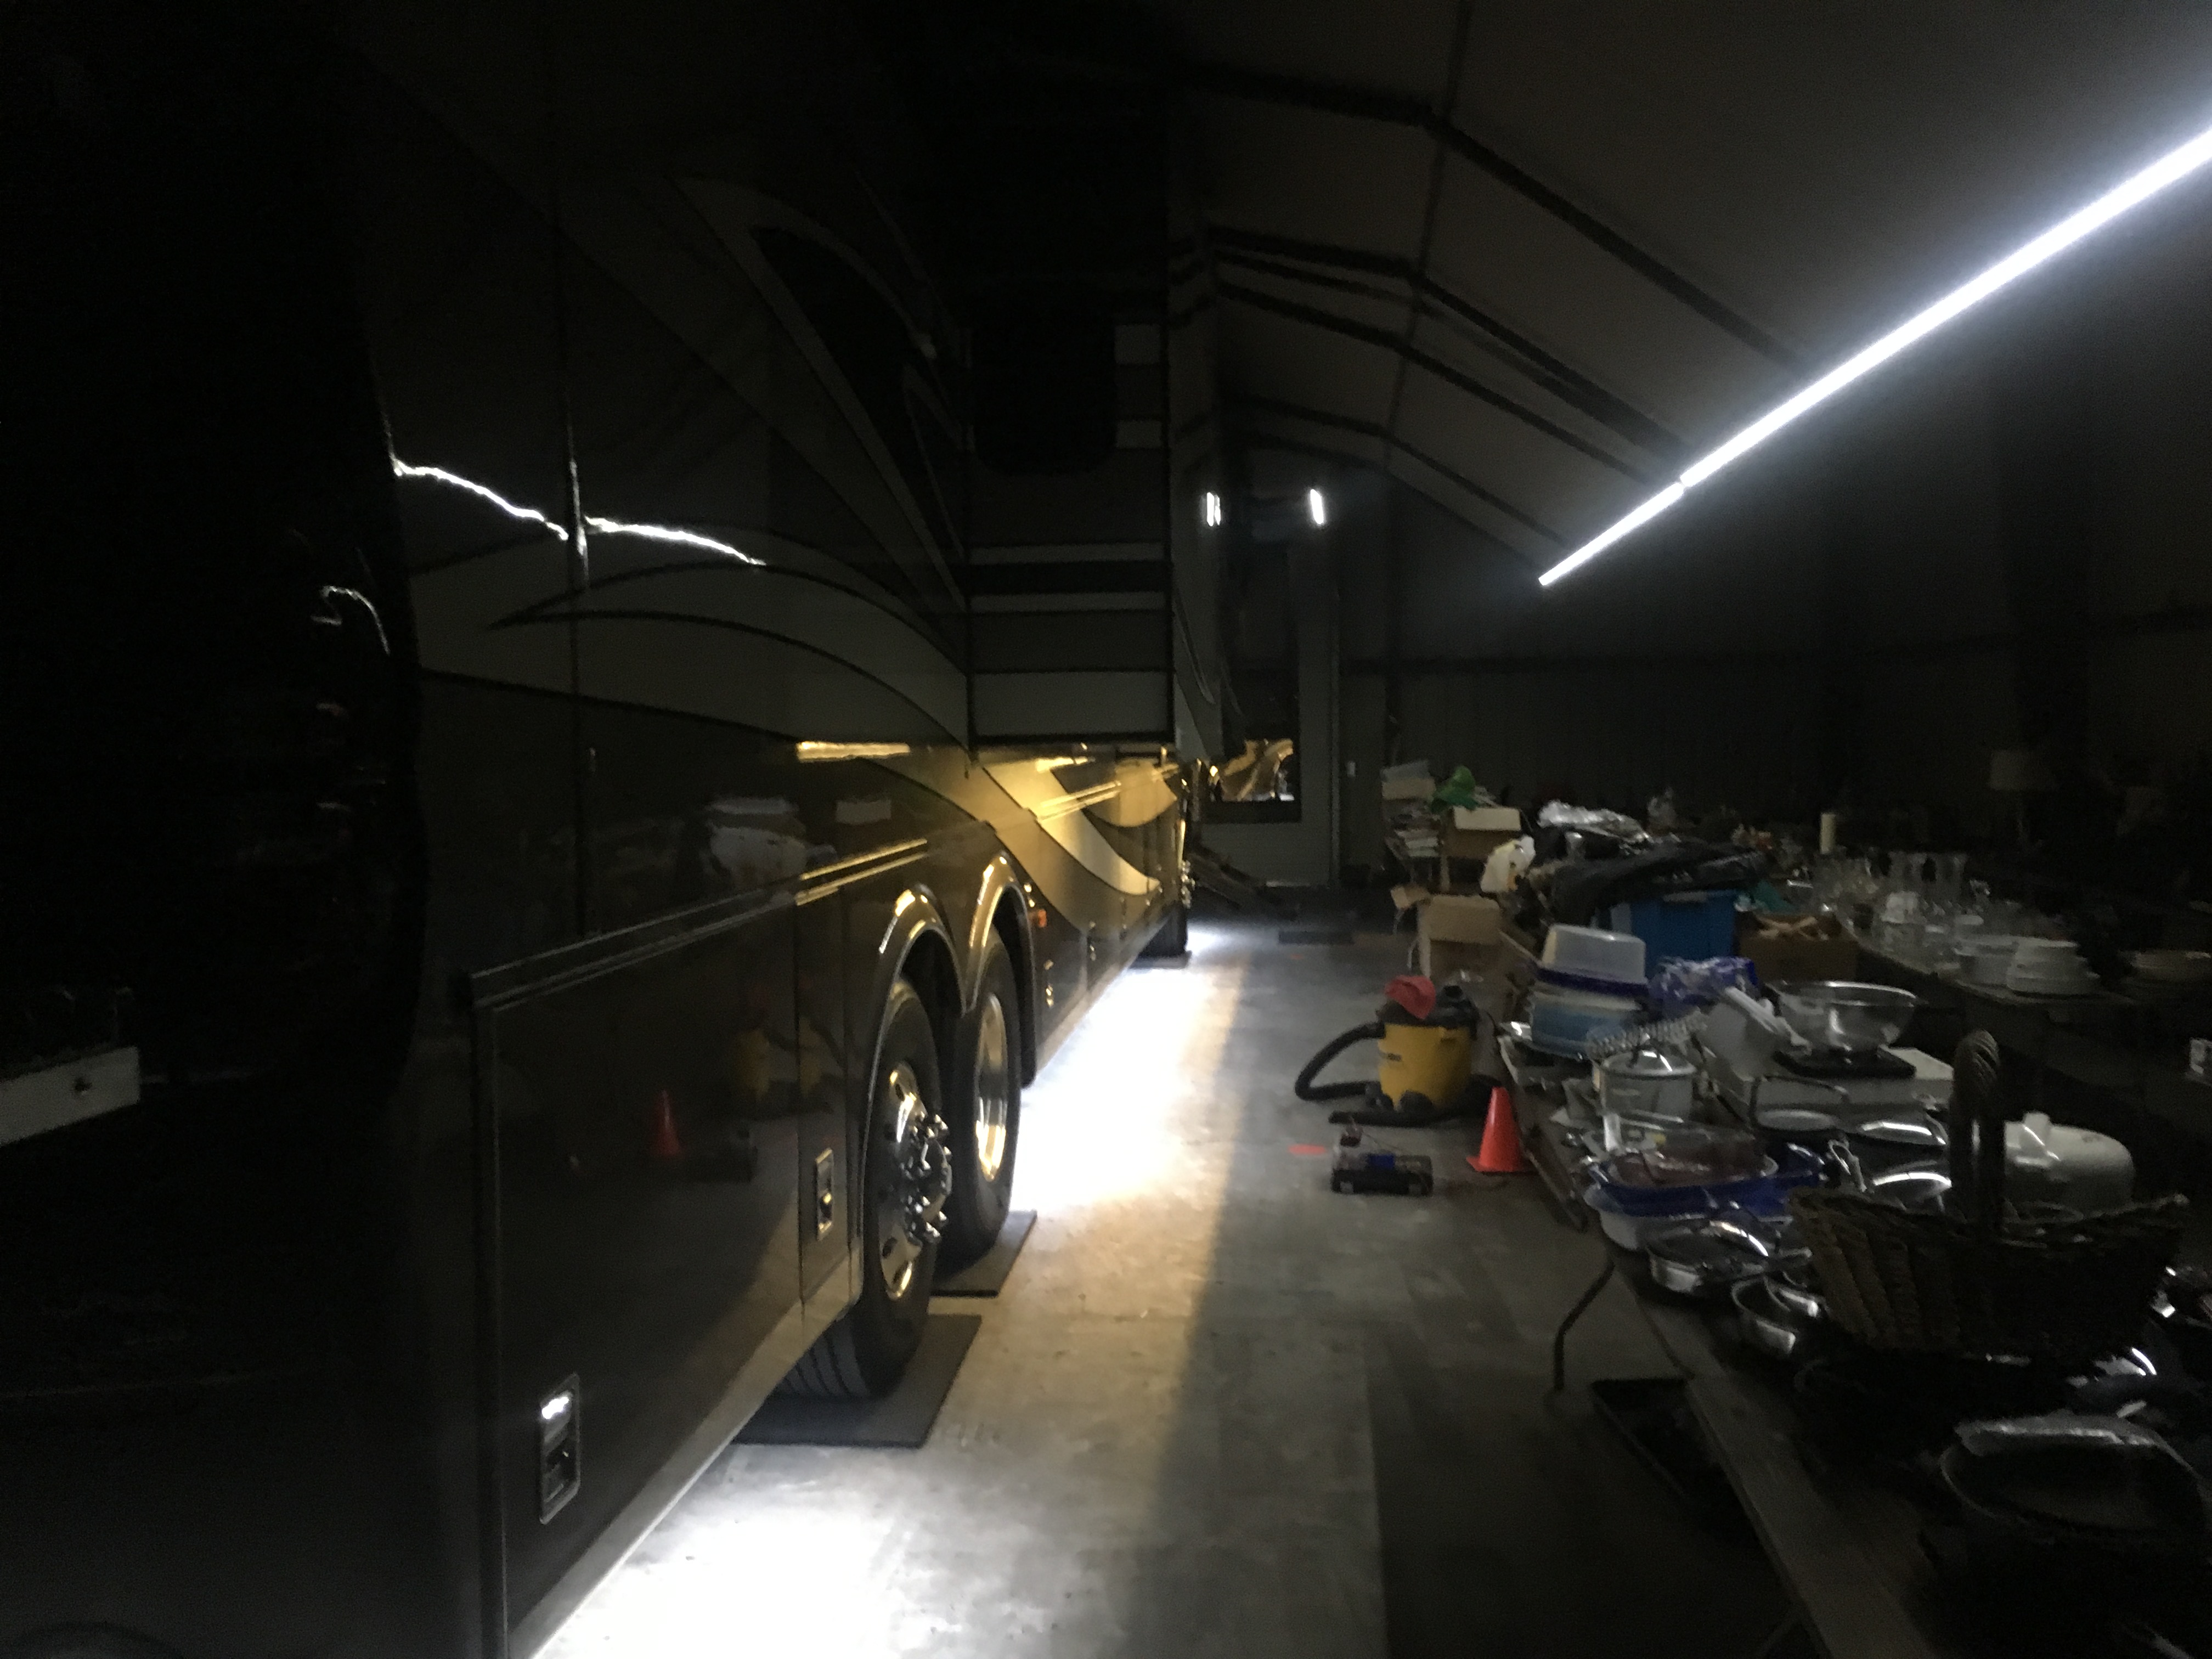
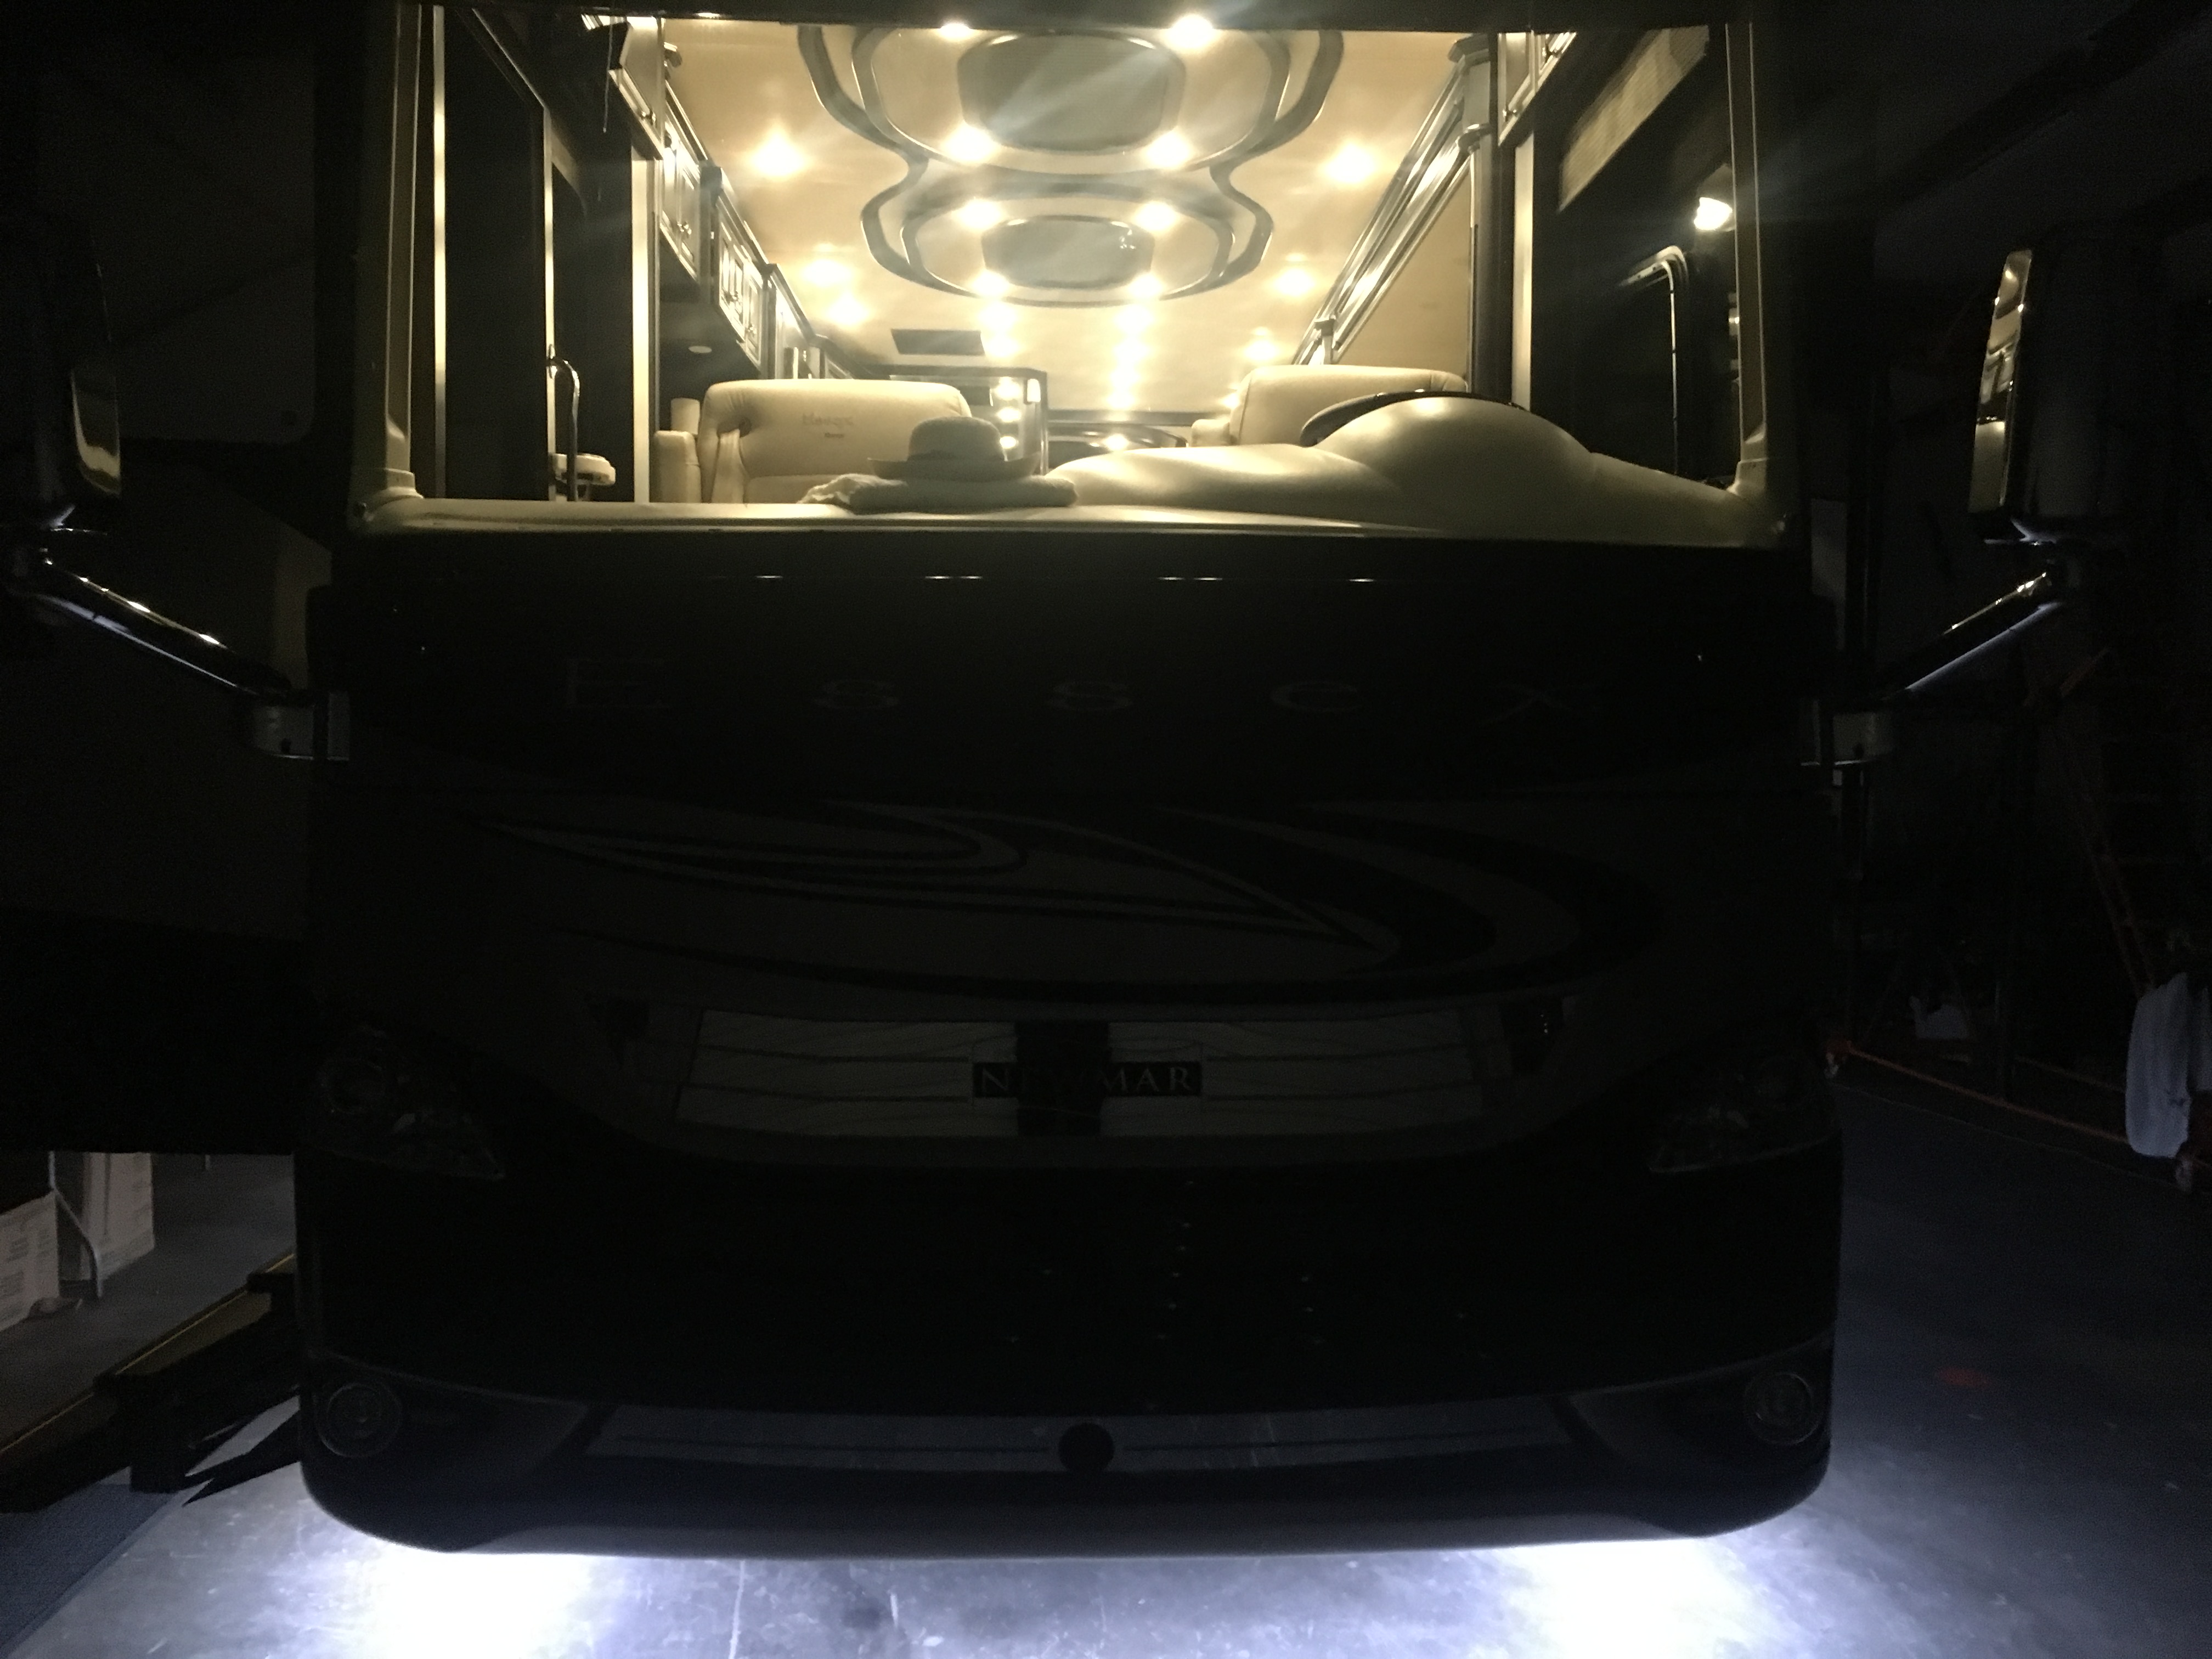
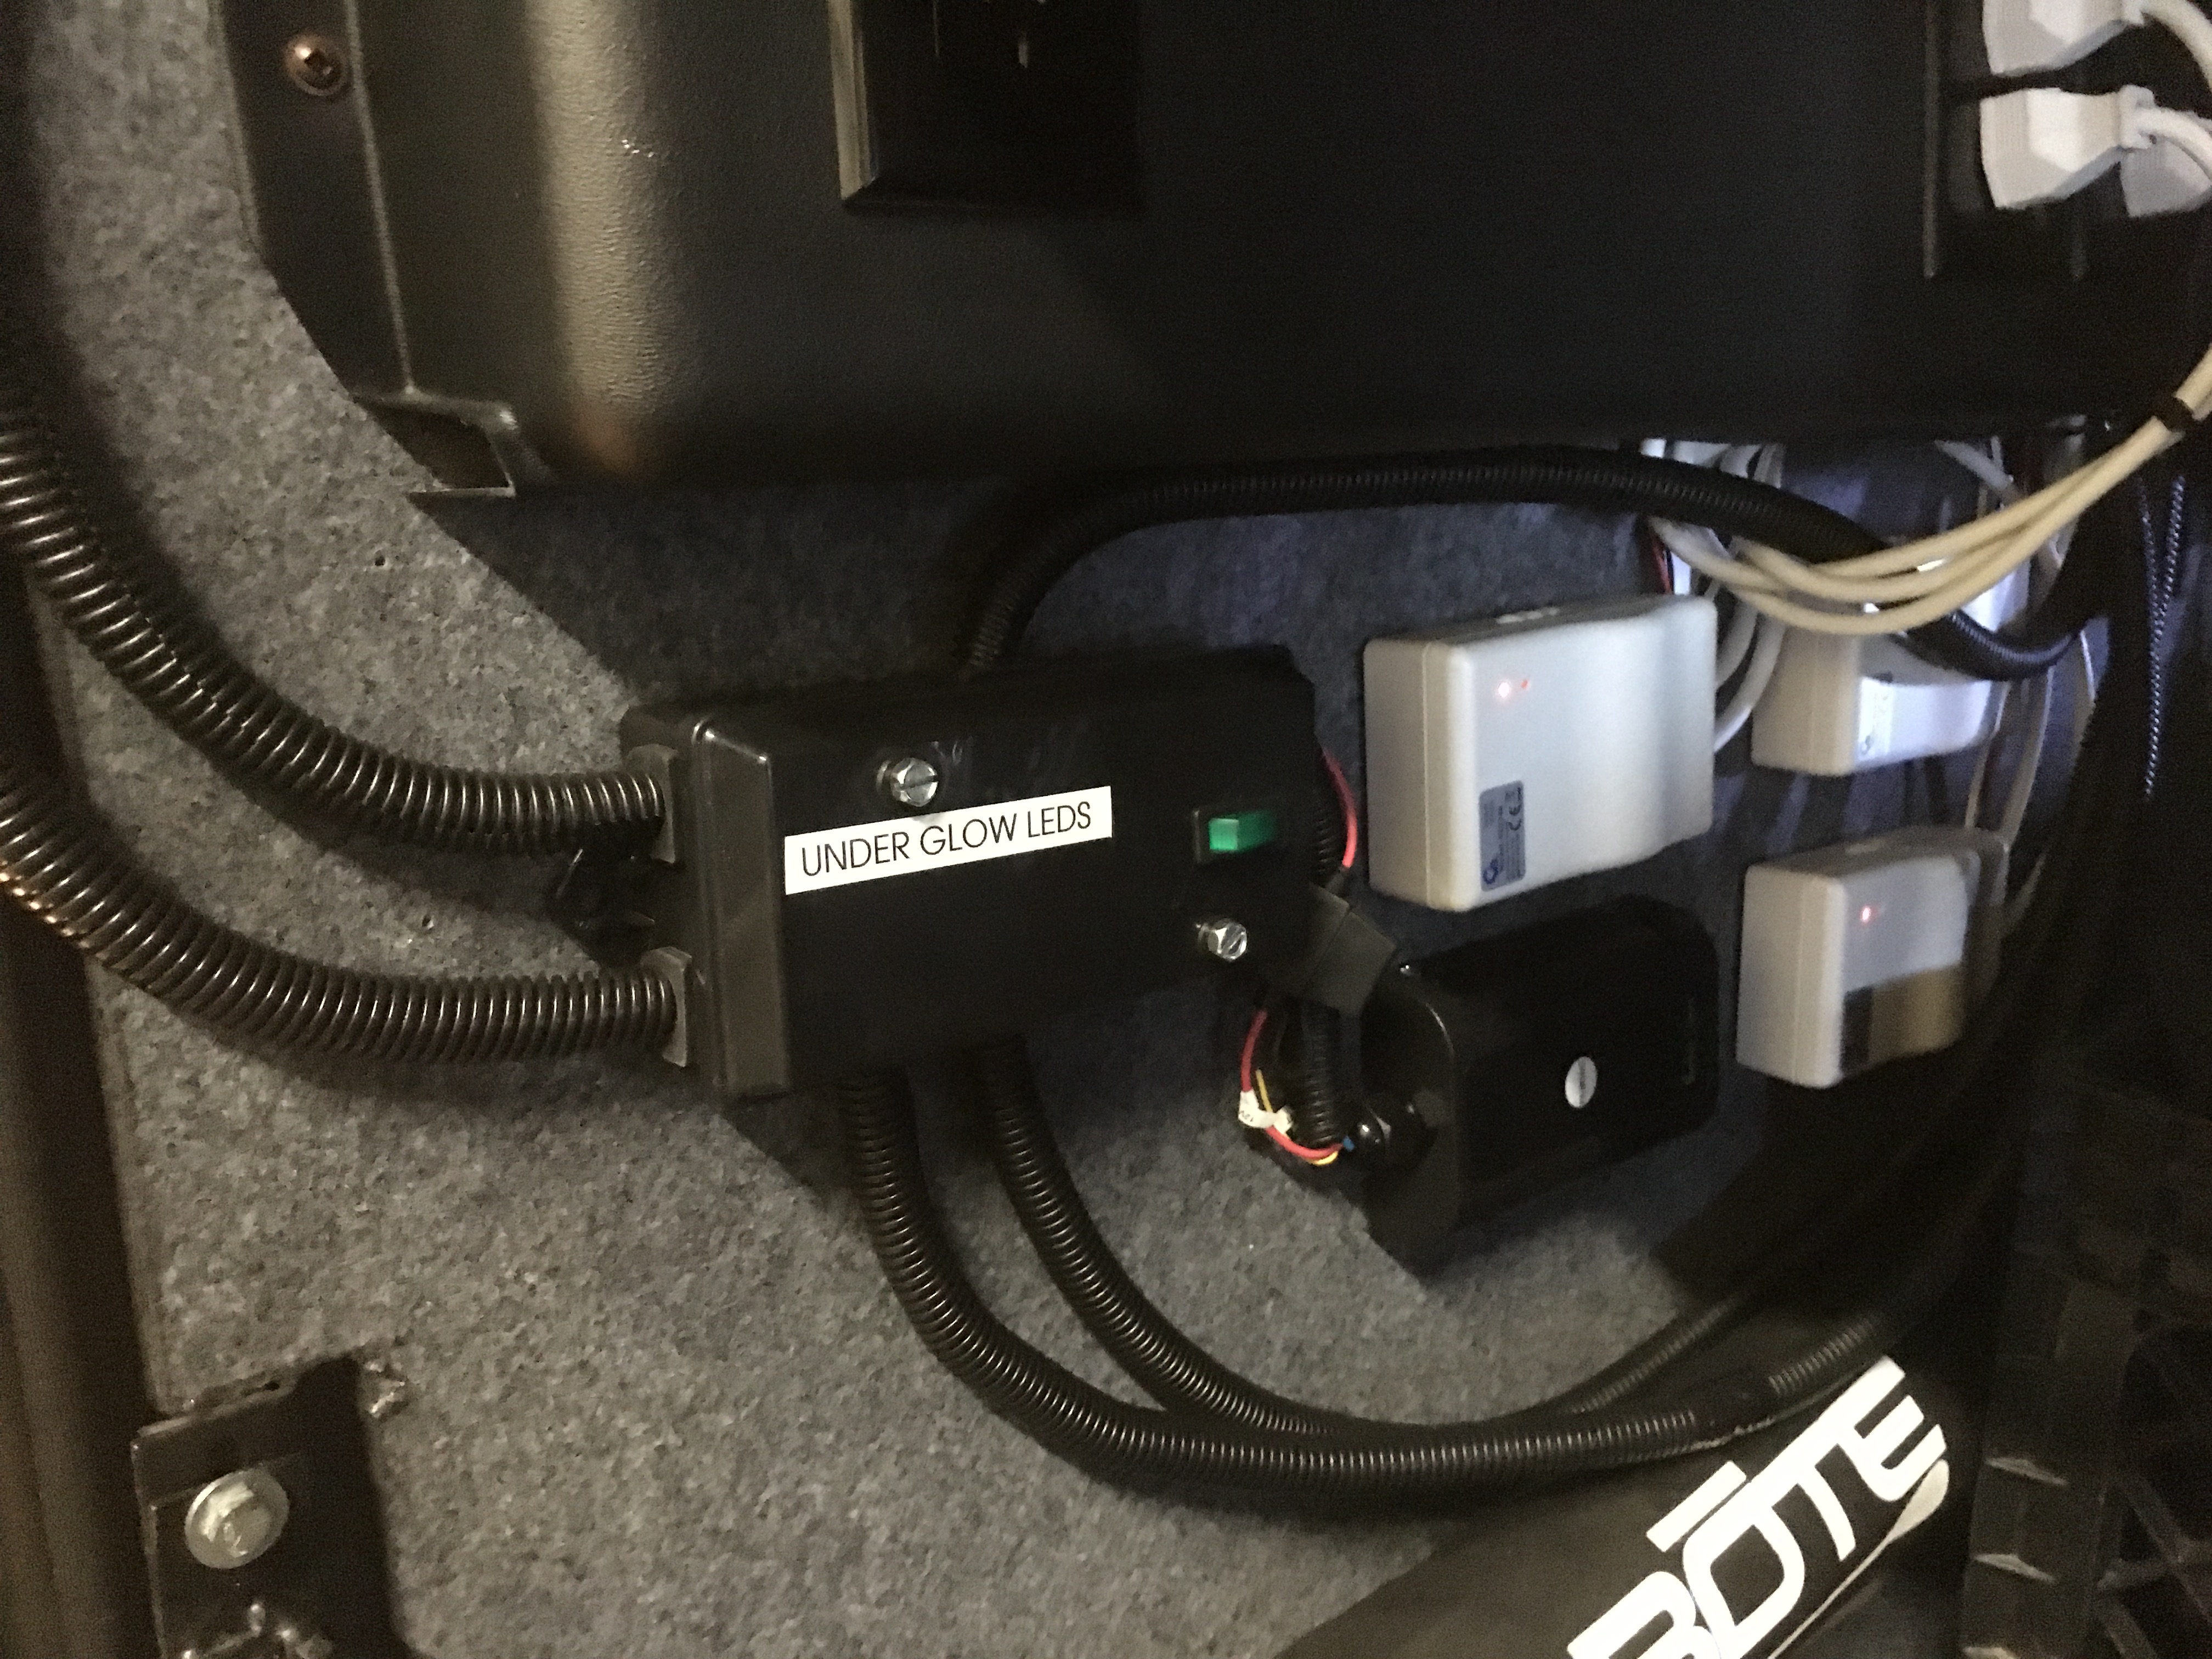
Sharing photos of my recent DIY installation of Boogey Lights "Under Glow" surround ground effects LED lighting. As shown, the LEDs were installed beneath the motor coach on all sides (F&R, Driver and Passenger sides including underneath the entrance door steps). Installation is relatively simple and easy to do but does require some pre-planning in terms of placement and wiring. I choose to direct wire my LEDs to the coach' 12vDC circuitry which is Boogey Lights recommended practice (in lieu of using a 110vAC converter which are available). Located the main junction box and LED controller inside the passenger/door side basement compartment just ahead of my wet tank basement and then ran a single 14-AWG power (Pos +) wire to my electrical bay located on the driver's side and connected to a spare fuse terminal on the main 12vDC fuse panel together with the use of a 20-amp fuse.
Materials required for the installation included 1) Boogey Lights (basic) RV Under Glow kit (which includes 2-ea 16' pre-measured LED lighting strips, a controller and wiring accessory kit) together with additional pre-measured LED light strips in 8', 4' and 3' sections along with their optional HD-M7 RF controller, aluminum channel extrusions (for mounting the LEDs strips as well as the light diffusers panels which "snap on" to the aluminum channel housing the LEDs), 2) additional materials and supplies used for my DIY installation which included 16 AWG wire, tie-wraps, #8 self tapping screws, black RVT silicone, some 3/4" x 3/4" x 8ft aluminum angle extrusions as well as some 1/4" x 1" x 8 ft. aluminum flat bar) along with other misc. parts and supplies.
As shown, I particularly selected Boogey Lights single color "soft white" LEDs while they do offer a multi-color version (basically R,B,G which along with their optional controllers can be "tuned" to produce millions of color variations if so desired and can also be controlled by their cell phone app). I also upgraded to their HD-M& RF controller that includes a dimming feature (as well as other lighting control features) which further allows me to adjust the LED lighting illumination to align/match with my existing OEM installed LEDs located beneath the 2-two passenger side slides as well as on my 3 Girard Canopy Awnings.
Used with discretion, these LEDs provide both lighting accent to the coach while at the same time offer increased safety when moving about the outside perimeter at night such as when needing to access the wet or electrical bays. Expectation is we will not "always" use these but on occasion do so while respecting the privacy of our fellow RV neighbors when in commercial parks.
Additional information and photos of the actual installation can be found in at IRV2.com under RV Forums > RV Systems and Tech > Gear Discussions; http://www.irv2.com/forums/f52/diy-installation-of-ground-effects-led-lighting-374831.html
I'd like to also mention and recommend Boogey Lights if your interested or contemplating a similar installation yourself. Boogey Lights Inc. is widely recognized as a supplier of high quality (and not the cheapest) LEDs particularly for recreational use applications, i.e. Automobiles, Motorcycles, Boats & RVs. The material composition and quality of their lights are apparent when you see them and even more so when you install and use them. They also offer the best warranty in terms of the lights themselves and are available to provide assistance (by phone or email) when it comes to planning or actually installing them. Don''t second guess yourself - you can easily "do it yourself (DIY)". No rocket science involved but does require that you do some "pre-planning" as to (a) where you want to install them, (b) what type of lights you want (single or multi-color), (c) the lengths of LED lighting you'll need or want, (d) where you will mount your controller (e) and whether you want to do direct 12vDC or use a 110v AC adapter - then its all a matter of labor from that point forward. On a coach the size of mine (45' DP) it was some what a labor of love that lasted more than 10-days to complete (albeit when I work for myself, I tend to call it a day and come and go as I please), hence the installation could have been quicker, I just wanted to take my time and work on them when I felt like it.
Why DIY one might ask (vs. having them done for you)?, Well I obtained numerous quotes that ranged from $3,700 to as much as $4,500 for the supply and installation of the LEDs. By doing it myself I have calculated that my total cost (excluding my personal labor) was <$1,000 (which included the LEDs and supplied materials purchased from Boogey Lights at a total cost off $589.00).
Hope you enjoy the photos.


-
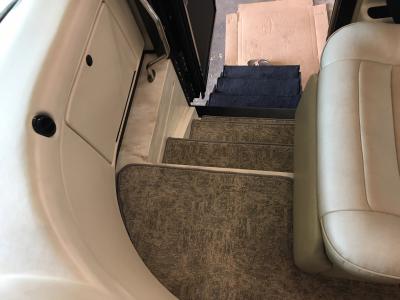
On January 8, 2018 at 5:39 AM, hermanmullins said:Just noticed in the OP the entry steps are a Corean, Granite or some other Hard surface material. It looks as if there is some sort of non skid on them. Maybe he can show the entry steps to the Topic about remodeling your entry steps.
Ernie made a comment about hard surfaces.
Sorry to move away from the Topic.
Herman
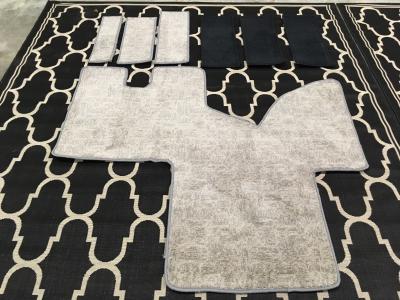
Herman, et al...the steps are OEM and appear to be a Corian-type scratch resistant material (similar to countertop surface material). The steps do have a non-slip rubber mat insert in each of the steps albeit we had custom floor and entryway carpets made. The carpets we had made have a rubber, non-slip backing on them as well as having serged edges (similar to binding) which ensures they will not come unravelled. We had the made by making cardboard templates and taking them to North Texas Carpet Binding Inc. who has a large inventory of carpeting including remnants which work perfect for such a project and have been using them now for well over a year. All in, the large cockpit area & 3-interior steps mats (in a remnant color close to the color of our flooring) together with 3-exterior step carpet mats (in black) cost us $365.00 for the 7pcs. in total including shipping to our home.
We really like them and they work well as they are easy to remove and clean and help to keep the rest of our flooring (all tiled) clean.
https://www.northtexascarpetbinding.net
Here are some photos of the complete set as well as with the rugs in use...
-
20 hours ago, manholt said:Rich. Very well done! Your awning and under slide lights are blinding, while the Boogey Light's are pleasing to the eye! Sorry, but like Rich, Linda and I have more stuff than you! Total of 4 houses and 2 coaches between us....that's going to be a garage sale! LOL
Looks like the RV park is a sports field, got more light's than needed.
Carl, I think its more the optics of the under-slide and canopy awnings being the direct line of sight of the phone camera lens. The LEDs are actually not that bright unless you look up directly at them (which my phone camera may have captured when taking the photos). As to the sports field appearance of the RV park - not really so...they have pedestal lights (normal), but other than that not so many pole lights. Its actually fairly dark out and about the resort at night. I think its just a matter of what my camera and its flash picked up when taking those photos.
As to you're reference to having more stuff than me well all I can say is I'm happy for you and happier for me. Good on ya!
-
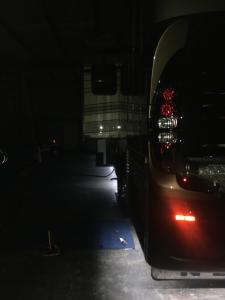
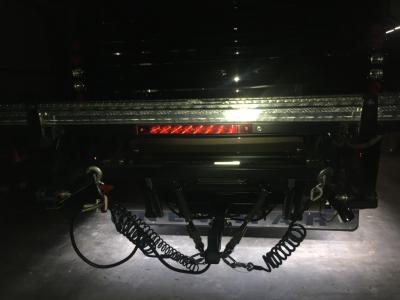
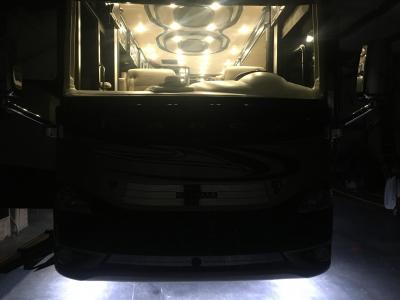
Posting a few pictures of finished DIY project of installing Boogey Lights UnderGlow LEDs albeit the phone camera lens must have had some condensation on it as a few are a bit blurry. Some photos show the lights at full their brightness setting while being subdued in others (lowered illumination). I personally prefer the lower setting which I feel better compliments the OEM LEDs installed under the slides and on the canopy awnings as well as being more respectful to neighbors when being used.
Having the lighting on the driver side of the coach is also a plus when considering the need to walk/work around it at night, i.e. wet bay, electrical cord reel bay, etc.
Taken at Eastlake RV Resort Houston, TX.
Hope you guys like them, We do.


-
Have no fear..it's just stuff and once its gone you'll realize how little you miss it. Plus it will make room for new stuff. As to our having downsized the home, that deal came with my purchase of a commercial lot & 60' x 100' metal building that now serves as my shop and coach storage" which is about 6 miles from where we live.
-
ps, should anyone want to know, all that stuff on the tables next to the coach is our 30+ year old collection of housewares, and misc. stuff, etc. that we intend to dispose of having downsized into a 2-hr Town Home now that the kids are grown, on their own and we're retired - its amazing how much "stuff" we all can amass after so many years and when you step back and look at it all realize how little you used a lot of it. Garage Sale anyone? We've got 1/2 by shop filled with this stuff and hoping to get a thrift store or someone with interest to come and buy it all for one lump sum offering.
-
Here are a few photos of the finished product (Under Glow surround LEDs) taken from inside my shop. Brightness of the new Under Glow lights is adjustable using the RF Remote and such that we can near match the existing LEDs under the slides and on the canopy awnings. We chose to go with the single color soft white. Expectation is that these will look much better when the coach is in use (i.e. outdoors at an RV camp site or park) and will be used with discretion. (re: not intended as "bling" but moreso to provide soft light around the base perimeter of the coach particularly when walking around it at night).
-
Do you have a RV Lifestyle Motto?
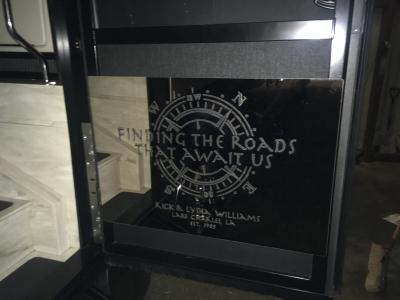
Our RV lifestyle motto is "Finding the Roads that Await Us"...and after having seen the "Crown" emblem screen door signs Newmar places exclusively on it's King Aire model we liked the "idea" of it and had our own personal version made as shown below. Lydia came up with the idea of the compass which she found on-line then we just added the wording and had it made.
The sign is laser cut mirror finish stainless steel adhered to the screen door frame using 3M double-sided tape and whereby the screen door remains fully functional.
-
1 hour ago, DickandLois said:Rick. Nice job! I Did not know that there was a wire raceway running the length of the enclosed bay area>
That sure saved some time and parts.
As you mentioned , a project like that enhances ones knowledge of how things are wired and where those wires run.
Rich.
Thank you. Neither did Newmar CS and was only in desperation that I happened to find it after an exhaustive search using shop & flashlights along with a fishing tape trying to find a means to run 1-one wire from the rear/engine compartment into the basement (forward of the drive axle). The access is actually not an existing wire raceway and is nothing other than a structure frame member sandwiched between the RV house and the Basement framework that runs the length of the coach from the rear all the way forward to just behind the steer axle. The framework is the same that the basement door hinges bolt to only its open at the top which allowed me to run the 1/2" split loom and wire through then simply secure the loom with plastic clamps to kept it taunt and straight. Made for a nice concealed wire run that does not interfere with anything.
As to the knowledge gained through the entire DIY project your correct, I learned a lot about both about the location and wiring leads to a lot of the components. Only problem is that I'm 6'2" @ 205 and ertainly didn't belong in many of the crawl spaces I managed to get myself up and into. It's a lot easier to climb in than it is to climb out (in reverse) and my head, arms and hands as well as my back prove evidence of having been in close quarters. There was a moment when I got off my creeper up under the drive/tag axles and managed to sit somewhat in an upward position while trying to get to the back of the RV house and wasn't sure I could get outta there which was a but "stupid is as stupid does" as I was working alone and my cell phone was on one of my work benches (before anyone "goes there", I had ea. 22-ton jack stands under the chassis beams in addition to the coach being elevated on it's hyd. jacks as back-up). Got those from Northern Tool at a very reasonable price.
-
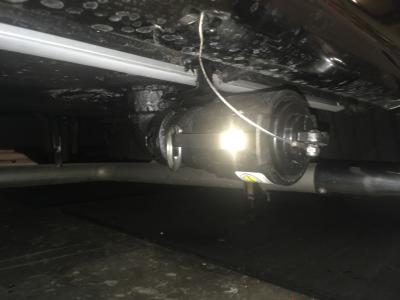
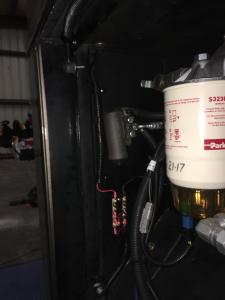
25 minutes ago, jleamont said:Can't wait to see it light up! Just a note, that has got to be the best place I have ever seen the air brake governor mounted! Not sure what make/model coach you have but I can certainly tell what manufacturers it's not.
It's in my signature, a '17 Newmar Essex (Spartan K3 chassis). Will post final photos in the next few days to including ones at night with the lights on once I pull the coach outside of my shop next week as We're heading over to New Orleans to do some wining & dining in celebration of a birthday with some dear friends and troll around the French Quarter and Riverfront for a few days.
-
Well Gents,
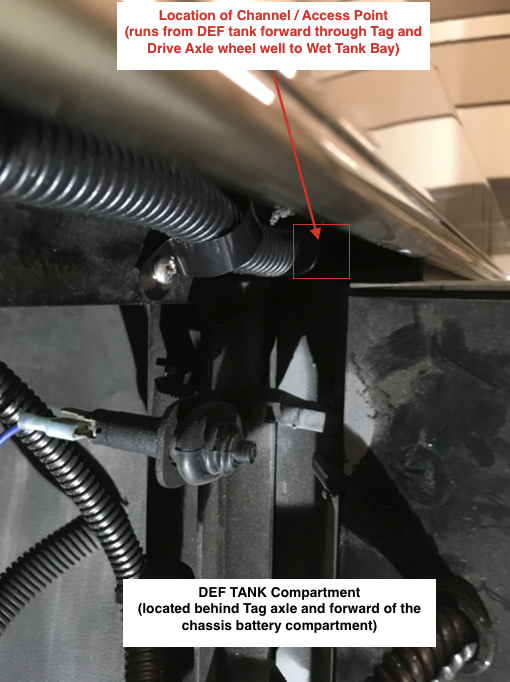
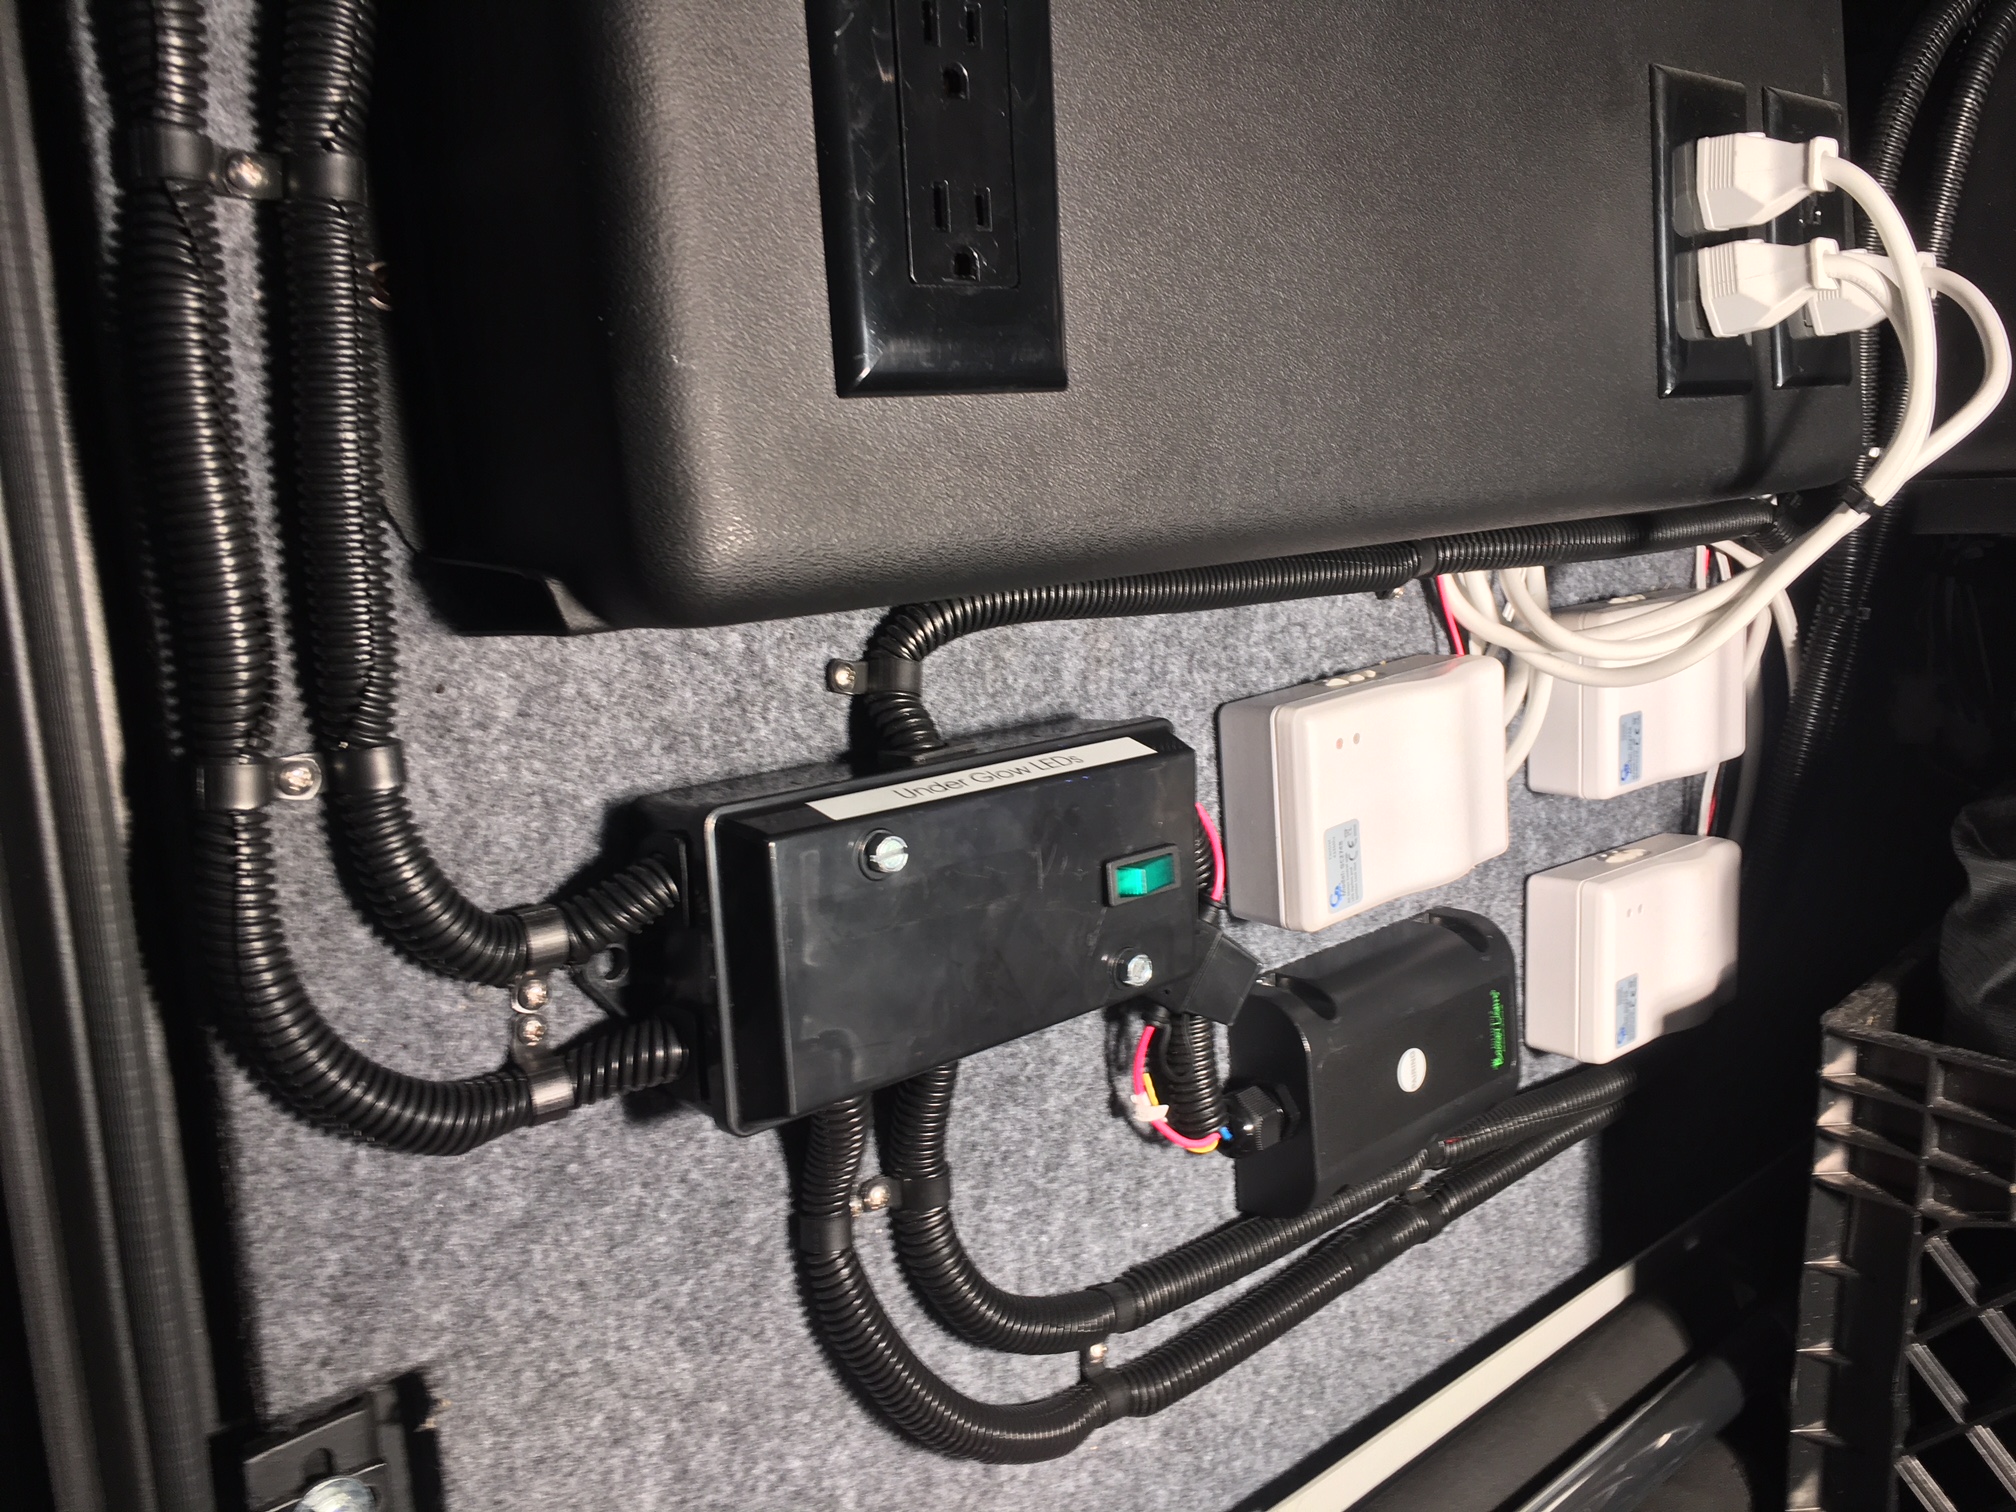
I'm now 99.9% complete with my DIY installation of UnderGlow Exterior surround LEDS on my 45DP. All that remains is the securing of some of the 1/2" split loom conduit I used. All LED light strip aluminum channel ends have been closed/sealed with RTV silicone and all cable/loom runs secured throughout the basements and forward/aft sections of the chassis. I used pole terminals in the generator slide compartment to bank the wiring for the 3-sections up front ahead of the front axle, and in the chassis battery compartment for the 3-sections aft of the Tag axle as well as chassis grounding at these two locations. All exposed wiring has been sealed using a urethane electrical seal coating. I also had 2-two long 14AWG single wire runs from the generator slide and rear chassis to my P-4 door side basement (midship) compartment where I located the central junction box and HD M7 RF controller for the LEDs. I fished my wire from the generator compartment alongside of my option hot water line that runs from the wet bay to the front of the coach and the rear wire as already posted using an open channel located from the DEF compartment into the forward Wet Bay Tank compartment.
End Result = by doing this installation myself, I saved between $2,700-3,200 based upon quotes earlier obtained and my total material cost was less than $700. I also gained the experience of knowing where everything is in the "unlikely" event I ever have a problem with any of the lights.
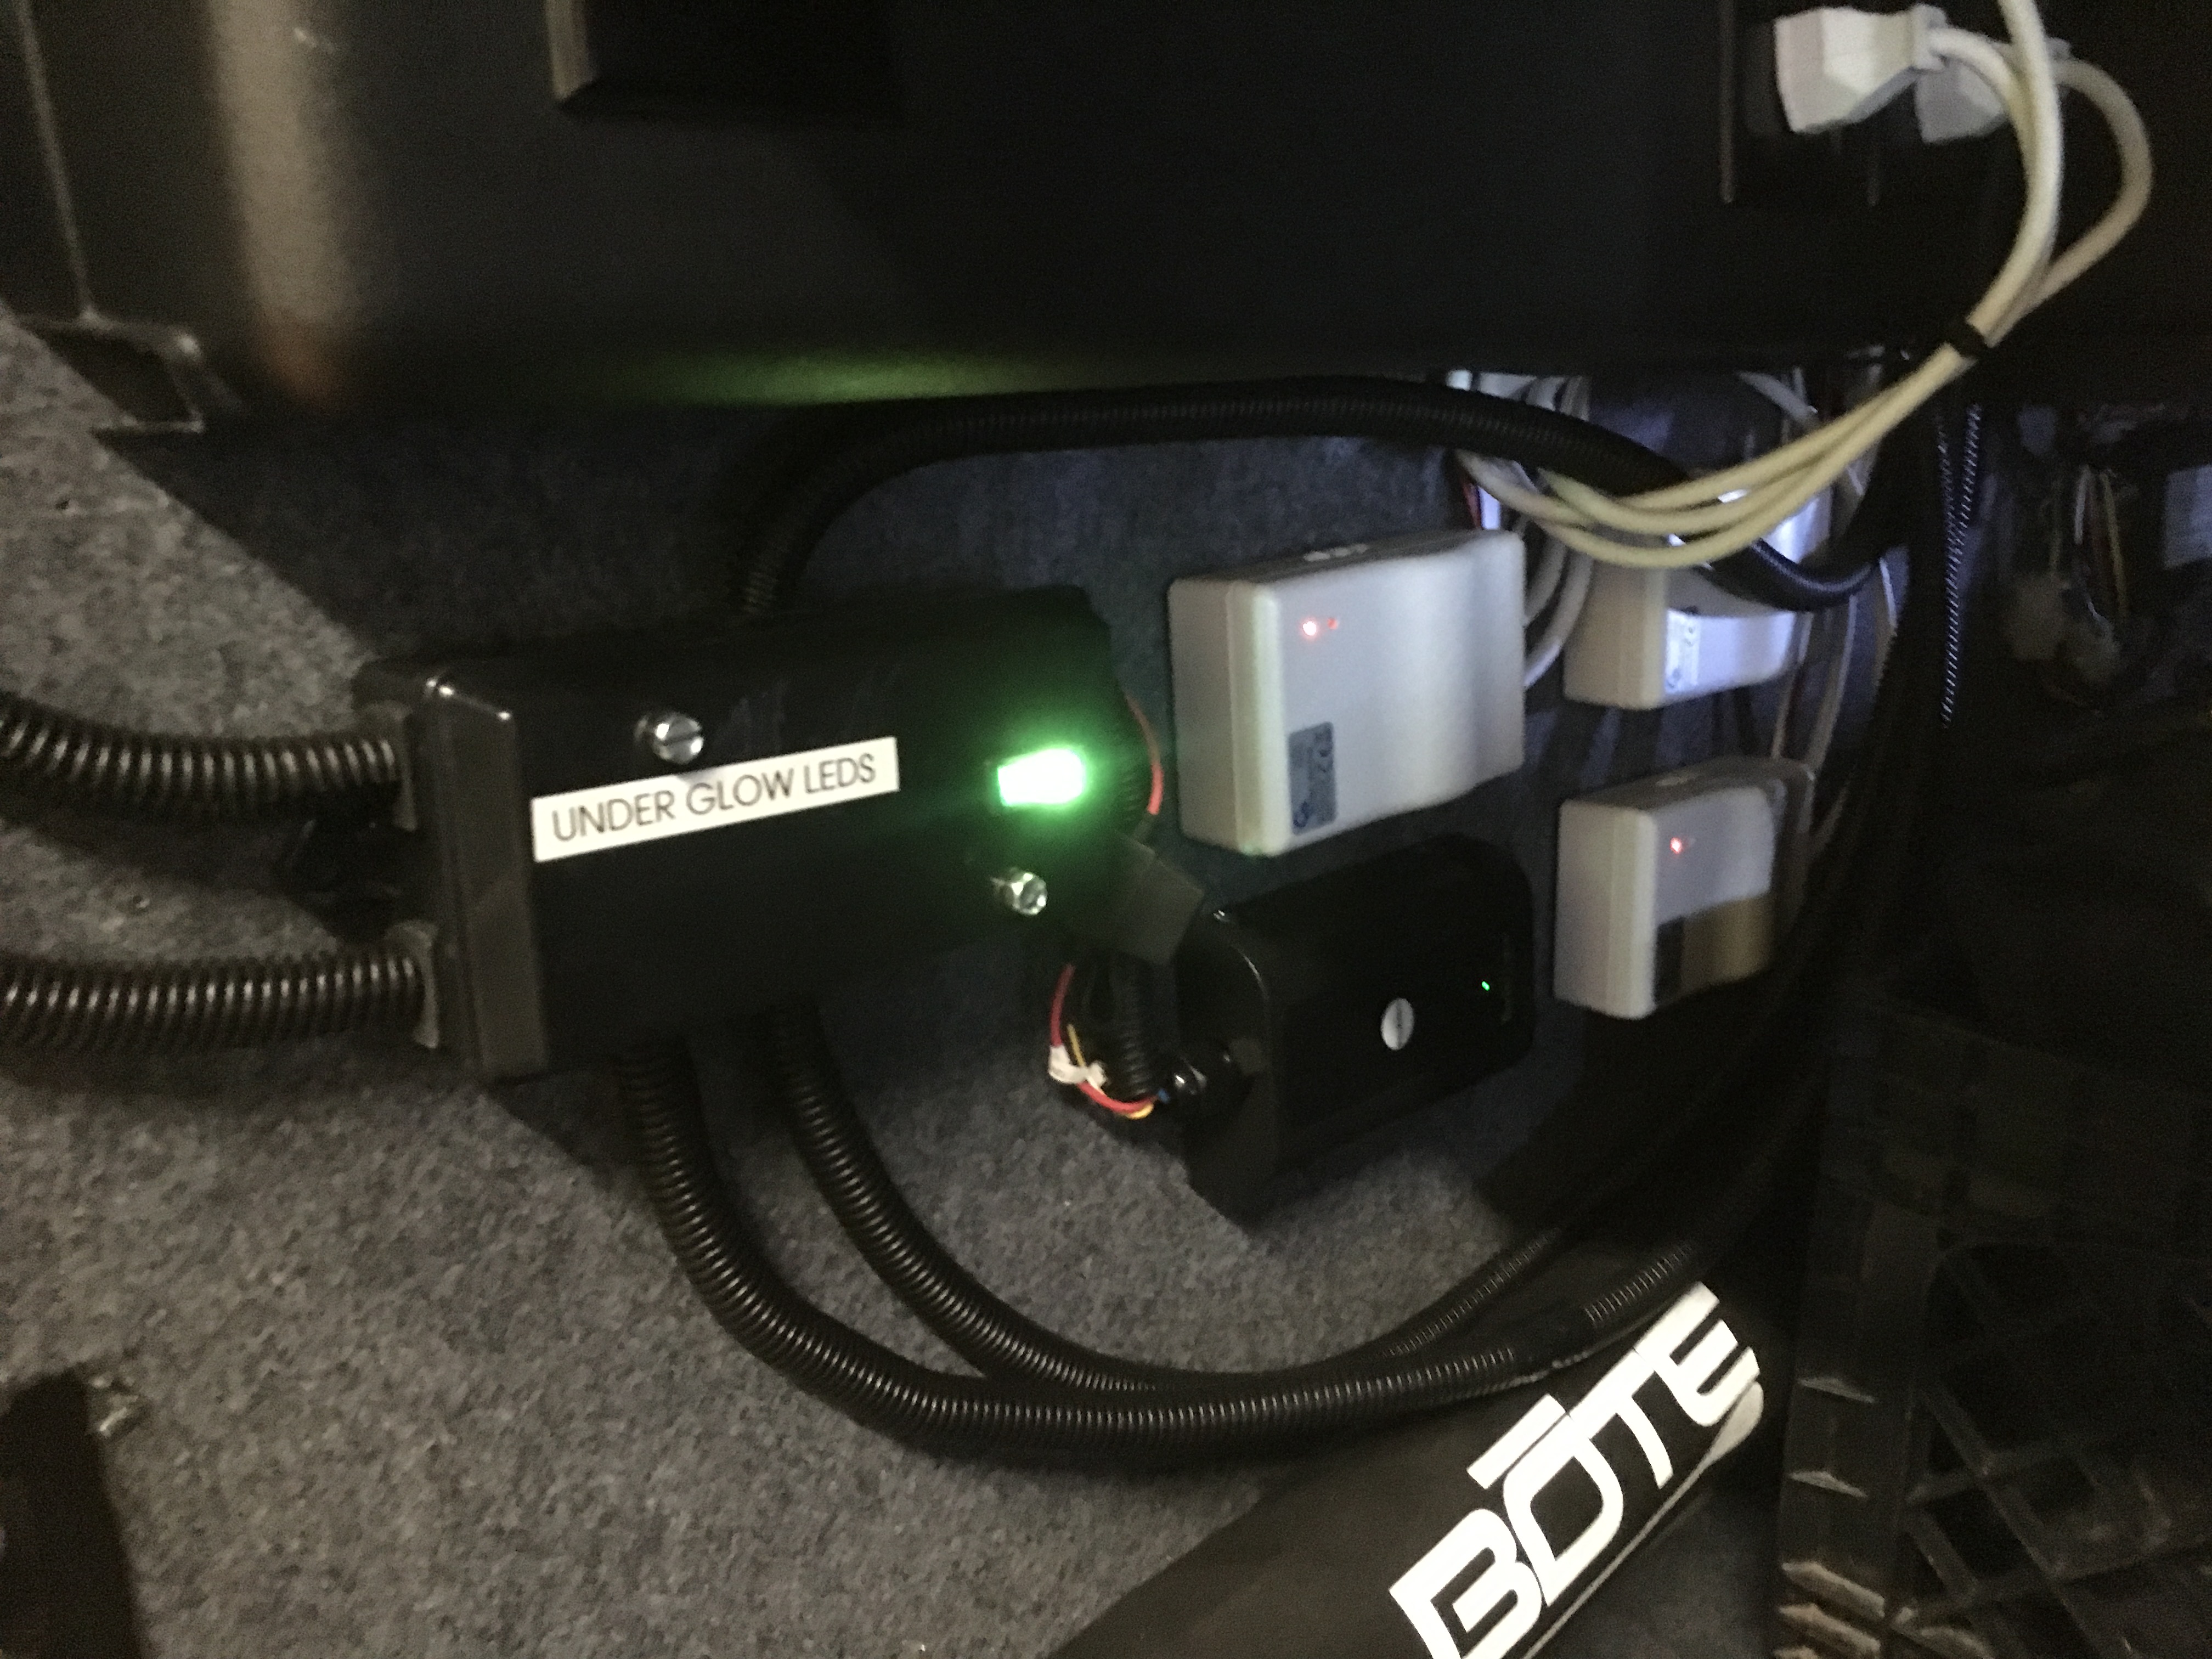
INSTALLED CENTRAL JUNCTION BOX AND SEPARATE RF LED CONTROLLER IN P-4 (PASSENGER SIDE) MIDSHIP BASEMENT COMPARTMENT. (all that is pending to complete installation is tethering of the 1/2" split loom with plastic clamp/fasteners to secure it neat and orderly inside the compartment).
INSTALLED LIGHTED ON/OFF ROCKER SWITCH TO SERVE AS MASTER POWER SWITCH IN ADDITION TO REMOTE CONTROL. MAIN POWER LEAD RUN TO SPARE 20-AMP FUSE TERMINAL ON 12V DC PANEL IN DRIVER' SIDE CORD REEL ELECTRICAL BAY
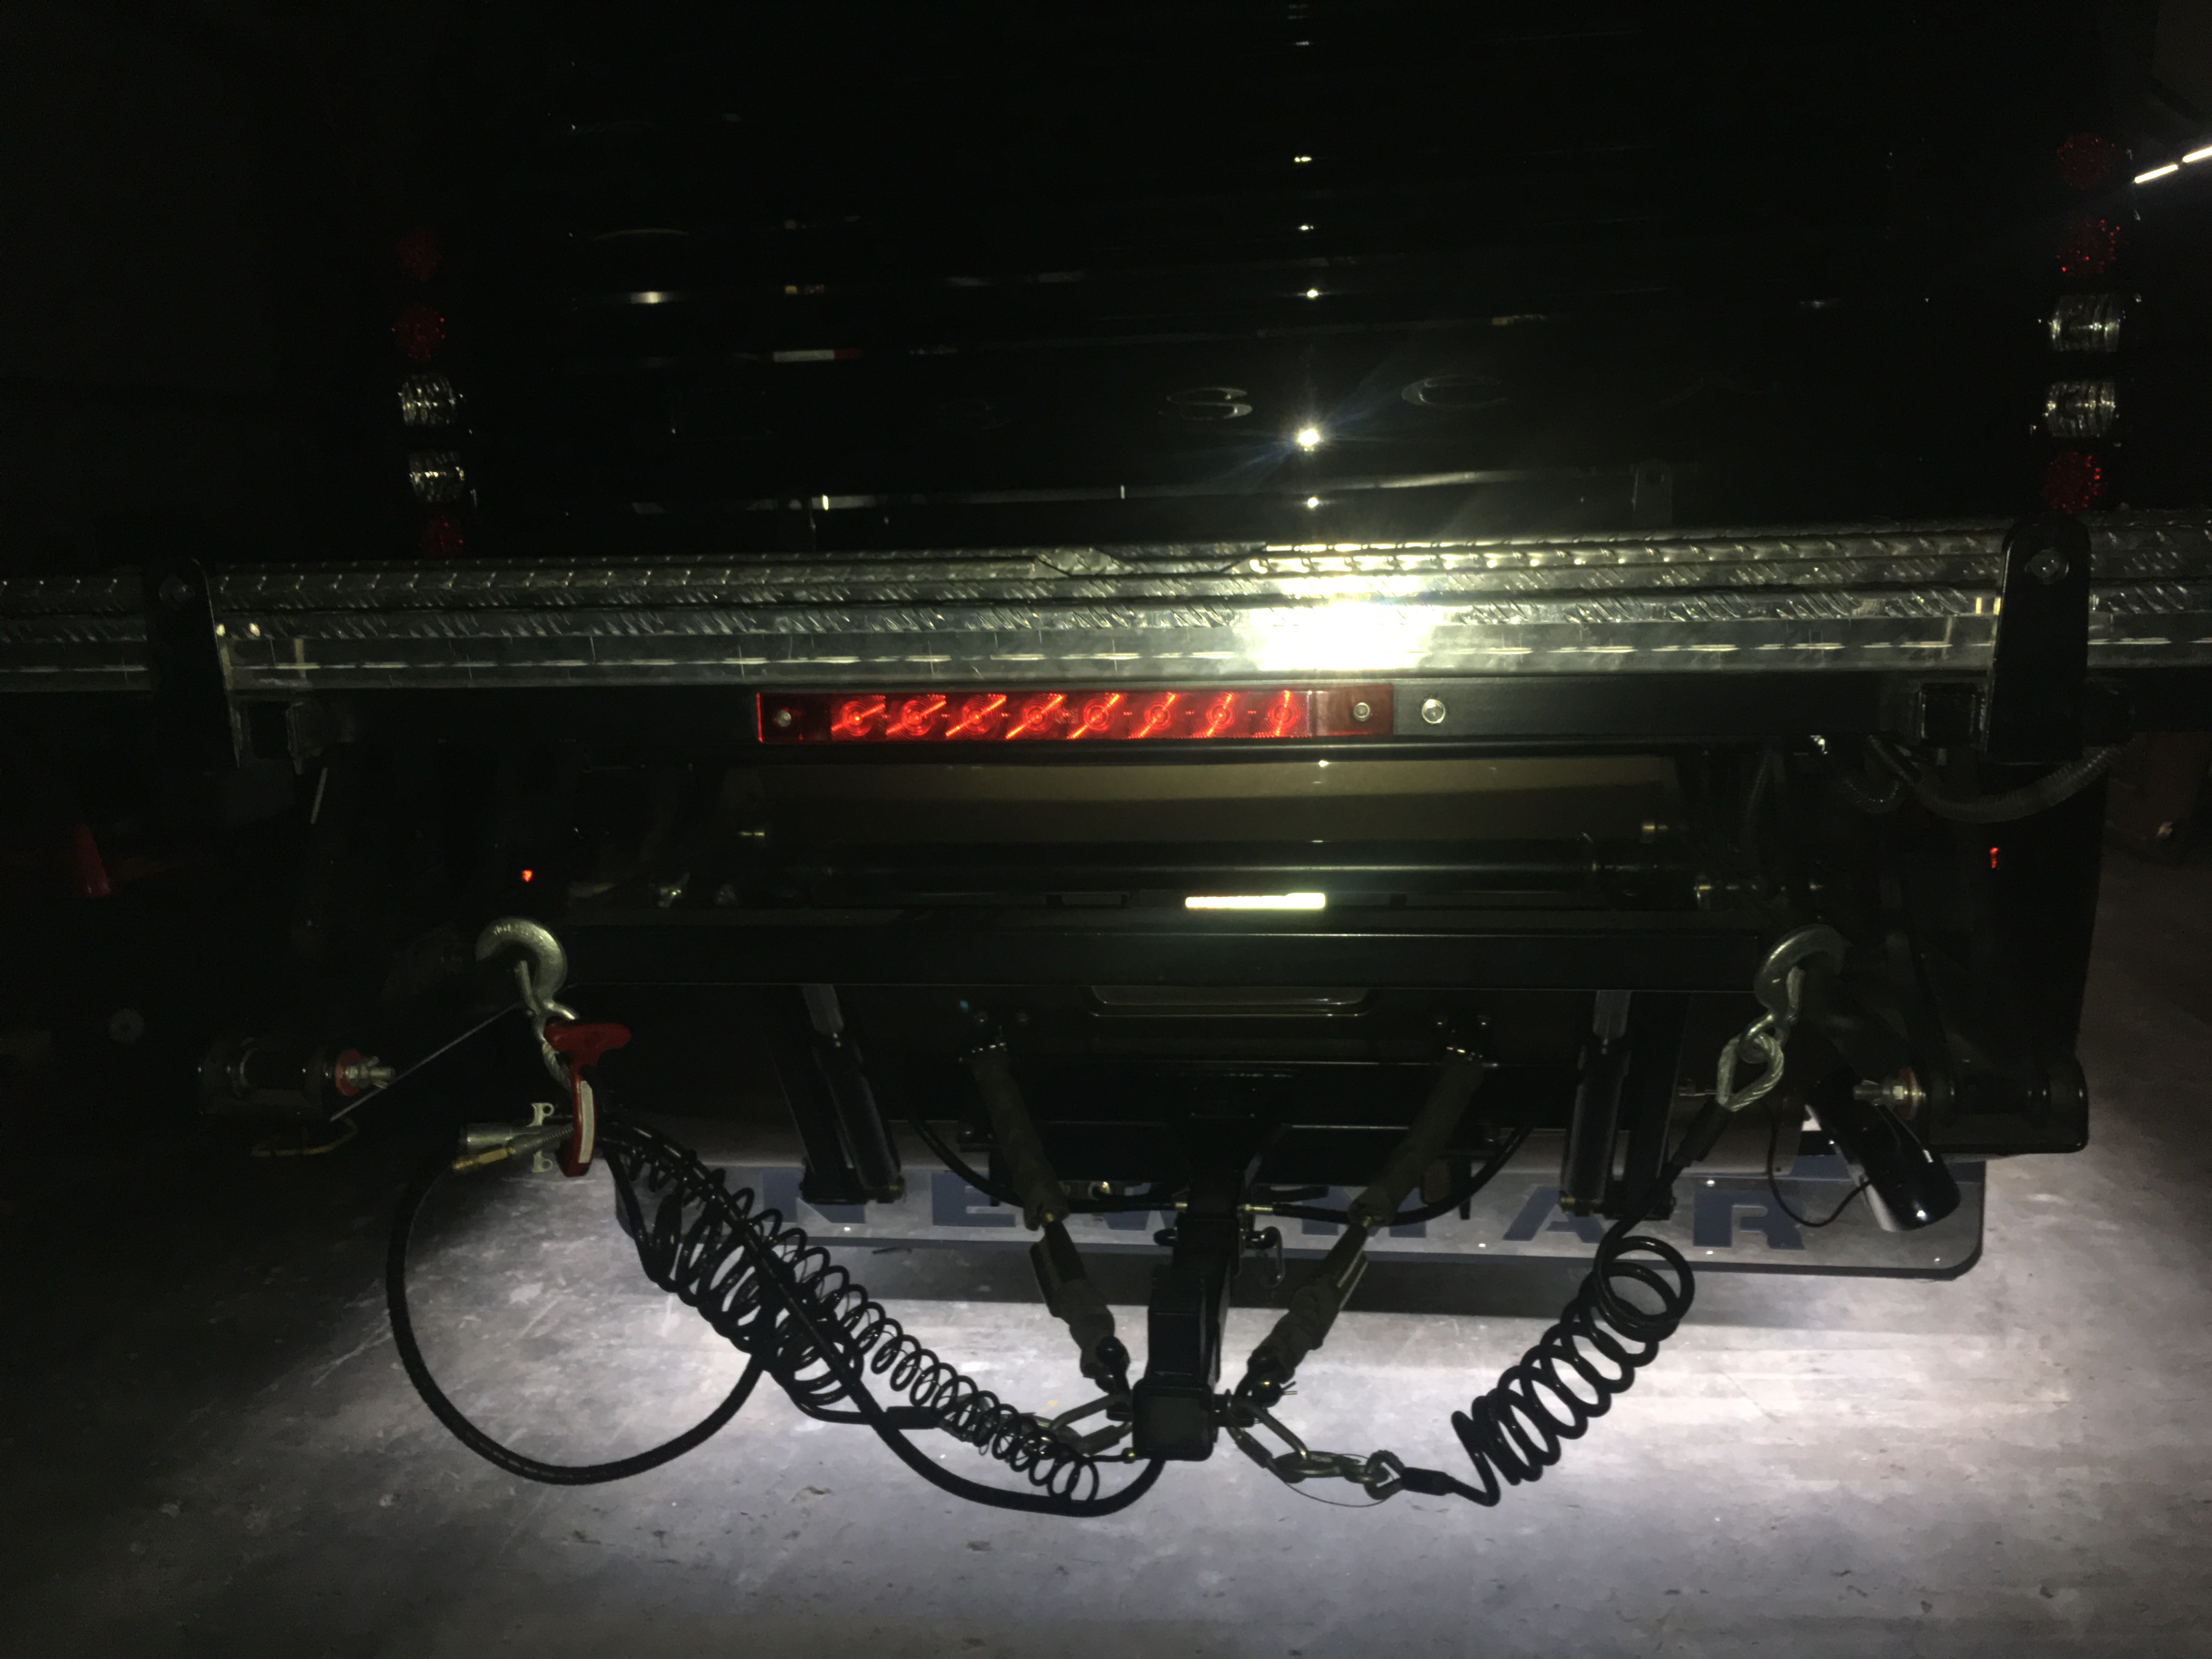
REAR POLE CONNECTOR MOUNT - TIES RR/LR AND REAR BUMPER/ROCK GUARD LED LIGHT STRIPS TOGETHER AND USING COMMON CHASSIS GROUND.
-
Happy to say at this phase of life we have no other commitments other than what can be accomplished using cell phones, face time and PCs (i.e. email). We do on occasion and should need arise, leave the coach at a good park or resort and may fly home for a short period then return back and continue. We did that last June from Baltimore when we left our coach at Cherry Hill Park and flew to Houston for 3 weeks before heading back and spending the 4th of July in DC. I have on occasion done some consulting but its more the type that allows me to remain at the personal location of my choosing (I don't do business travel anymore including overseas). Just grew tired of air travel having spent the better part of 30 years abroad.


Hard-Piping Thetford Sanicon Sewer Dump Line
in Modifications
Posted · Report reply
After thought. After completing my recent Thetford Sanicon hard piping project I realized there just wasn't enough light in the wet bay compartment so using a surplus section of LED lighting strip I mounted it and tied it into the existing small 12v dome light Newmar installs on the left wall near the door hinge. What a difference a little light makes! I now think I'll do the same up front in my generator slide compartment (where there is currently no lighting) as well as the engine compartment (only has 12v dome light now) and as well the chassis electrical basement compartment (LF forward of steer tire). My view (or lack of it) being one can never have too much light in these areas when its needed and as well, installing them are easy to do and make a huge difference...