


moonwink
-
Content Count
226 -
Joined
-
Last visited
Posts posted by moonwink
-
-
I haven't tried using sound deadening myself but many others have and a few have documented their efforts on YouTube:
https://www.youtube.com/results?search_query=class+A+rv+sound+deadening
Have a look at how they did it and be sure to get back here and post your results.
-
There's no cap but as delivered, mine was set to locally notify when I reached the limit it was set at. Like so many others, I changed that setting to a number large enough I'd never reach it. I don't have the instructions handy but it's been discussed several times on this forum.
I've been very happy with mine since I started using it about a year ago.
-
The end of the gear shift on my Aerostar fell off several years ago. I used the standard J-B Weld epoxy to put it back and haven't had any issues since. It sets in the sun everyday and is still solid as a rock. Couldn't hurt giving it a try. The important thing is to keep it immobile overnight while it hardens.
-
If you've got a ladder on the back, here's a solution that works well:
FMCA Coach Plate Ladder Brackets

I've got a gas powered MH and the grill was recessed behind the level of the fiberglass cap. I used a couple of pieces of PVC pipe as spacers with long screws to fasten the ovals securely to the grill.
-
I've used the NSA ReadyBrake for fully proportional brake control of my toweds for about 20 years. It's worked great! It's easy and quick to hook up and disconnect. I couldn't be happier. I used it with Blue Ox towbar but I'm seriously thinking about swapping things around and buying the combined towbar/ReadyBrake you're looking at. Either way, you can't go wrong. You won't find a less expensive fully proportional braking system anywhere.
I ran a two lead wire from the brakeswitch on my towed to an LED light on the dash so I know when the brakes are being applied. I see the latest design uses a switch in the ReadyBrake to simplify knowing when brakes are being applied. I still like getting that information from the towed vehicle though.
Disclaimer: I have no financial interest in NSA - just like their product.
-
The first thing I always do is make sure the cheapo vent covers have a good cover over them like the MaxxAire covers. All of the original covers I've seen are brittle from being in the sun. The last thing you want to do is step inside your MH after it's been in storage awhile to find the vent cover is gone and let the rain come in to destroy the bed or floor under. The covers are cheap insurance against disaster.
-
Copied from the 2018 Equinox Owner's manual
pages 358-359-360-361:Recreational Vehicle Towing
Recreational vehicle towing means towing the vehicle behind another vehicle – such as behind a motor home. The two most common types of recreational vehicle towing are known as dinghy towing and dolly towing. Dinghy towing is towing the vehicle with all four wheels on the ground. Dolly towing is towing the vehicle with two wheels on the ground and two wheels up on a device known as a dolly.Here are some important things to consider before recreational vehicle towing:
. The towing capacity of the towing vehicle. Be sure to read the tow vehicle manufacturer's recommendations.
. How far the vehicle will be towed. Some vehicles have restrictions on how far and how long they can tow.
. The proper towing equipment. See your dealer or trailering professional for additional advice and equipment recommendations.
. If the vehicle is ready to be towed. Just as preparing the vehicle for a long trip, make sure the vehicle is prepared to be towed.Dinghy Towing
Front-wheel-drive (1.5 L Gas FWD/1.6 L Diesel) and all-wheel-drive (1.6 L Diesel only) vehicles may be dinghy towed from the front. These vehicles can also be towed by placing them on a platform trailer with all four wheels off of the ground. All other engine/transmission combinations must be towed by platform trailer. Also see the information on dolly towing later in this section. For vehicles being dinghy towed, the vehicle should be run at the beginning of each day and at each
RV fuel stop for about five minutes. This will ensure proper lubrication of transmission components.Caution:
If the vehicle is towed without performing each of the steps listed under “Dinghy Towing,” the automatic transmission and AWD system could be damaged. Be sure to follow all steps of the dinghy towing procedure prior to and after towing the vehicle.
Caution:
If 105 km/h (65 mph) is exceeded while towing the vehicle, it could be damaged. Never exceed 105 km/h (65 mph) while towing the vehicle.Once the destination is reached:
1. Set the parking brake.
2. Shift the transmission to P (Park).
3. Turn the vehicle off.
4. Start the engine and let it idle for more than three minutes before driving the vehicle.Caution
Do not tow a vehicle with the front drive wheels on the ground if one of the front tires is a compact spare tire. Towing with two different tire sizes on the front of the vehicle can cause severe damage to the transmission.Caution
Use of a shield mounted in front of the vehicle grille could restrict airflow and cause damage to the transmission. The repairs would not be covered by the vehicle warranty. If using a shield, only use one that attaches to thetowing vehicle.Dolly Towing (All-Wheel-Drive Vehicles)
All-wheel-drive vehicles cannot be towed with two wheels on the ground. To properly tow these vehicles, they should be placed on a platform trailer with all four wheels off of the ground.Dolly Towing (Front-Wheel-Drive Vehicles)
To tow the vehicle from the front with the rear wheels on the ground:
1. Put the front wheels on a dolly.
2. Move the shift lever to P (Park).
3. Set the parking brake.
4. Secure the vehicle to the dolly.
5. Follow the dolly manufacturer's instructions for preparing the vehicle and dolly for towing.
6. Release the parking brake.
Towing the Vehicle from the Rear
Don't tow from the rear!Caution
Towing the vehicle from the rear could damage it. Also, repairs would not be covered by the vehicle warranty. Never have the vehicle towed from the rear. -
See if you can find a copy of the owner's manual. Next to calling Kia, it's the best source for information and RV towing capabilities. It should have a section with instructions on how to tow it if it can be towed.
-
-
As a "follow-up" to what I posted above I've found this information about Mac McCoy:
https://www.rvnetwork.com/topic/130172-mac-the-fire-guy/?do=findComment&comment=986380QuoteQuote By: Ed Dennis on rvnetwork,com Posted May 24, 2019
Our friends, Mac & Annie McCoy are no longer giving fire demonstrations. Mac had some serious cardiac problems and retired over a year ago. He sold his business and is no longer involved. He is a good guy and deserves his rest. Annie is still selling her clothing creations at local fairs. Similar updated products and popular Fire Safety Seminars are available from An RVer's Friend at major RV rallies.
Mac's ladder shown in his YouTube video isn't available anymore through him but you can find one to modify at Amazon: Search for "rv escape ladder"
Here's a link back to an FMCA Family Living magazine article from 2013: RV Escape Ladder
"By adapting a store bought escape ladder to fit the size of the motorhome's windowsill, the author created a safe and sturdy ladder for anyone who may need to evacuate through the emergency exit window" -
"Mac the Fire Guy" used to put on some VERY GOOD seminars at the FMCA International Rallies. Take a few minutes to watch this YouTube video he made about RV safety. At the 11 minute mark, you shows the ladder he had made for exactly the problem the OP describes. One thing he always recommends about exiting out that window is to grab the blankets off the bed and put them over the bottom window sill to make it easier on you as you exit.
Updated RV Safety | Mac The Fire Guy
Here's another VERY GOOD video by Mac The Fire Guy:
-
How does any of this talk about residential refrigerators help the OP with an issue with Error E13?
If you've got deep pockets, fine, go ahead and replace the refrigerator and hopefully you're good at redoing the woodwork around it. I'm happy for you. I've been RVing over 40 years. Never had any problems with my absorption refrigerators because I kept them level when in use. I didn't need a battery bank and inverter to operate them or solar panels to recharge the batteries. I've been very happy with the refrigerator that came with my RVs and will continue using them.
Now let's get back on topic.
-
I'll agree that being level is VERY IMPORTANT for the proper operation of absorption refrigerators and can't be stressed enough but it's not related to the cause of the E13 error the OP asked about. This error points to problems with the heating element in the drain tube/tray heater.
-
You might be able to use it with a MagicJack Internet phone but it is nothing but a WiFi hotspot. For sure you could use it for Zoom calls, Skype and FaceTime.
-
Allstarr, thanks for the links. Lots of good information. It shows the FMCA is as good or better than the other options available.
-
Shared for others:
From Section 11.2 error codes - (pg 34)"Er 13": (Defrost heater for the drain tube/tray heater is faulty)The fault is detected as an "open circuit" to the heating element in the drain tube/tray heater.Possible faults:•Loose wires in the harness connected to (P5) on the lower control board.•Wrong or loose connections in the inter-connection box inside the freezer compartment.•Blown overheating protection fuse in the heating element (heating element has to be replaced).•Broken element (heating element has to be replaced)•See section 10.7 for testing of the heater.10.7 drain tube/tray defrost Heating element (pg 32 - pictures didn't copy over - see https://www.manualslib.com/manual/1587861/Dometic-Nda1402.html?page=32#manual to view the pictures)
The drain tube/tray heater is placed at the bottom of the plastic cover, housing the freezer cooling plate. This heater is on at all times during the defrosting of the freezer and fresh food compartments and will remain on for short periods of time at the end of defrosting to help assure water does not refreeze in the drain line. To check the resistance of the heater, remove the cover from the main control board on the back of the refrigerator. Remove the P5 harness cable from lower PC board. Measure the resistance between pin 5 (white wire) and pin 2 (yellow wire). The resistance should be 13.3 Ohm's +/- 10%. The resistance can also be checked at the inter-connection box along the back wall behind the ice maker assembly. The refrigerator should be defrosted prior to this test to avoid erroneous readings. Frost/Ice could conduct current hiding an open circuit in the heater. A faulty heater may display an error code on the front display panel. See section 11 for trouble shooting error codes.
In some cases during the install or replacement of the drain tube/tray heater, the portion that extends into the drain tube may become folded over or bunched up. When the heater is activated, this may cause a short and cause the heater to become open. A faulty heater may display an error code on the front display panel. See section 11 for trouble shooting codes.
Another test would be to check the amp draw. A simple method is to remove the wires from the thermo fuse and place a meter inline. Enter the service mode, and proceed to test #9. The amp draw should be .9 +/- 10%.
note: The interior light must be off when performing this test as to avoid a false value of the actual amp draw of the heater.
-
The "bra" is a pain for sure. If you put it on a dirty car just once it will be full of abrasives for life and grind into your paint.
I use the Protect-A-Tow and like it for the easy/quick on and off plus it rolls up and stores in a small bag.Make sure your mudflap clears the ground the recommended 4 to 5 inches or it will kick-up rocks and anything else you may drive over right at your towed.
-
If we're talking about an RV absorption refrigerator, the heating elements can develop an internal short to ground that trips the GFCI. They're hard to test because after they cool, the short vanishes. The heating elements aren't too expensive (if ordered online) or hard to change (YouTube). Replacing it would be worth trying. If it's a 1200 Norcold, it has two elements.
-
The first question I always asked when troubleshooting is "did it ever work?" If it did work at one time, what has changed?
-
GFCI are not circuit breakers and don't monitor the amount of electricity going through them. They monitor the power going through the "hot" wire and make sure the power on the "neutral" wire matches it. Any imbalance means there's a problem and it trips. The leakage could be to the ground wire or to another source of ground. It's there for your safety - not overloads.
-
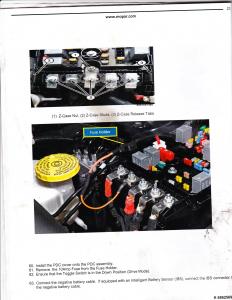
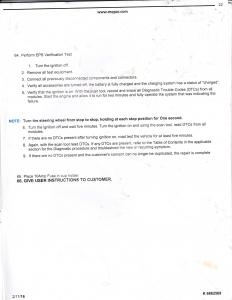
https://community.fmca.com/topic/8903-important-towing-information-2014-2016-jeep-cherokee/page/2/
On page 6 of the thread linked to above are some interesting replies by John Johnson - associate editor at Family Motor Coaching magazine. Not sure how dated they may be but still very interesting.
QuoteOn 1/22/2016 at 9:18 AM, FMCANationalOffice said:This is John Johnston, associate editor at Family Motor Coaching magazine. I contacted an official at Fiat Chrysler Automobiles (FCA) about the above questions. Apparently there was an internal misunderstanding at FCA regarding when the Jeep Customer Assistance Center would start taking questions about the wobble issue. But that has been straightened out, according to the FCA spokesman, and FCA product specialists are now available to take questions at (877) 426-5337. (877-IAMJEEP). As for what Jeep Cherokee owners are supposed to do until the modification is made, this is the Fiat Chrysler response: "All owners will receive updated instructions starting next month. These instructions supersede any previously communicated information -- including that which is currently in customer hands. FCA US apologizes for any inconvenience." I asked for clarification on when next month the updated instructions will be available. The FCA spokesman's response: Late February. "But be assured our supplier is indeed tooling up." If anyone calls the Jeep Customer Assistance Center about the wobble issue and finds that the FCA rep doesn't know what you're talking about, let me know, either by posting here or emailing me at jjohnston@fmca.com.
QuoteOn 1/20/2016 at 1:33 PM, FMCANationalOffice said:Fiat Chrysler today (January 20, 2016) released the following information exclusively to Family Motor Coaching magazine.
Fiat Chrysler Automobiles US LLC (FCA) has announced plans for resolving a problem that sometimes occurs when 2014-16 Jeep Cherokees are towed four wheels down behind a motorhome.
FCA released a statement in response to inquiries by Family Motor Coaching magazine and concerns of a number of Jeep owners who reported problems when flat towing their Cherokees. The owners reported that the vehicle sometimes wobbles significantly, raising safety concerns. The wobble reportedly has occurred at slow speeds and at highway speeds, and has happened with a variety of motorhomes and towing systems. The only way to stop the wobble, owners have said, is to bring the vehicle to a complete stop.
The FCA statement said: “Under certain operating conditions, such as traveling excessively bumpy or poorly maintained roads, the flat-towed vehicle may not consistently track in line with the tow vehicle.” The cause, according to the statement: “The vehicle’s Electronic Power Steering (EPS) system is inactive while the vehicle is being flat-towed with the ignition in the ‘off’ position. Accordingly, the vehicle does not benefit from the system’s function.”
A Jeep official said the company knows of several dozen Cherokee owners who have experienced the problem. For those owners, FCA will “provide a complimentary jumper wire harness and switch to ensure the vehicle’s EPS system has power to function while it is being flat-towed. These components have been engineered and validated by FCA US LLC and will be made available to all customers through MOPAR, as early as January 29. In addition, all Cherokee owners will be contacted directly by FCA US and provided with updated instructions for flat-towing. These instructions supersede all previous instructions. Also, the vehicle’s online owners manual will be updated.”
Family Motor Coaching brought the problem to the attention of Fiat Chrysler in September 2015 after an FMCA member contacted the magazine and provided a link to a video showing a Cherokee wobbling as it was being towed behind a motorhome. FCA assigned engineers and technicians to investigate and resolve the problem.
For more information, Cherokee owners can call the Jeep Customer Assistance Center at (877) 426-5337. -
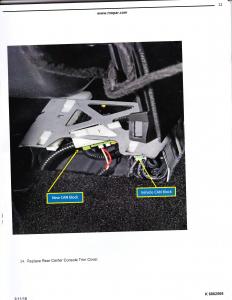
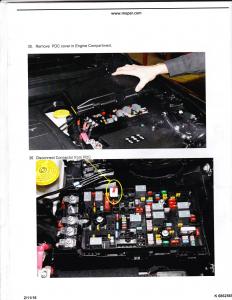
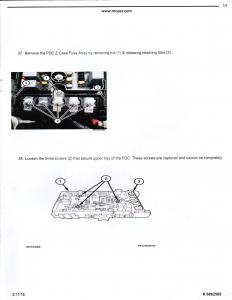
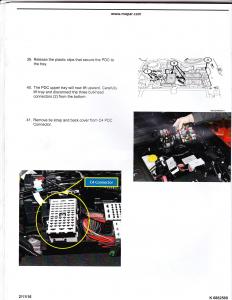
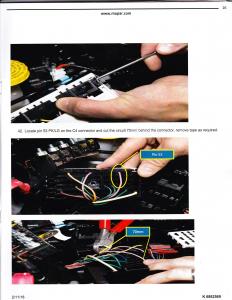
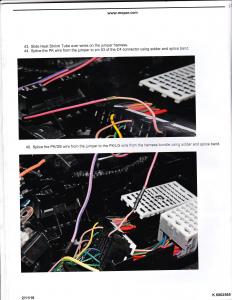
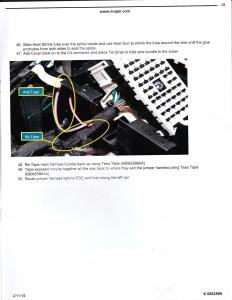
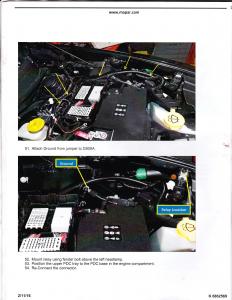
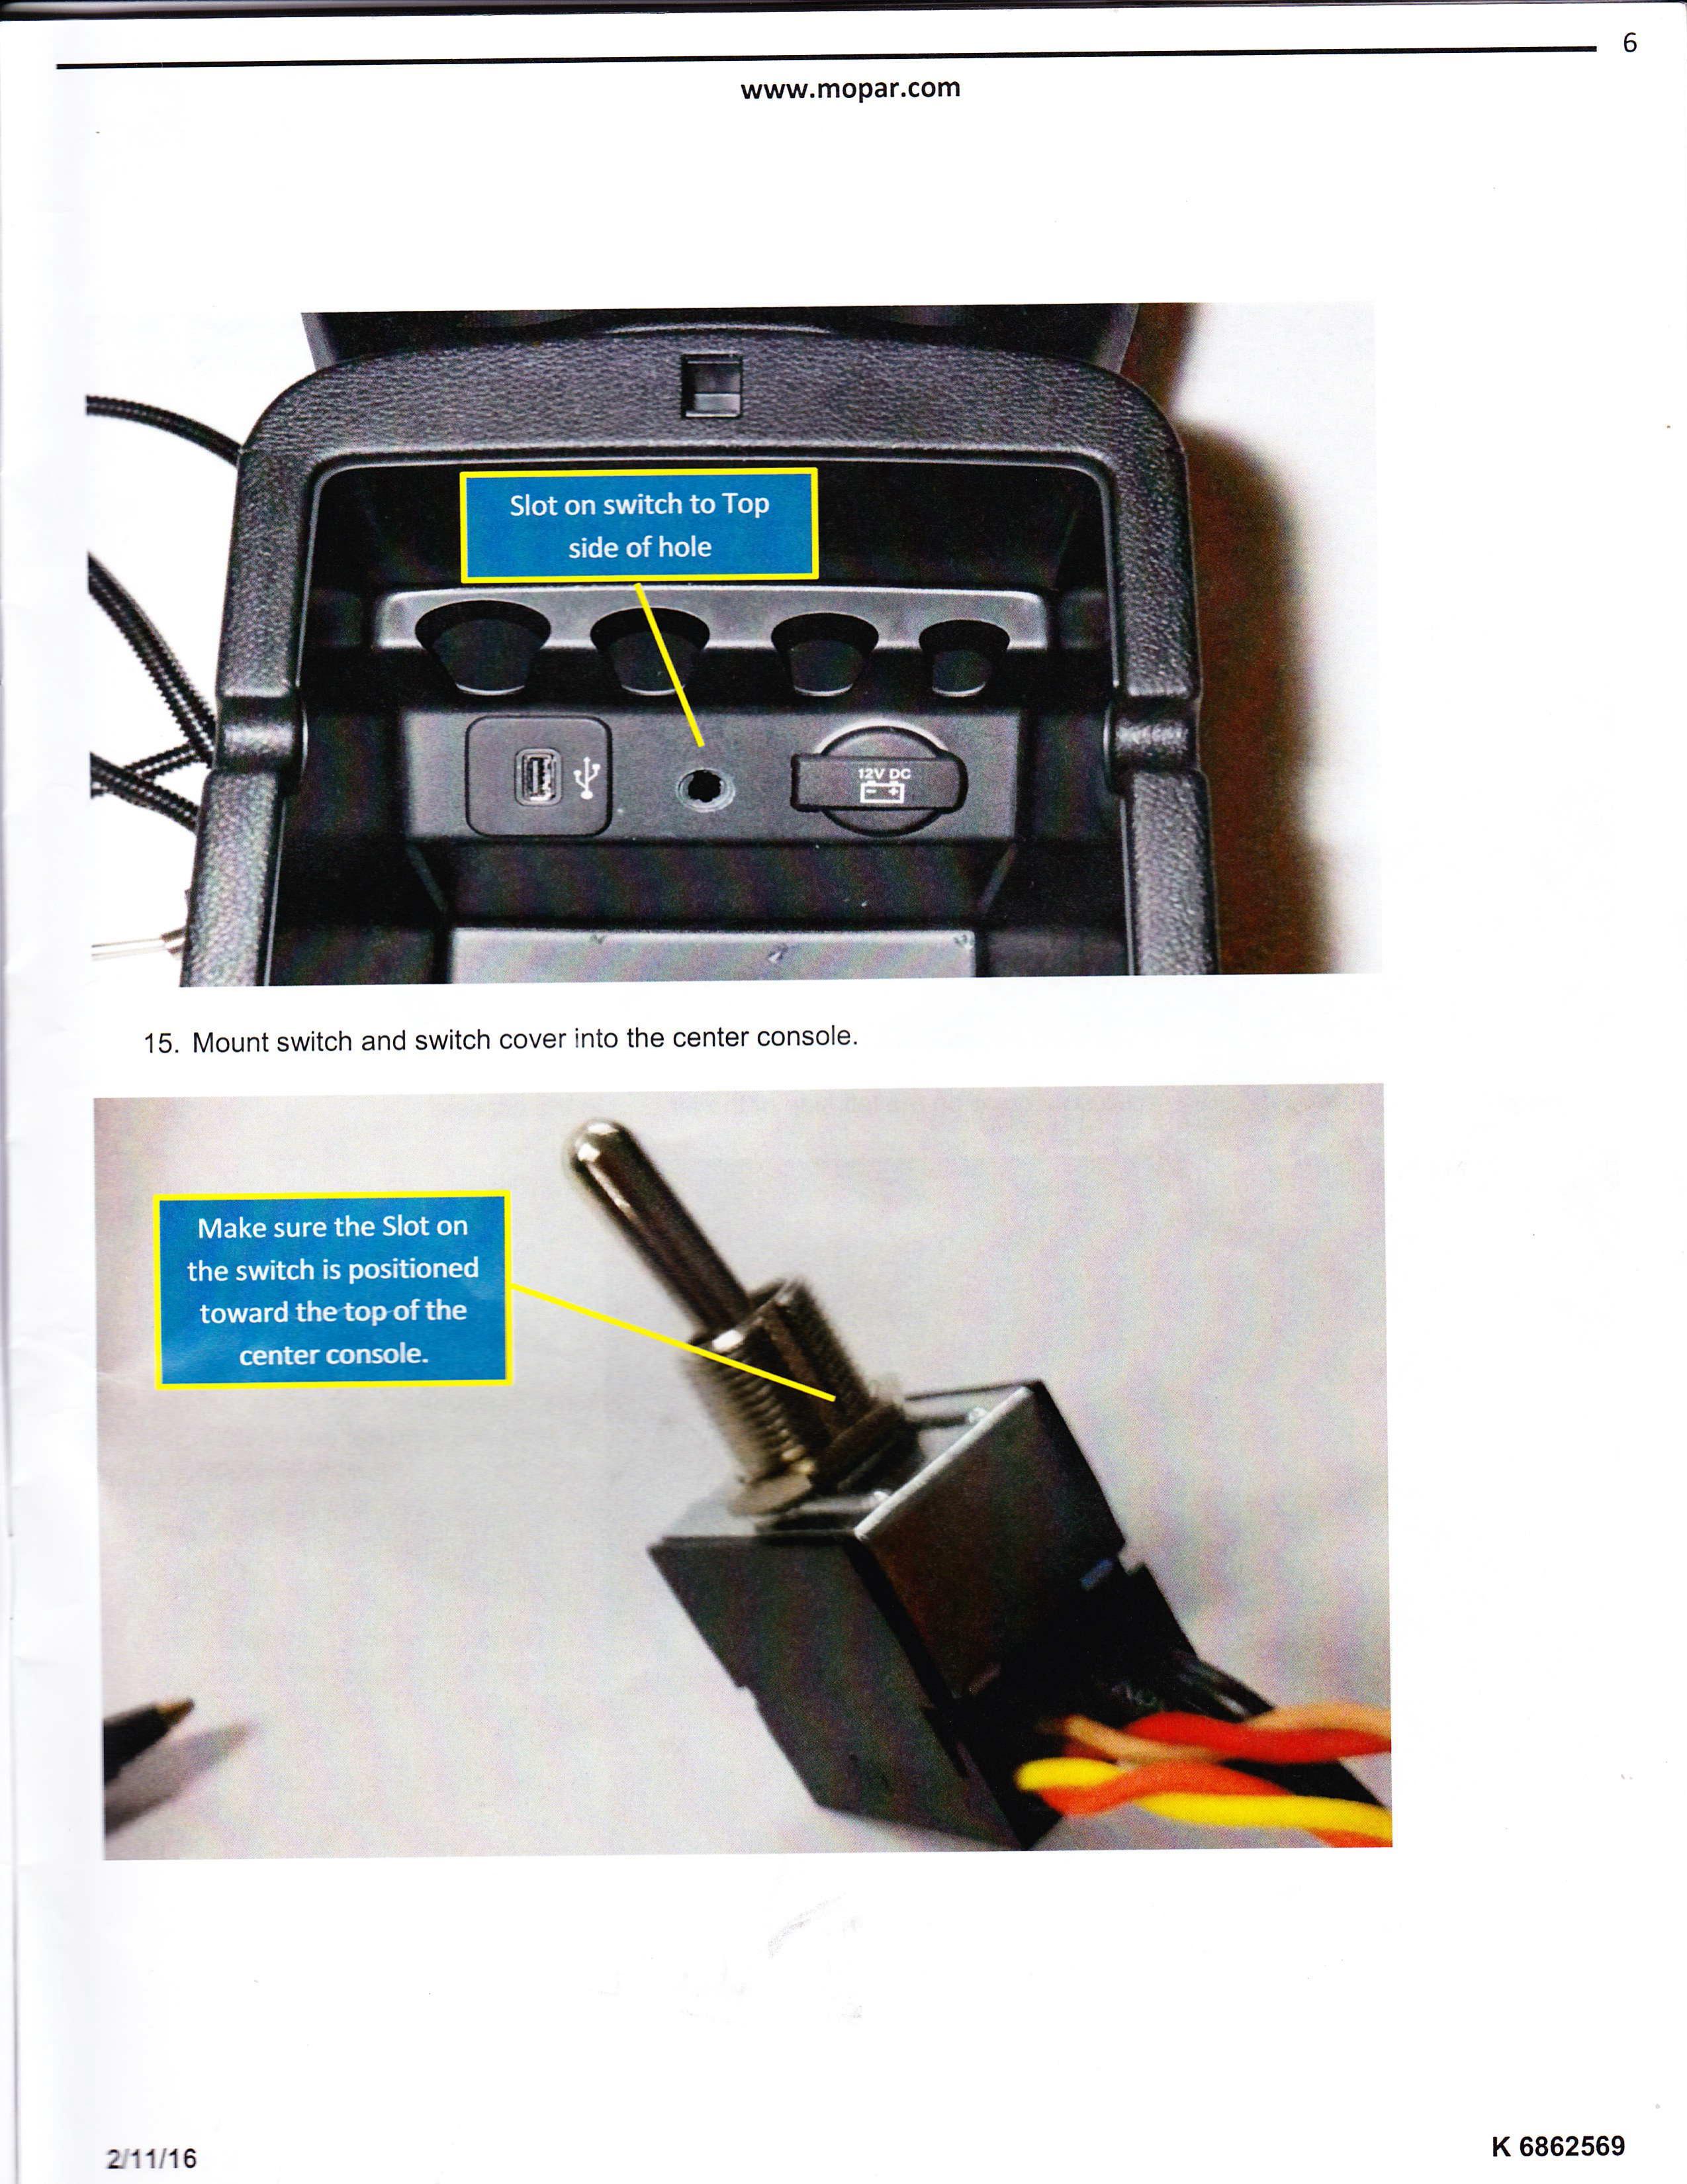
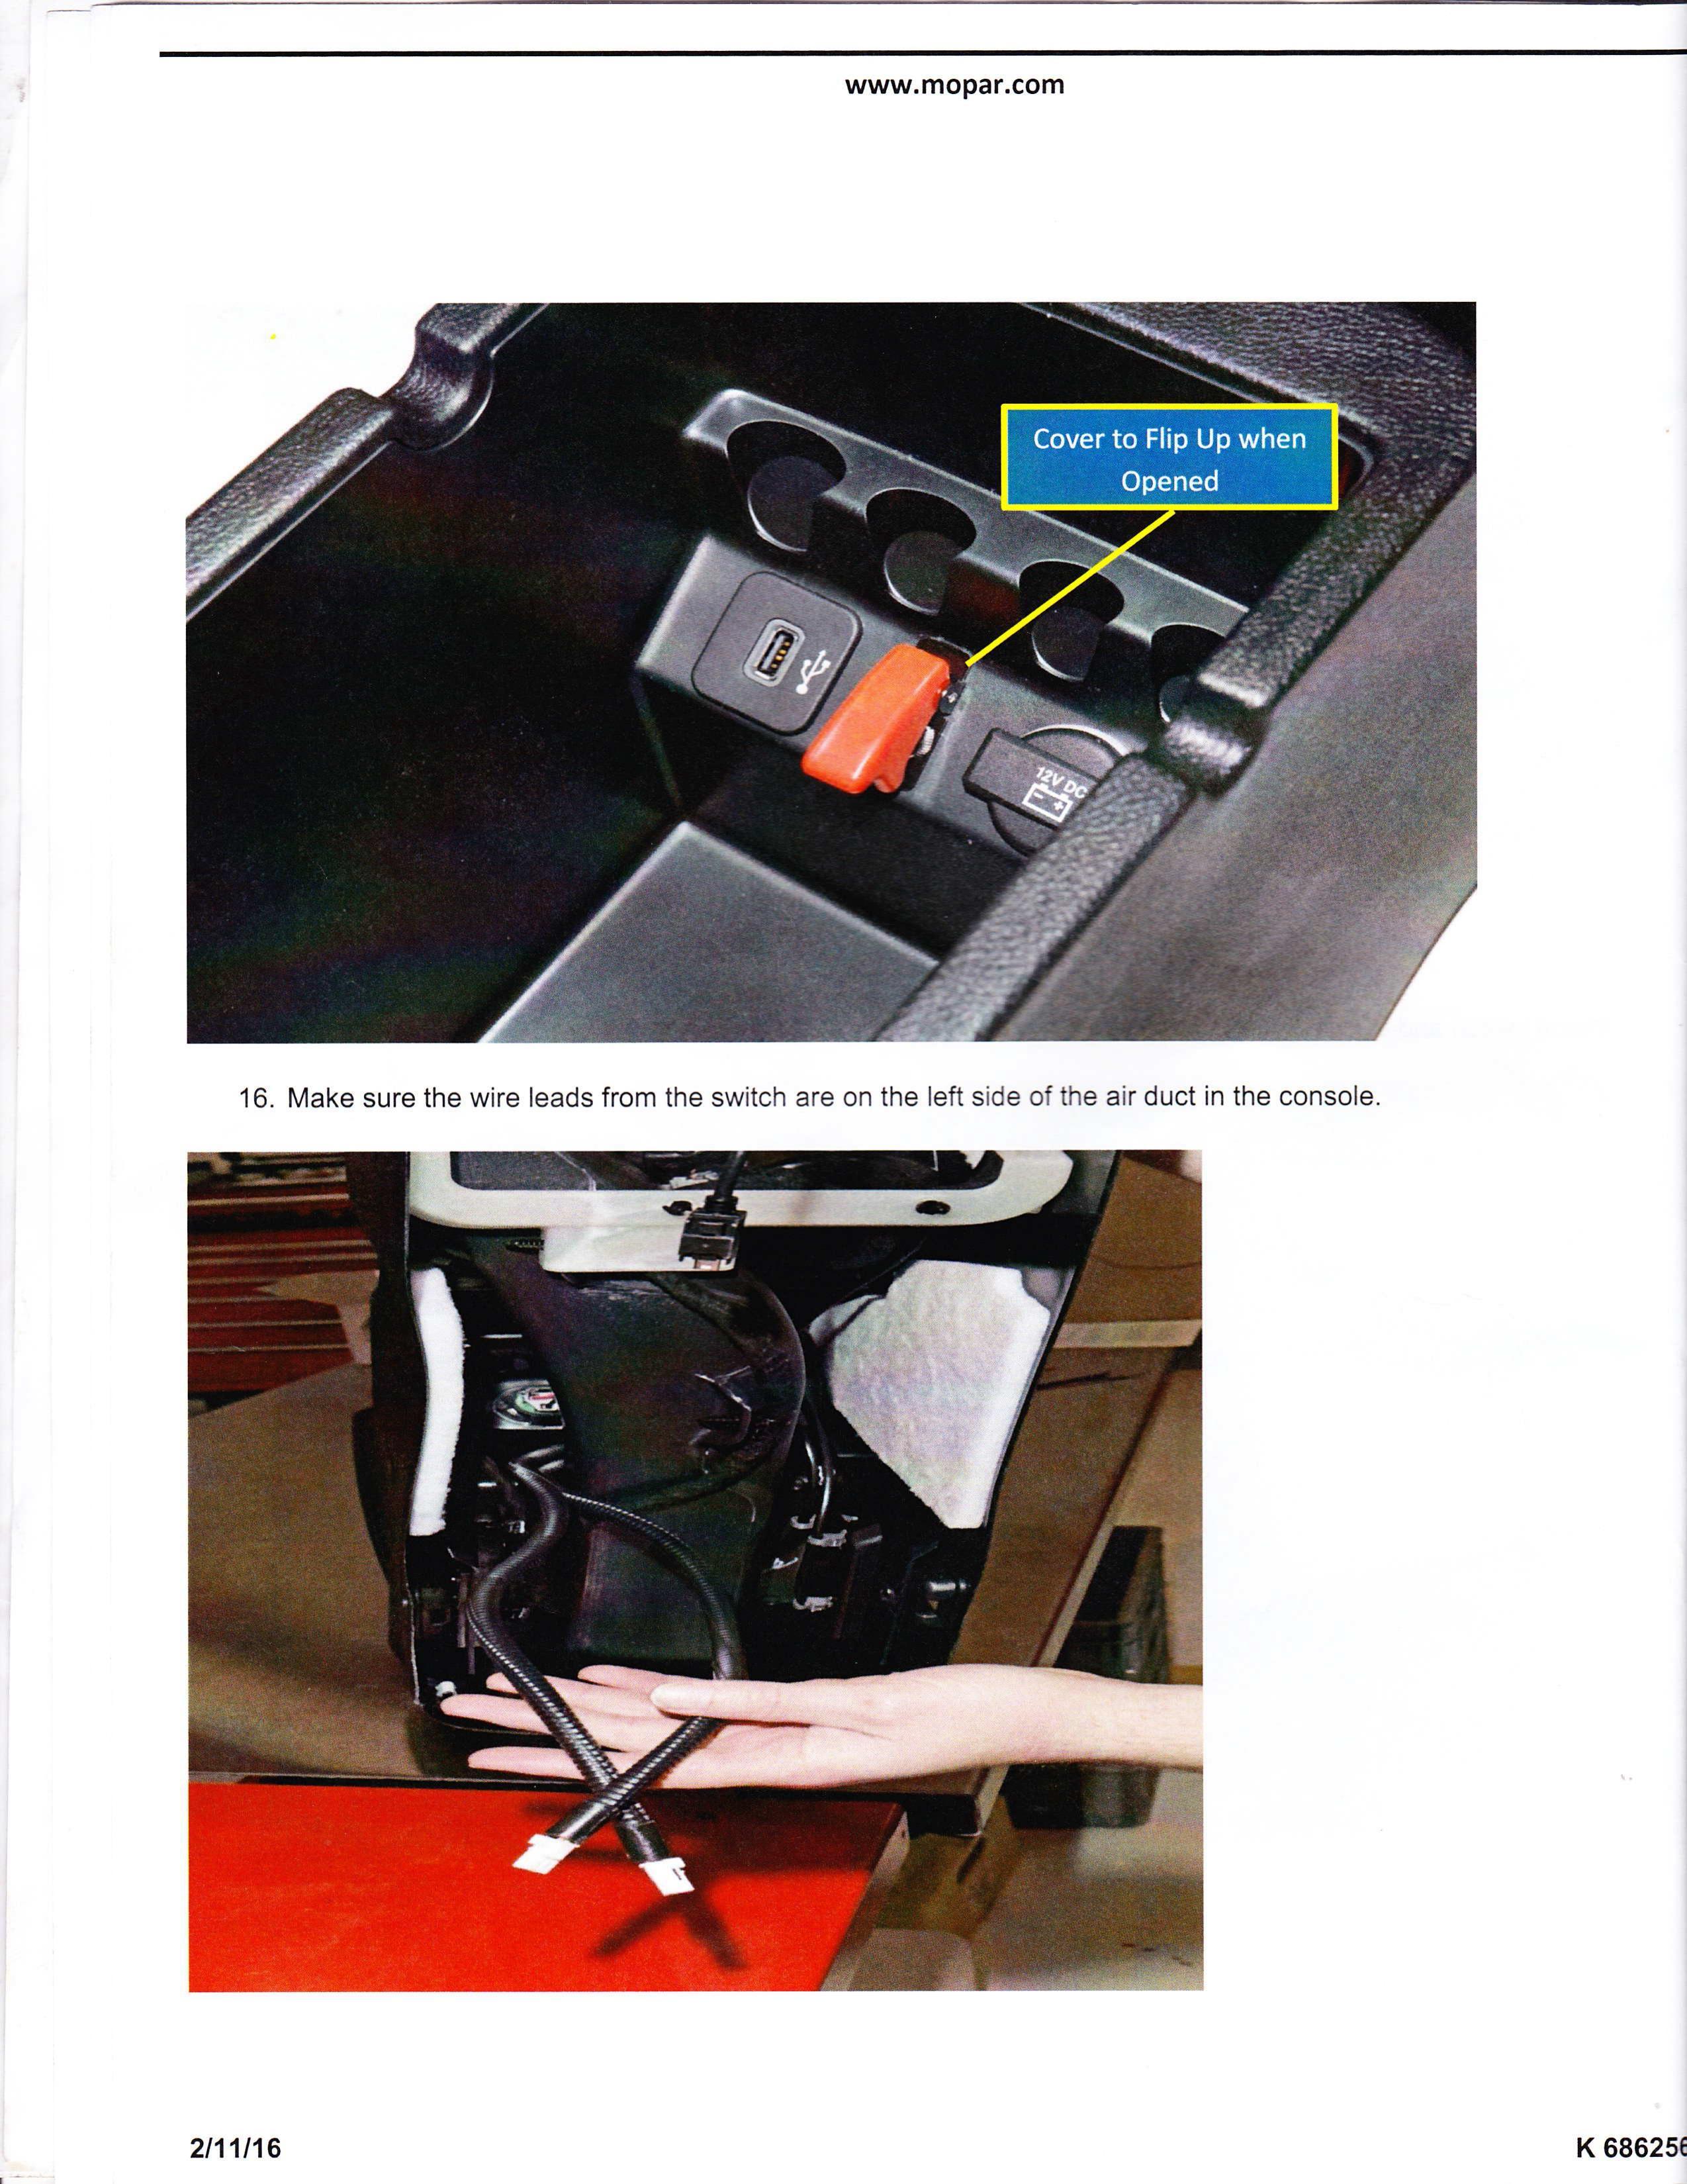
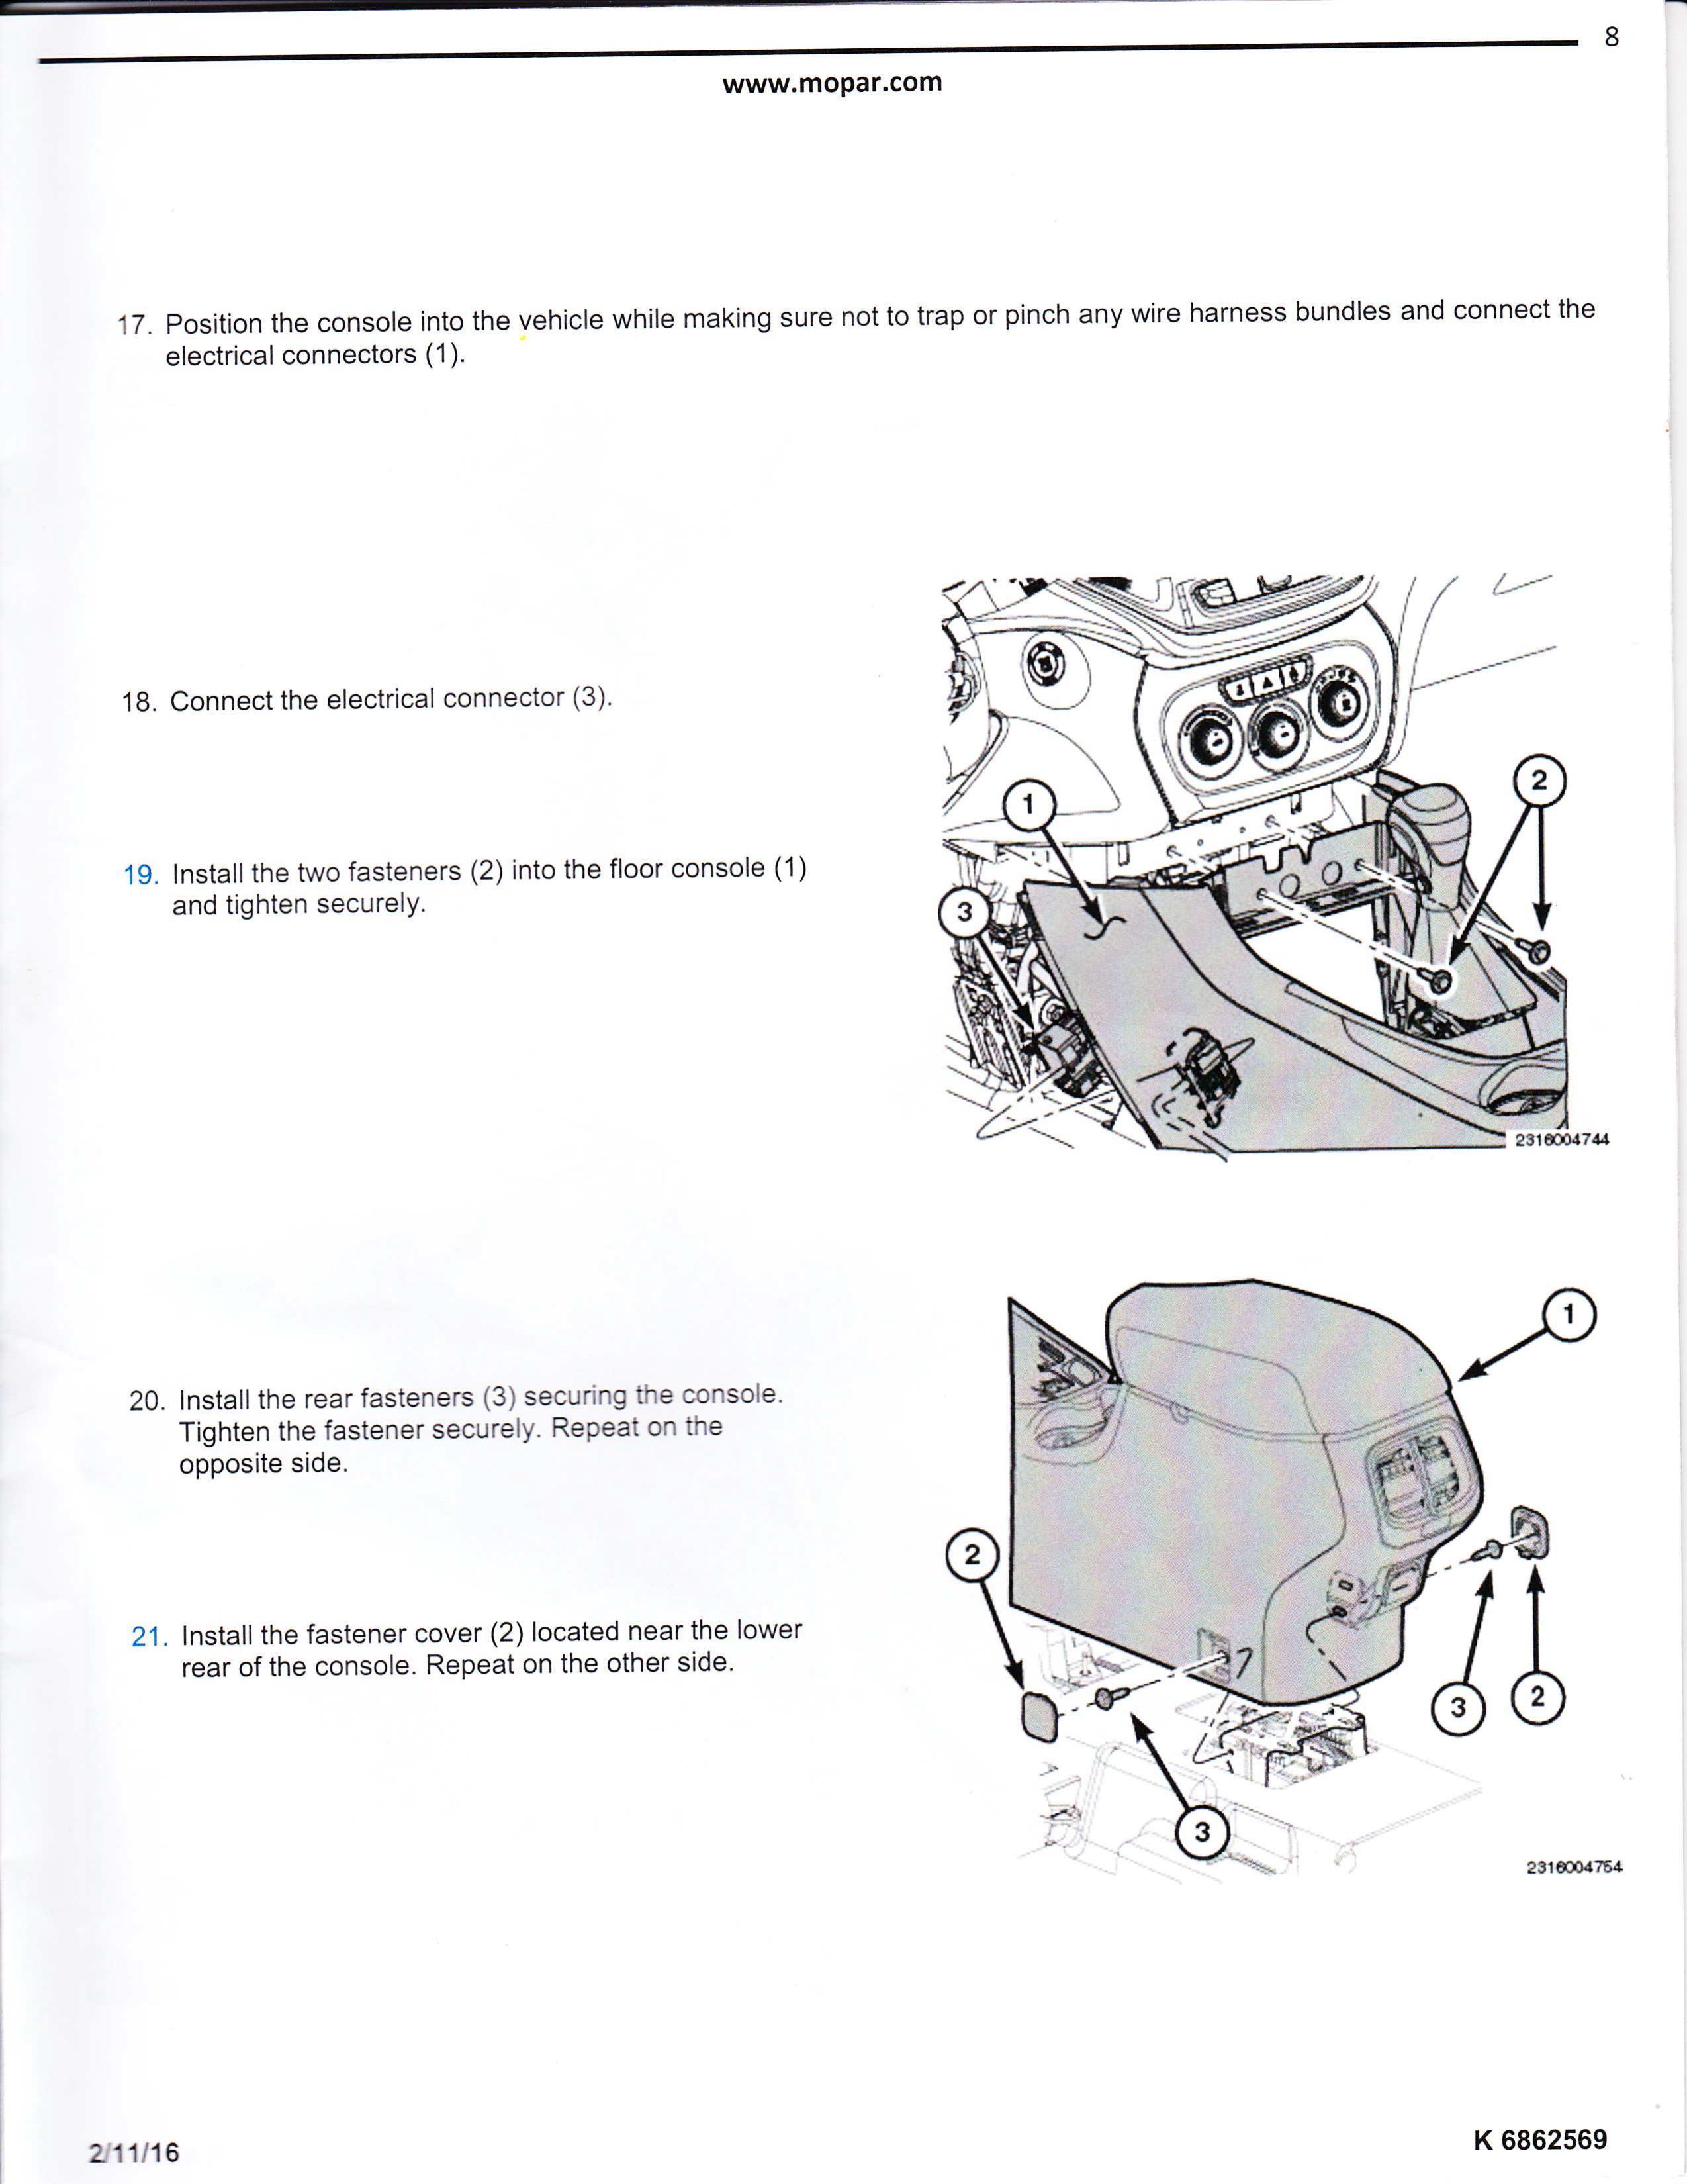
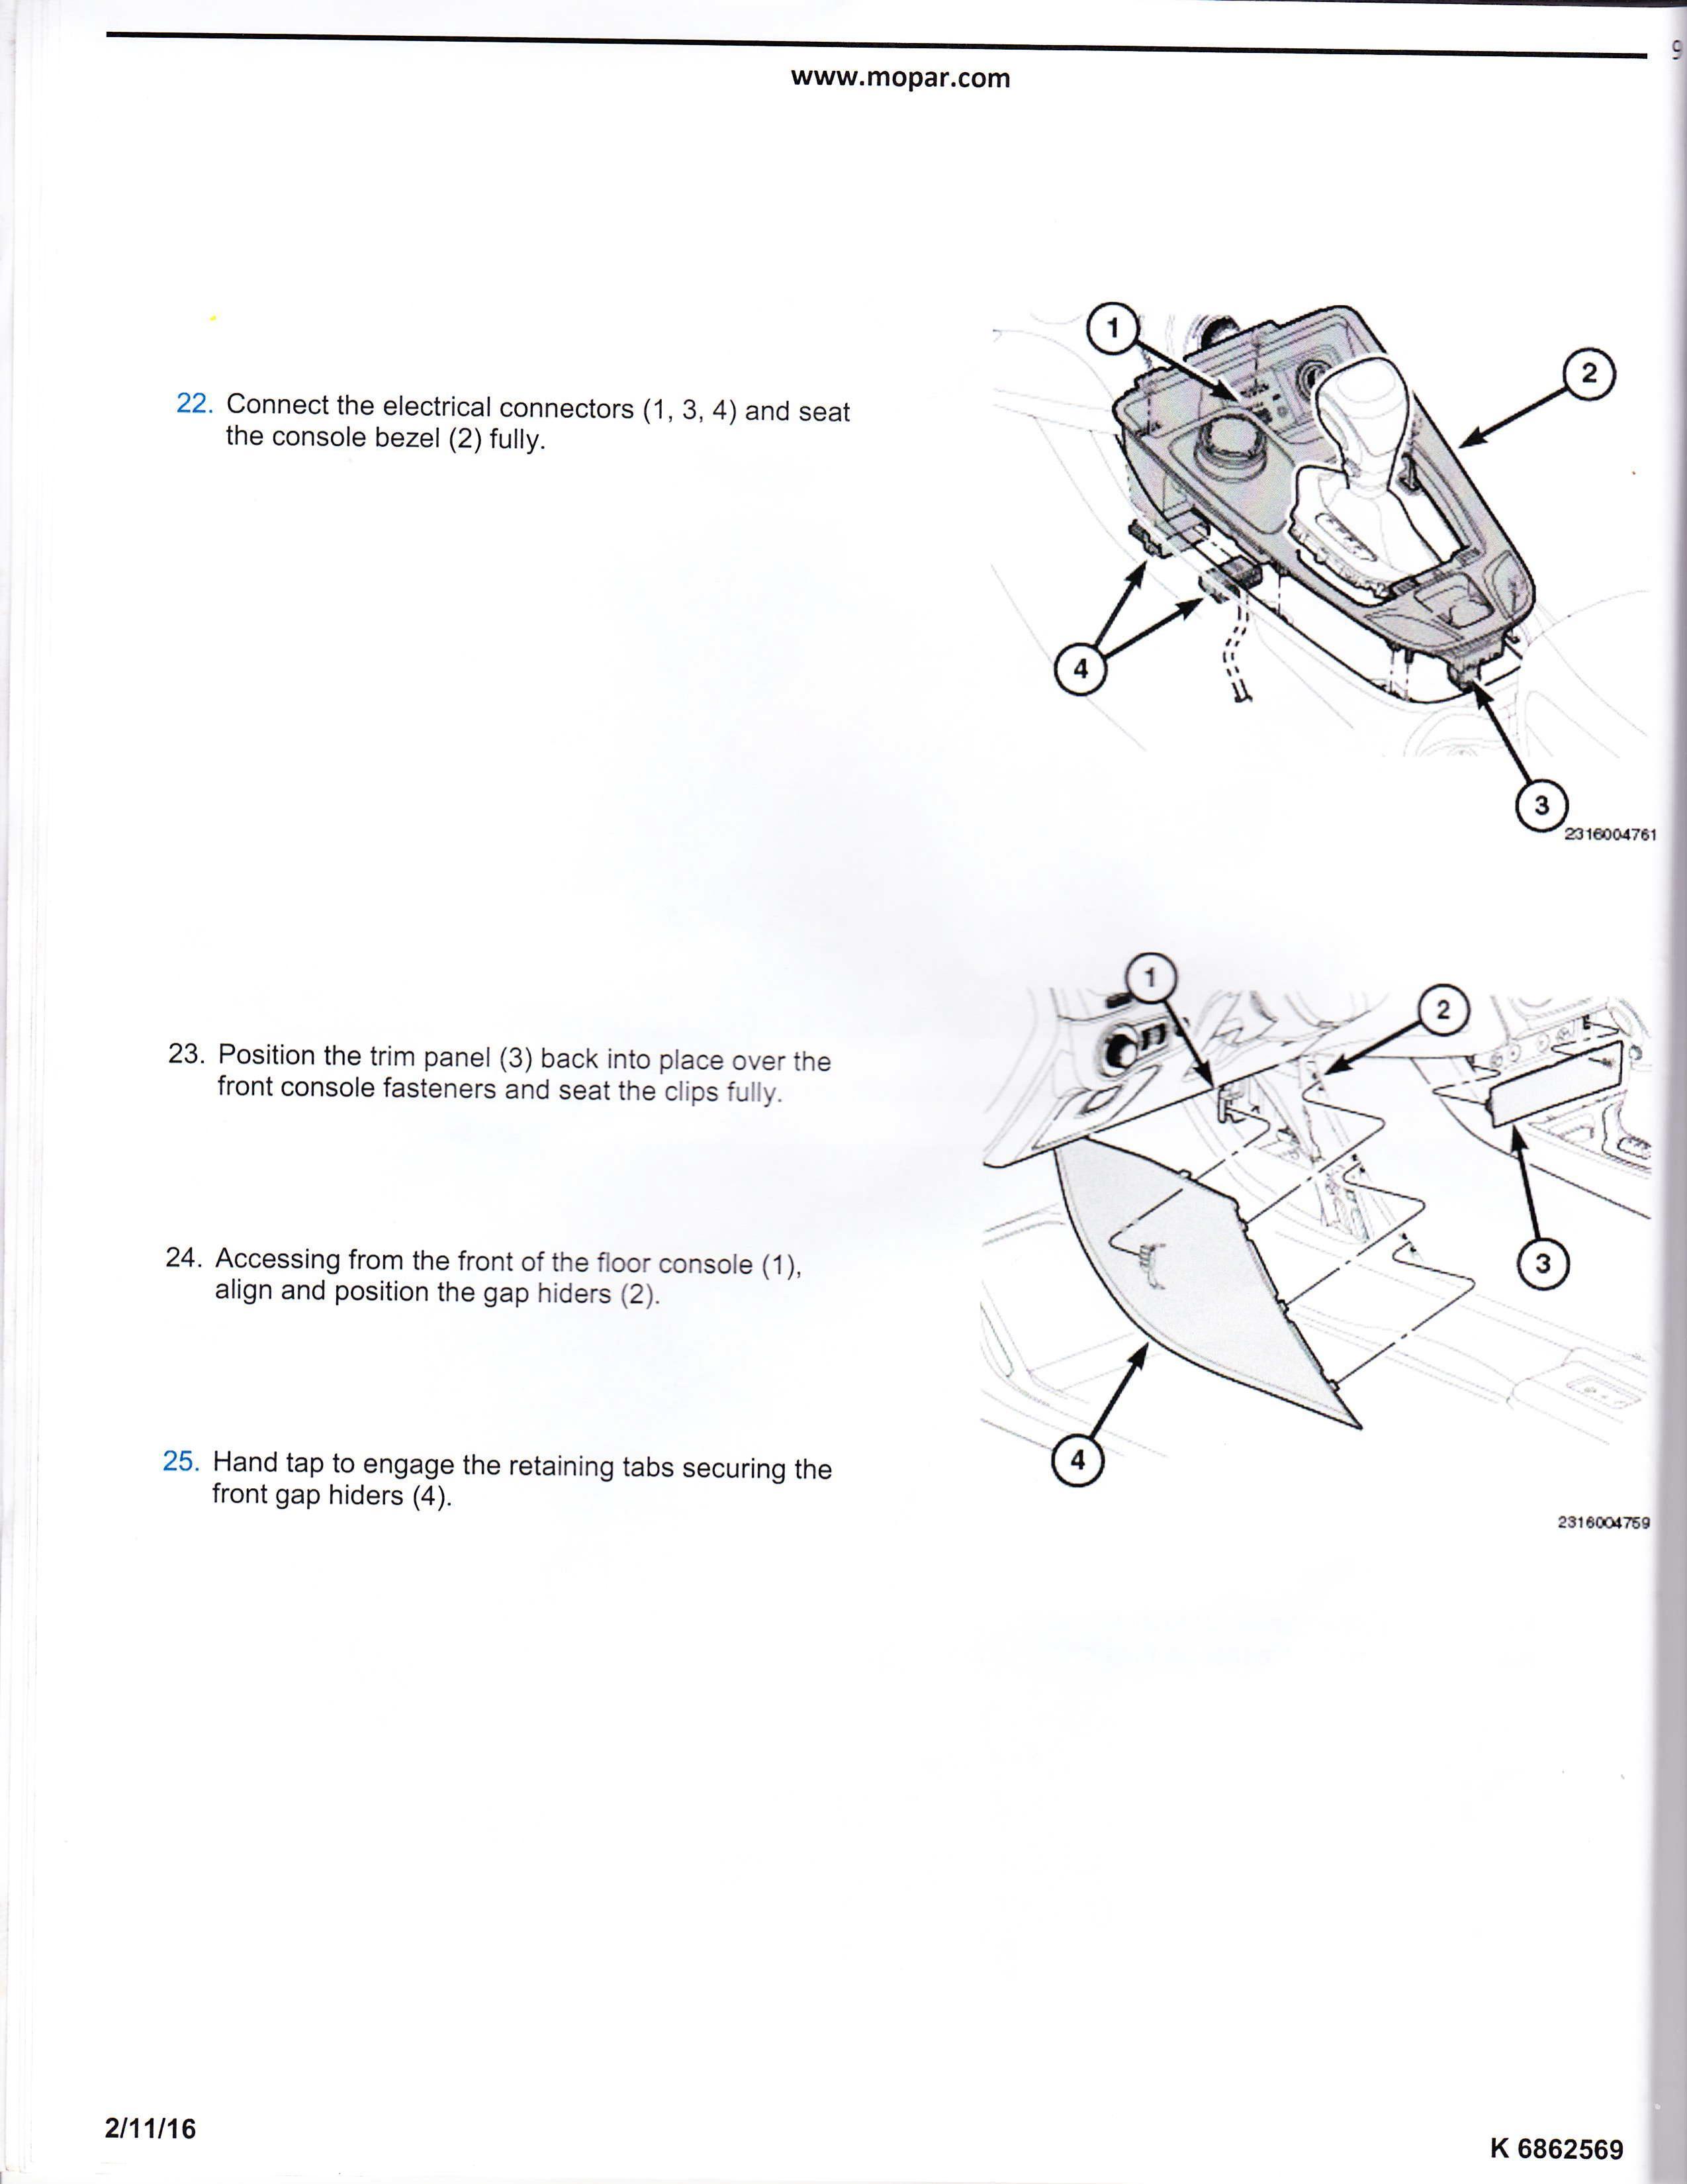
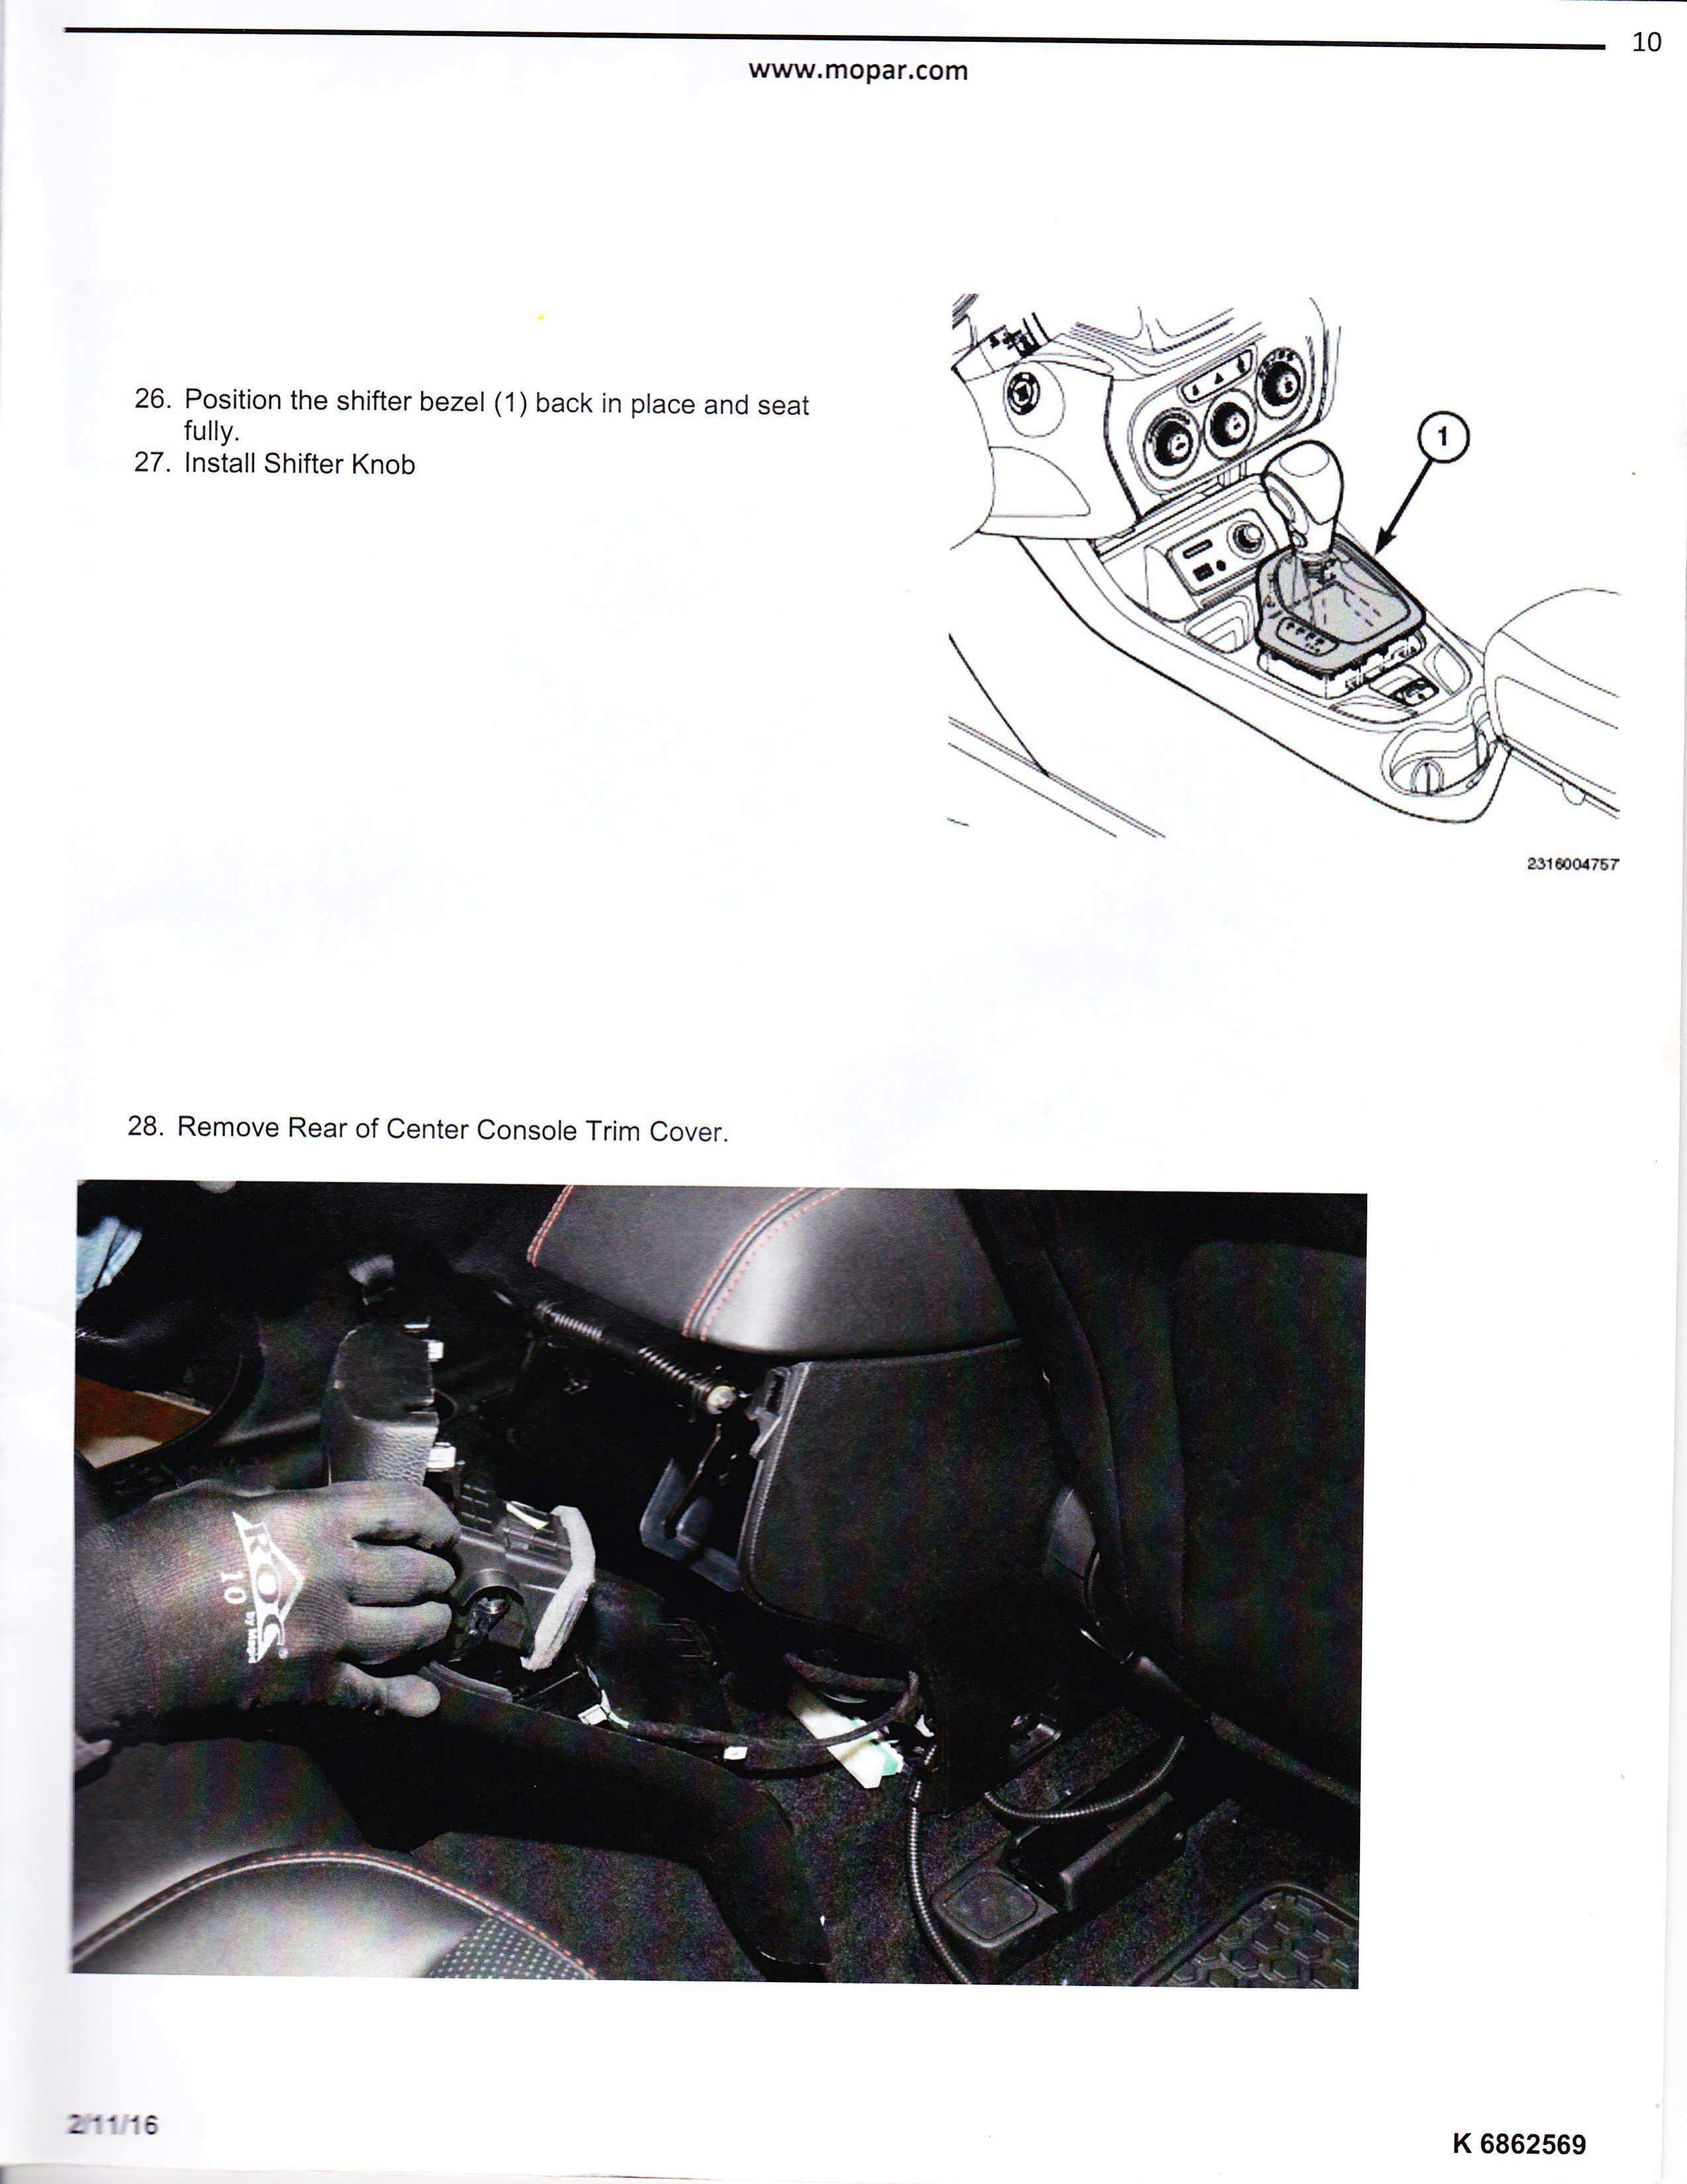
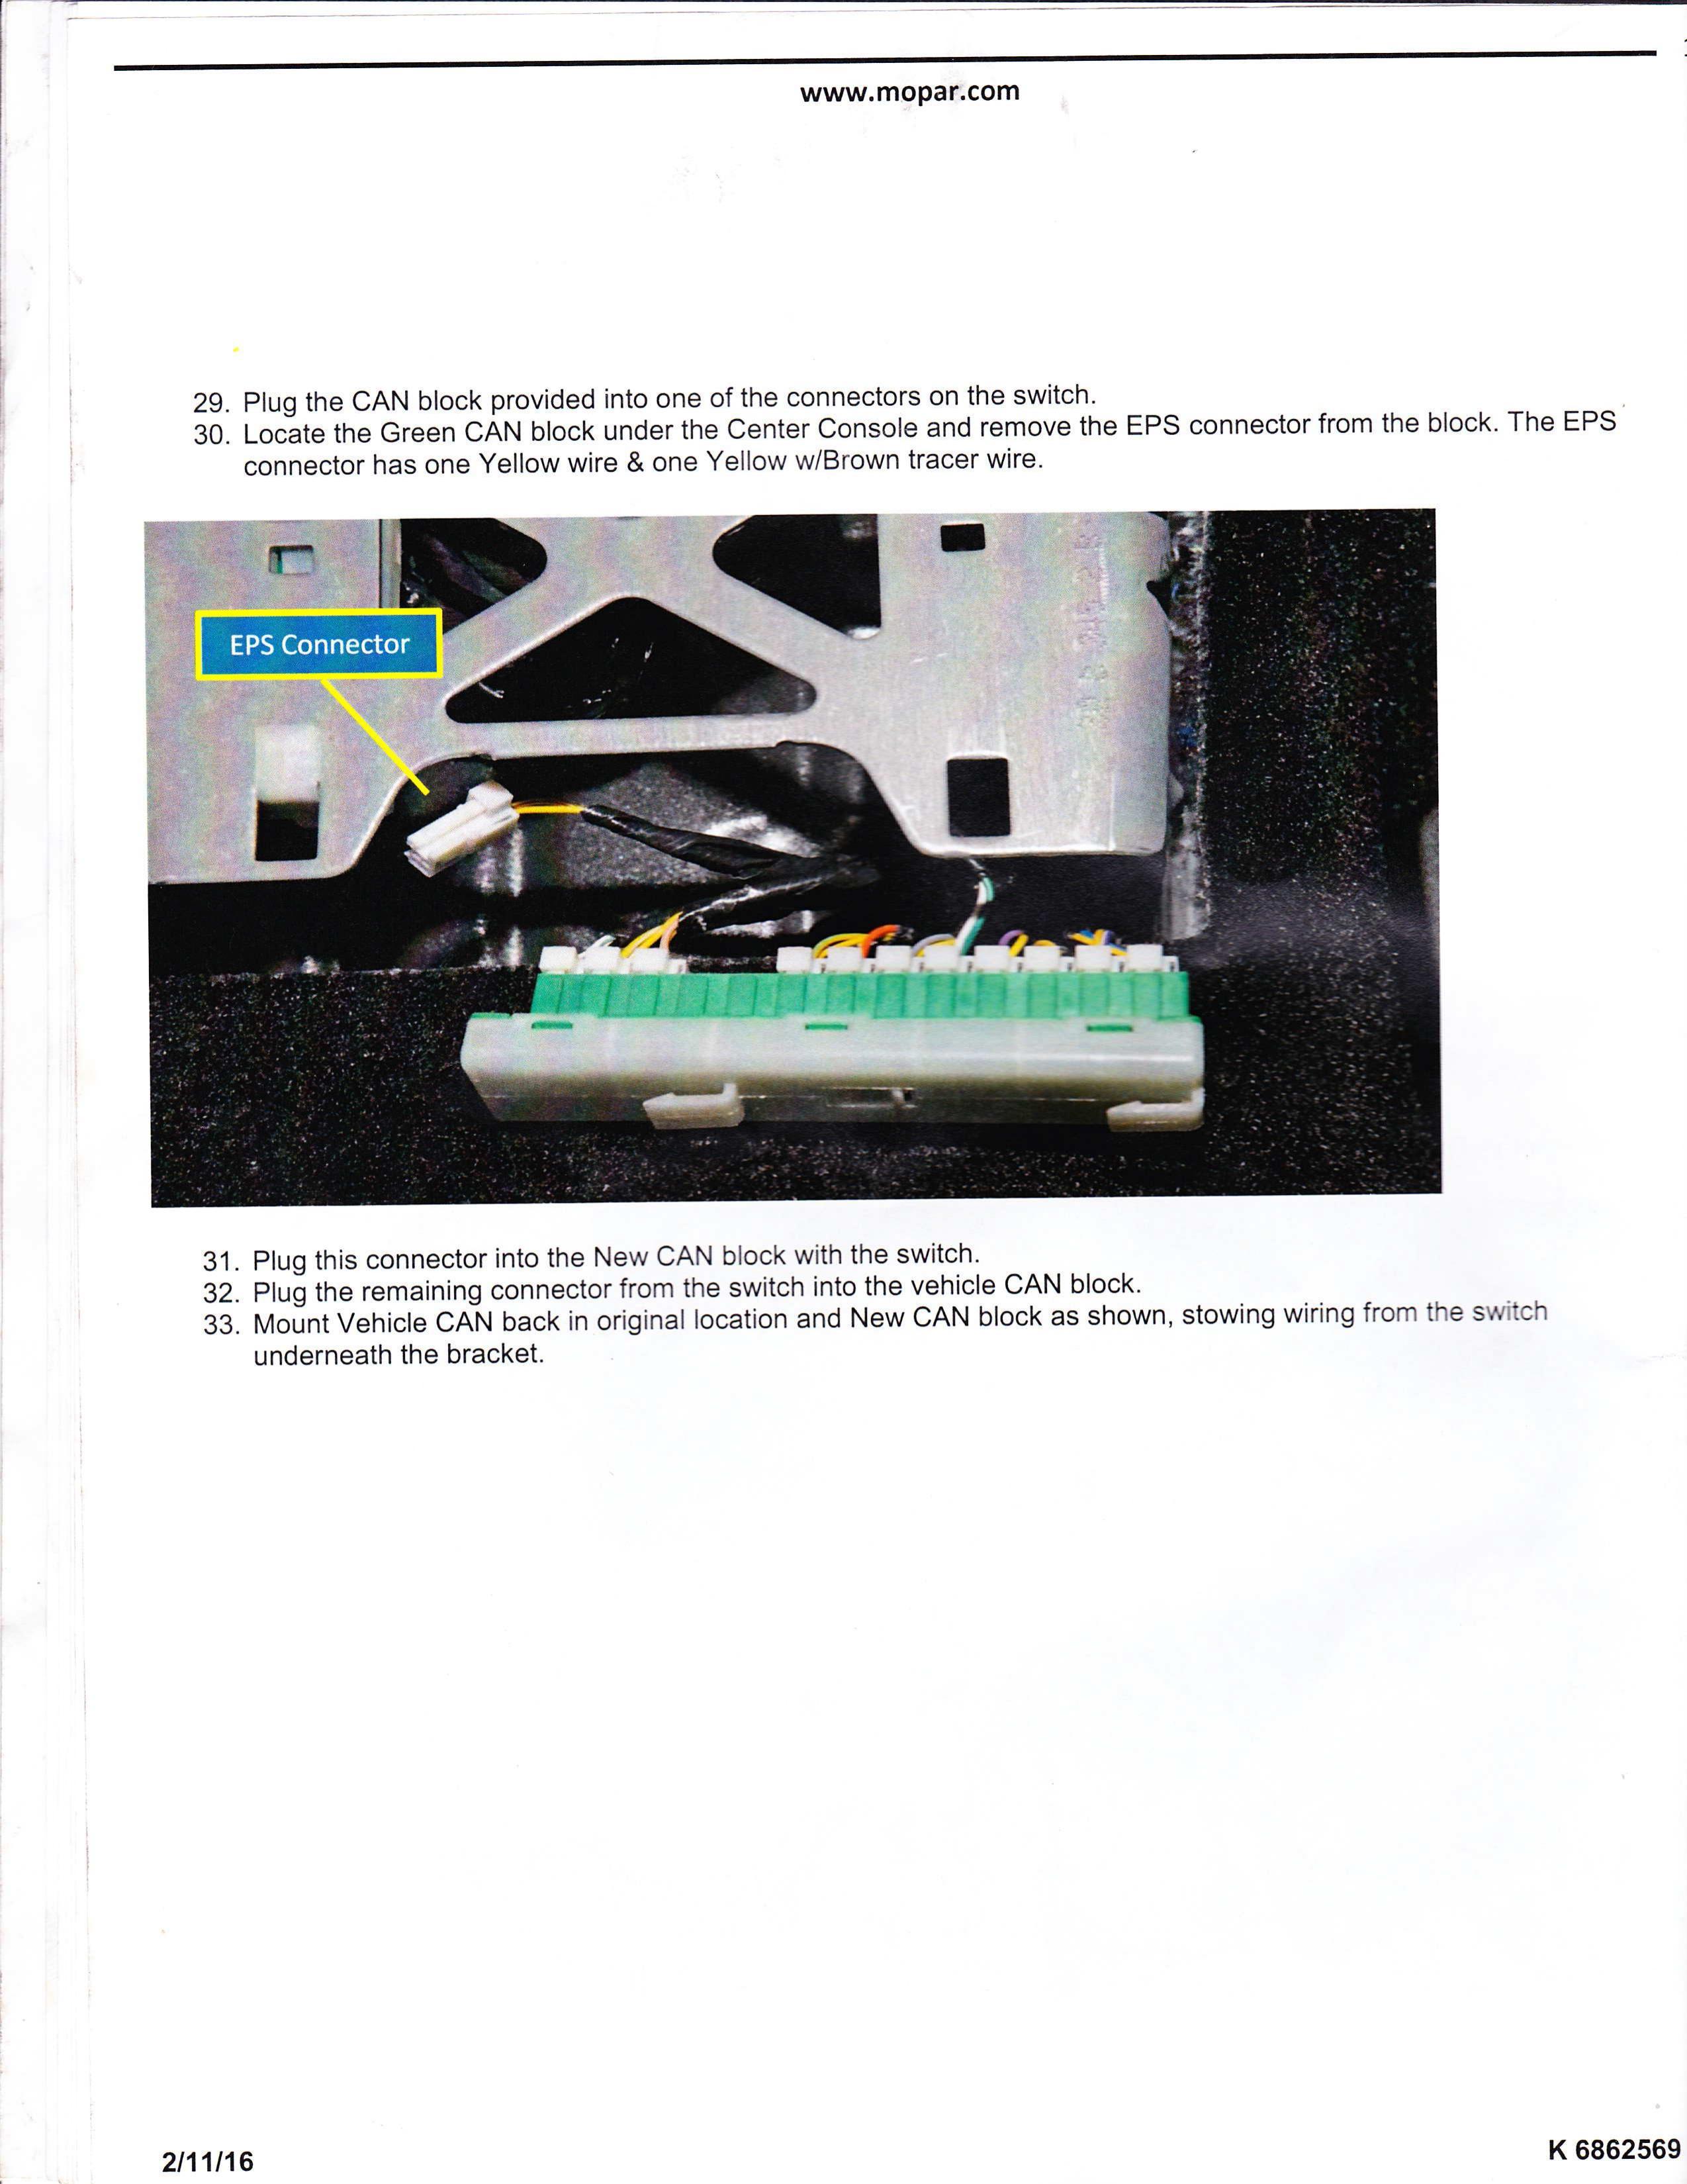
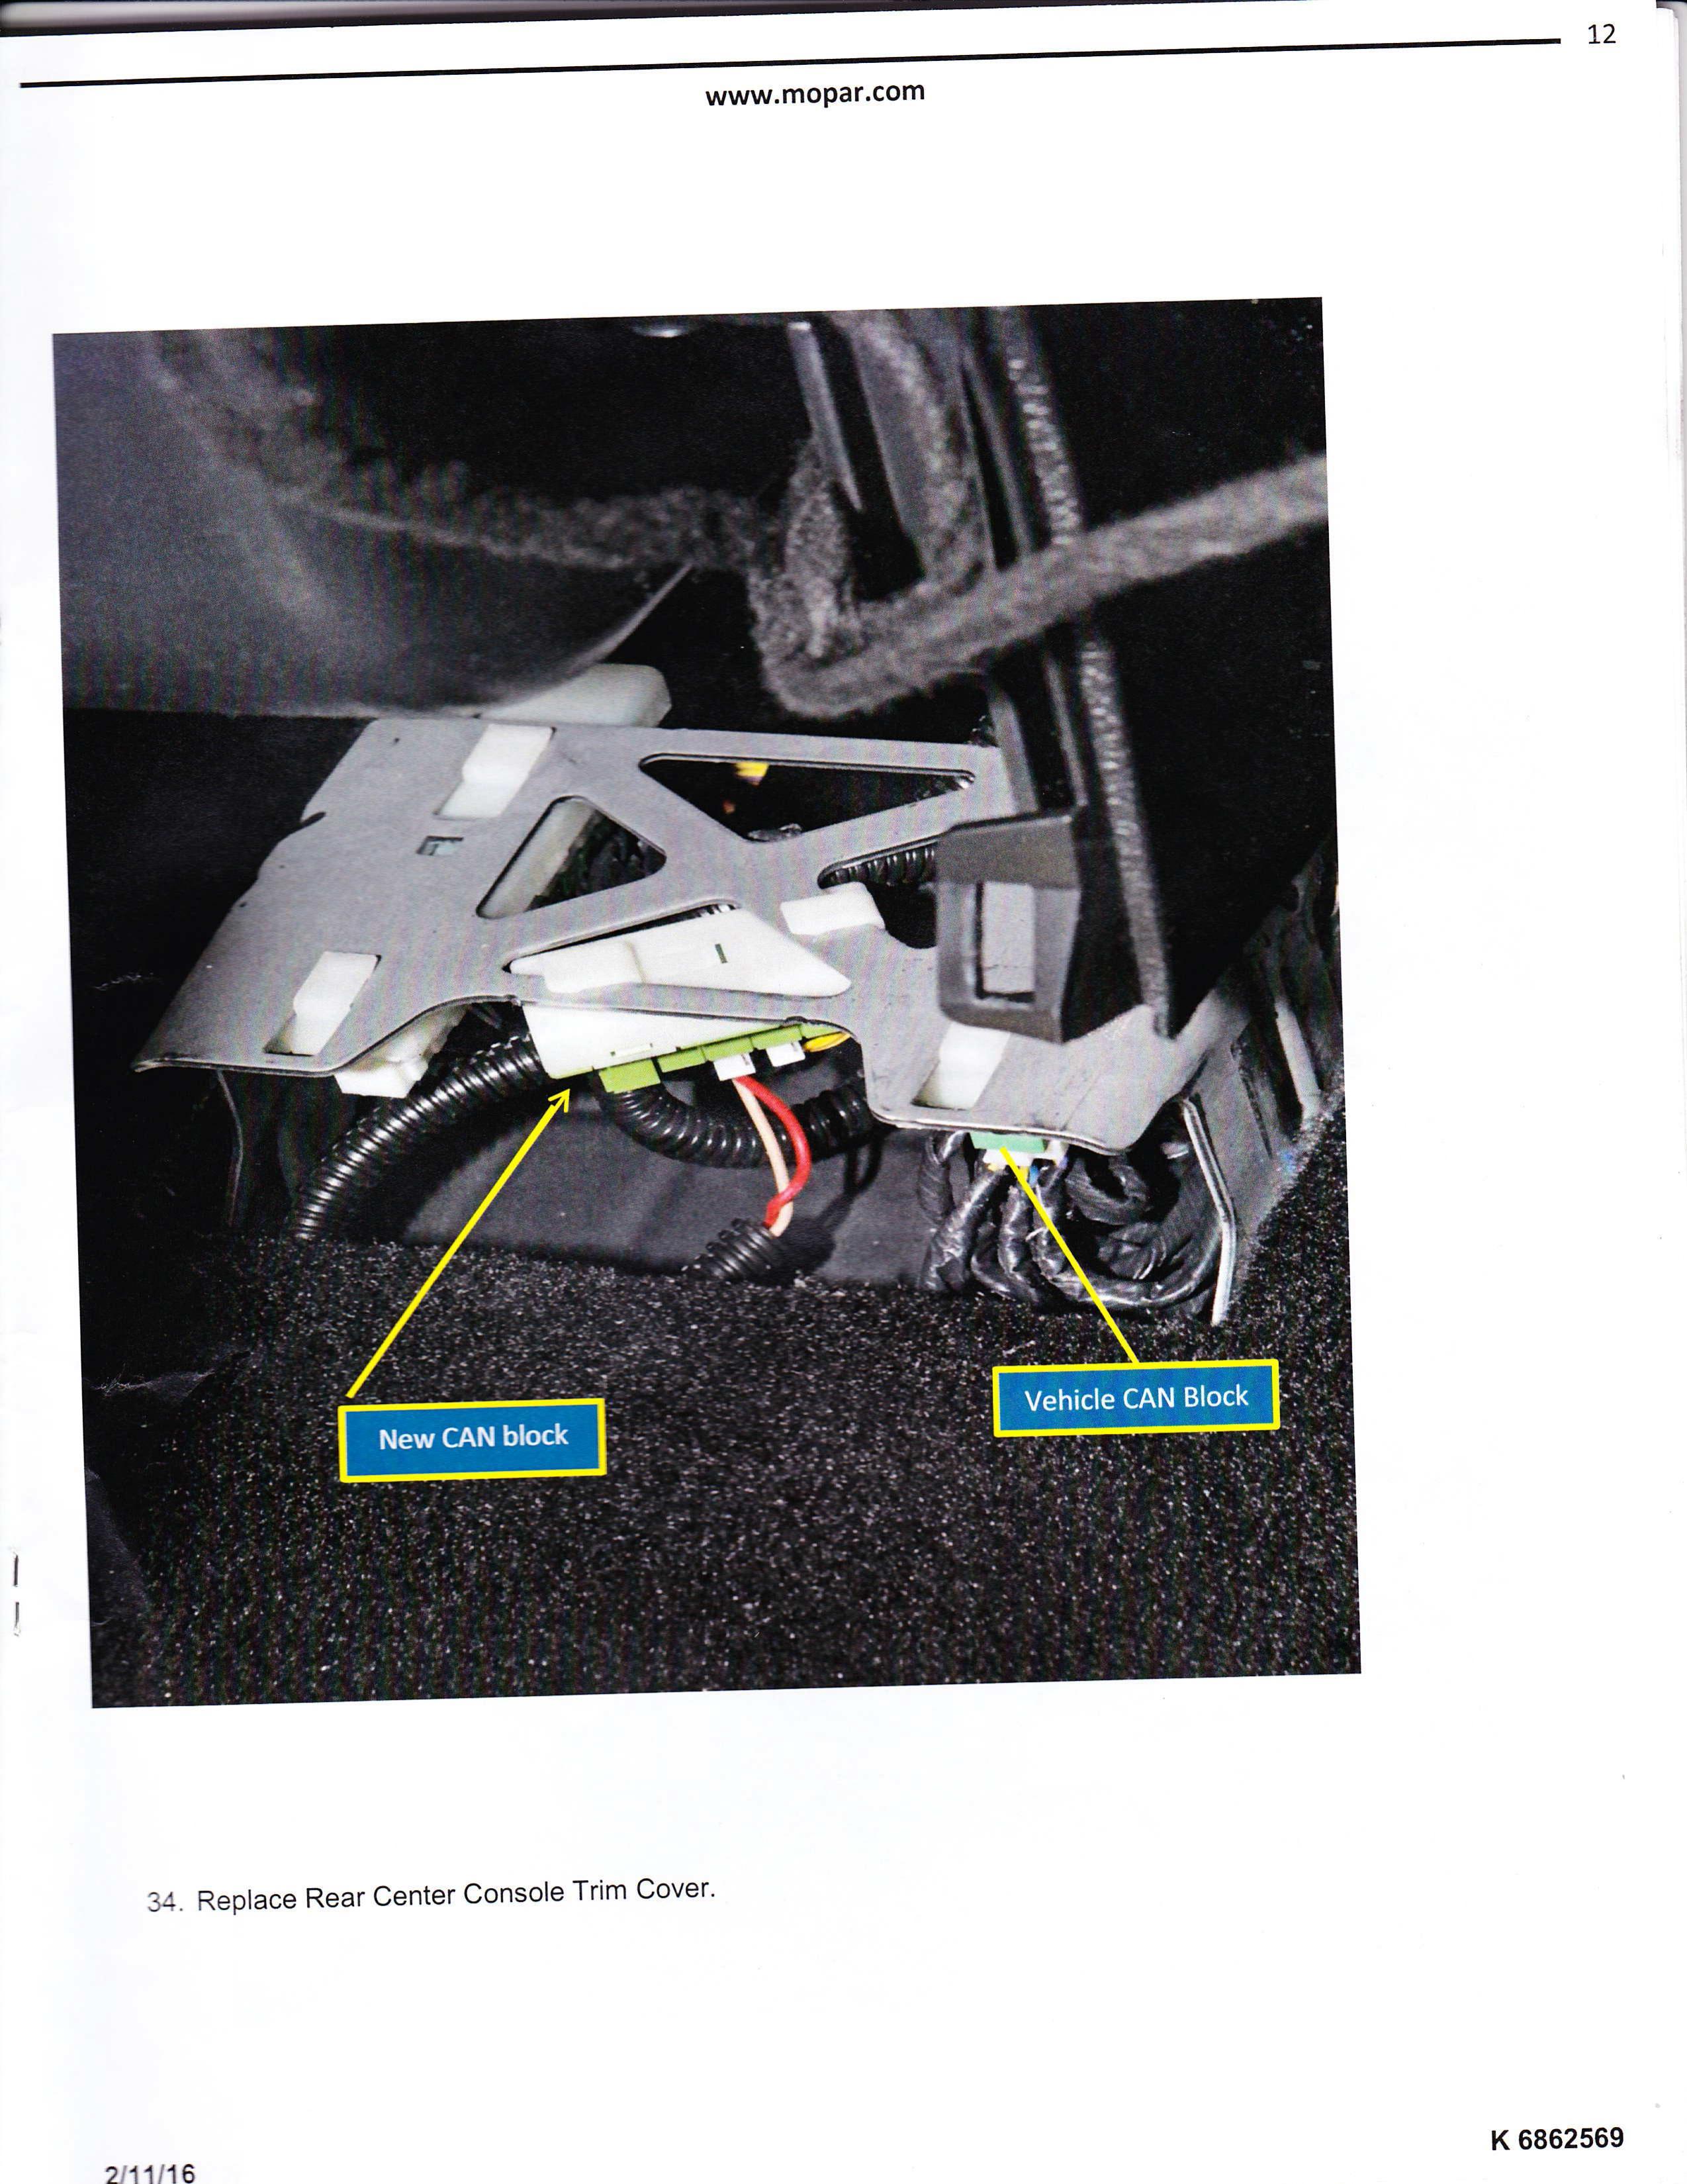
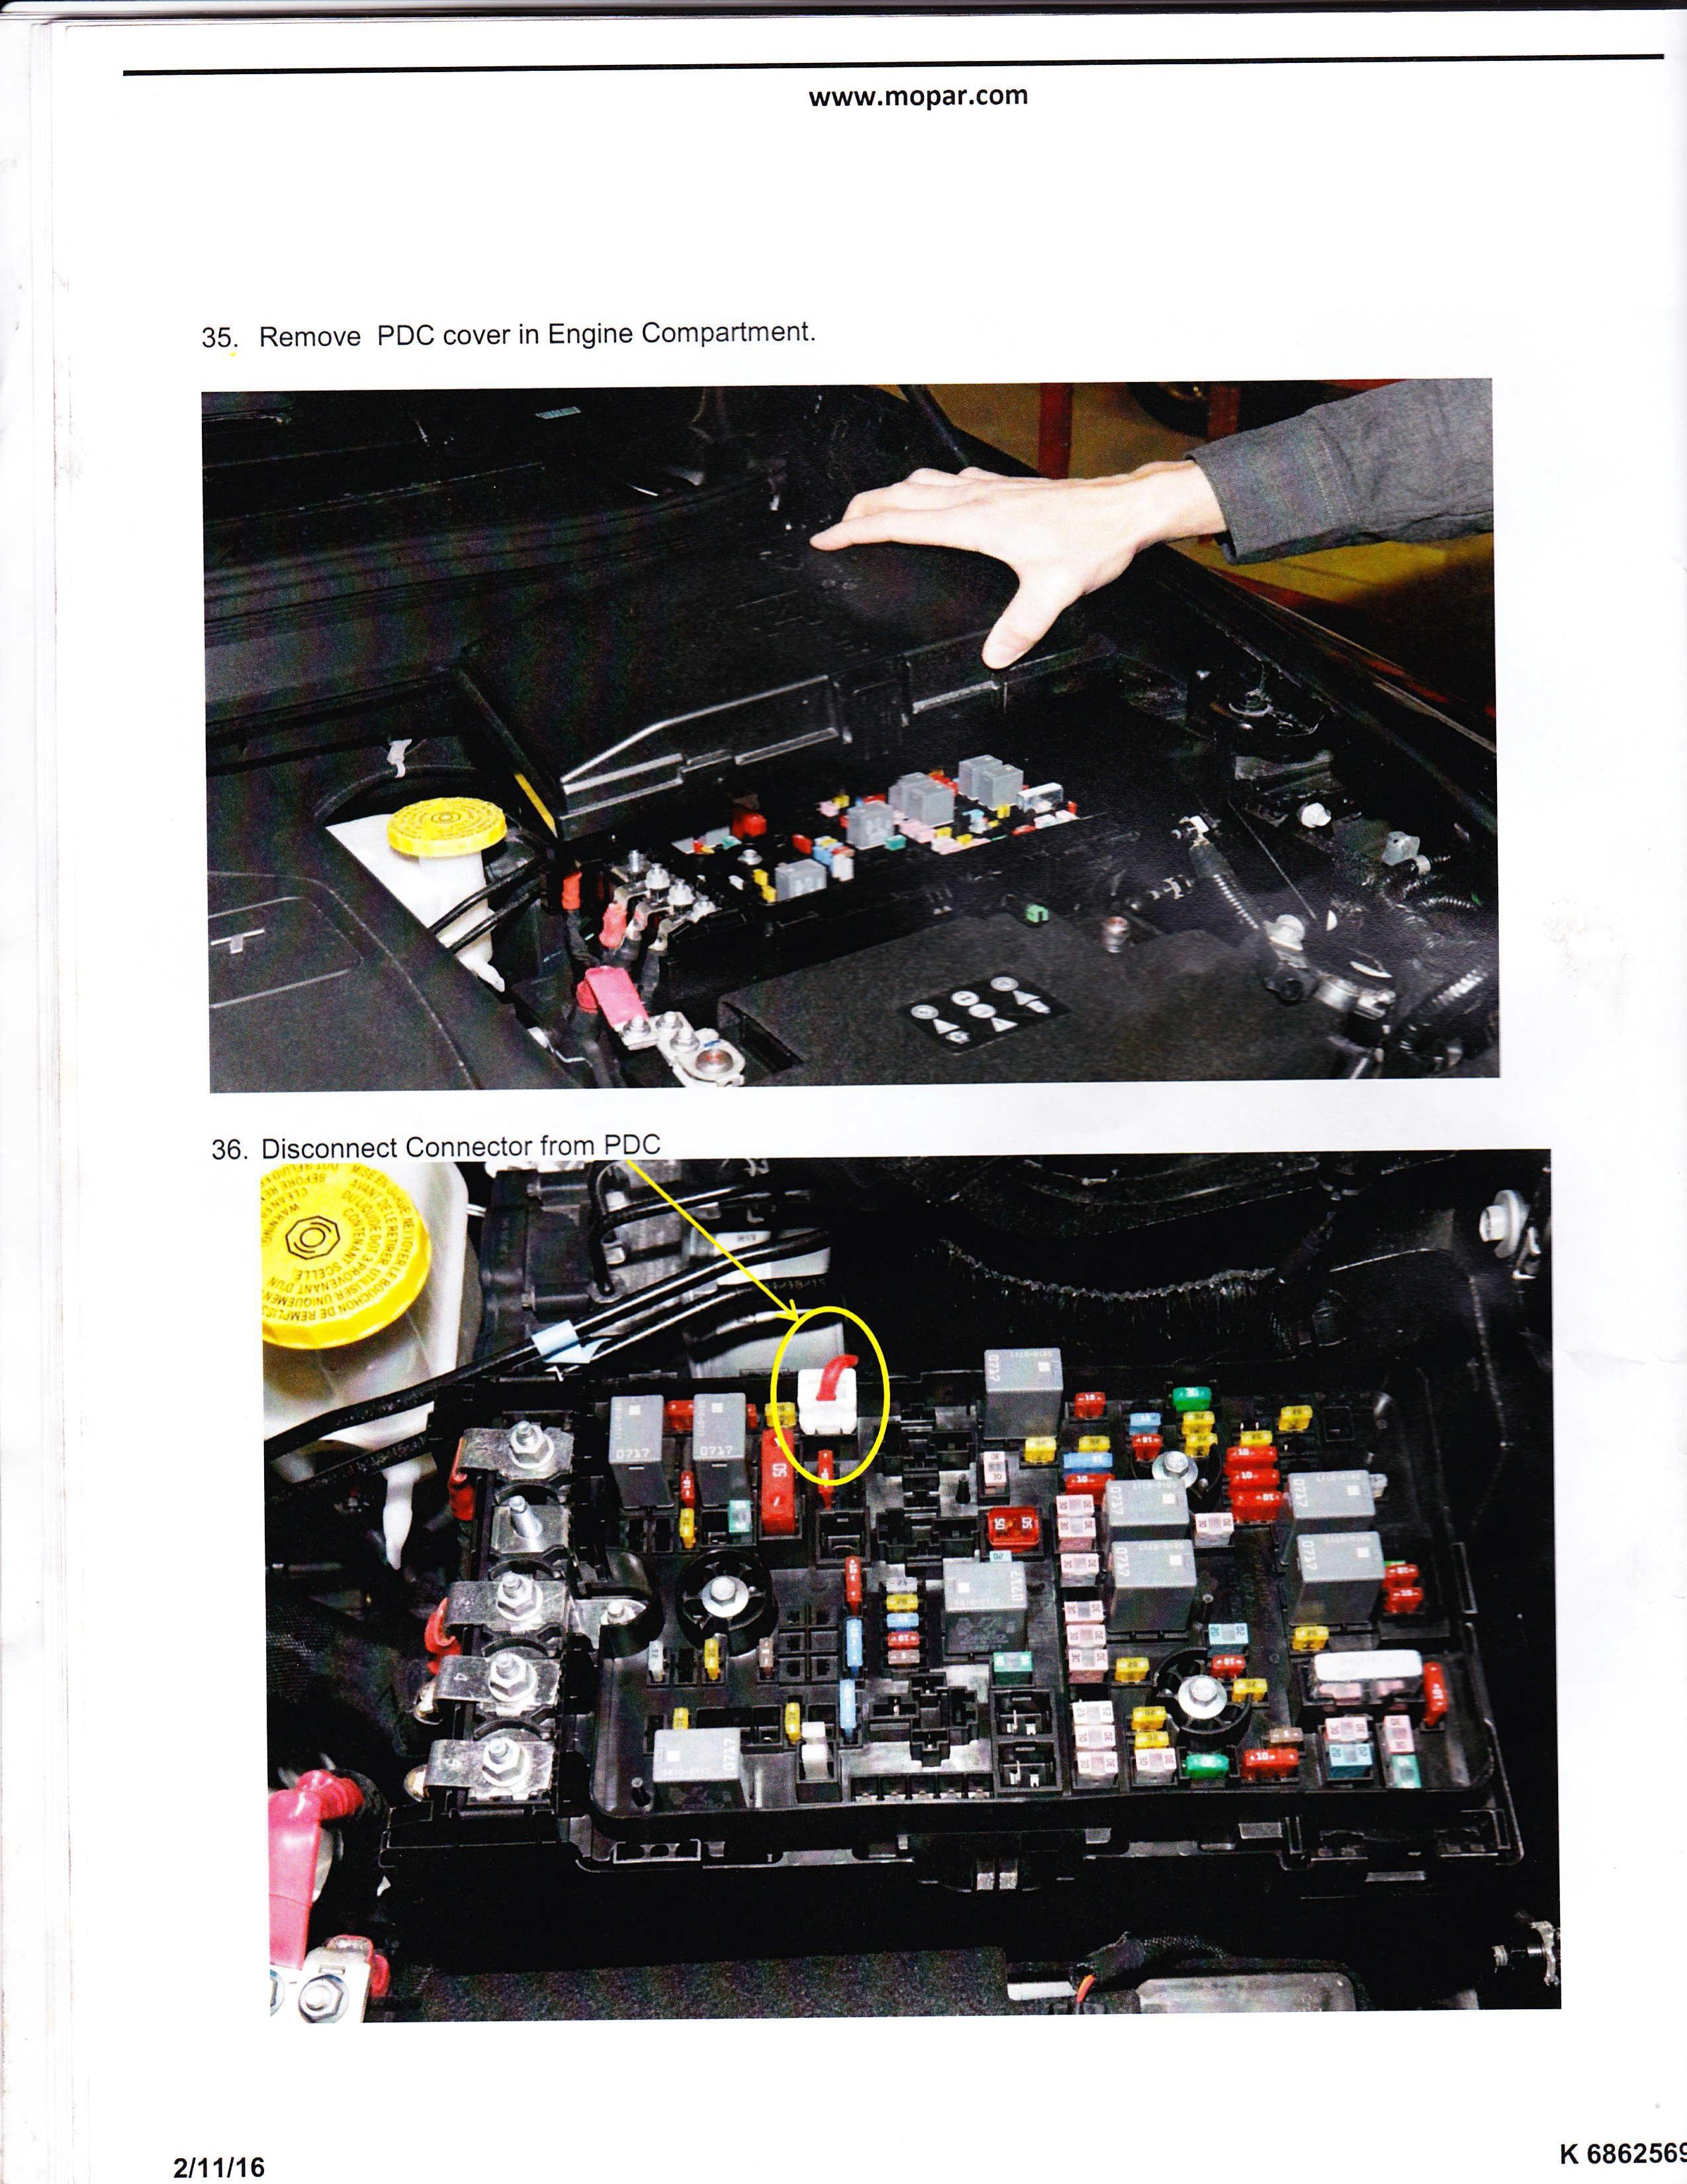
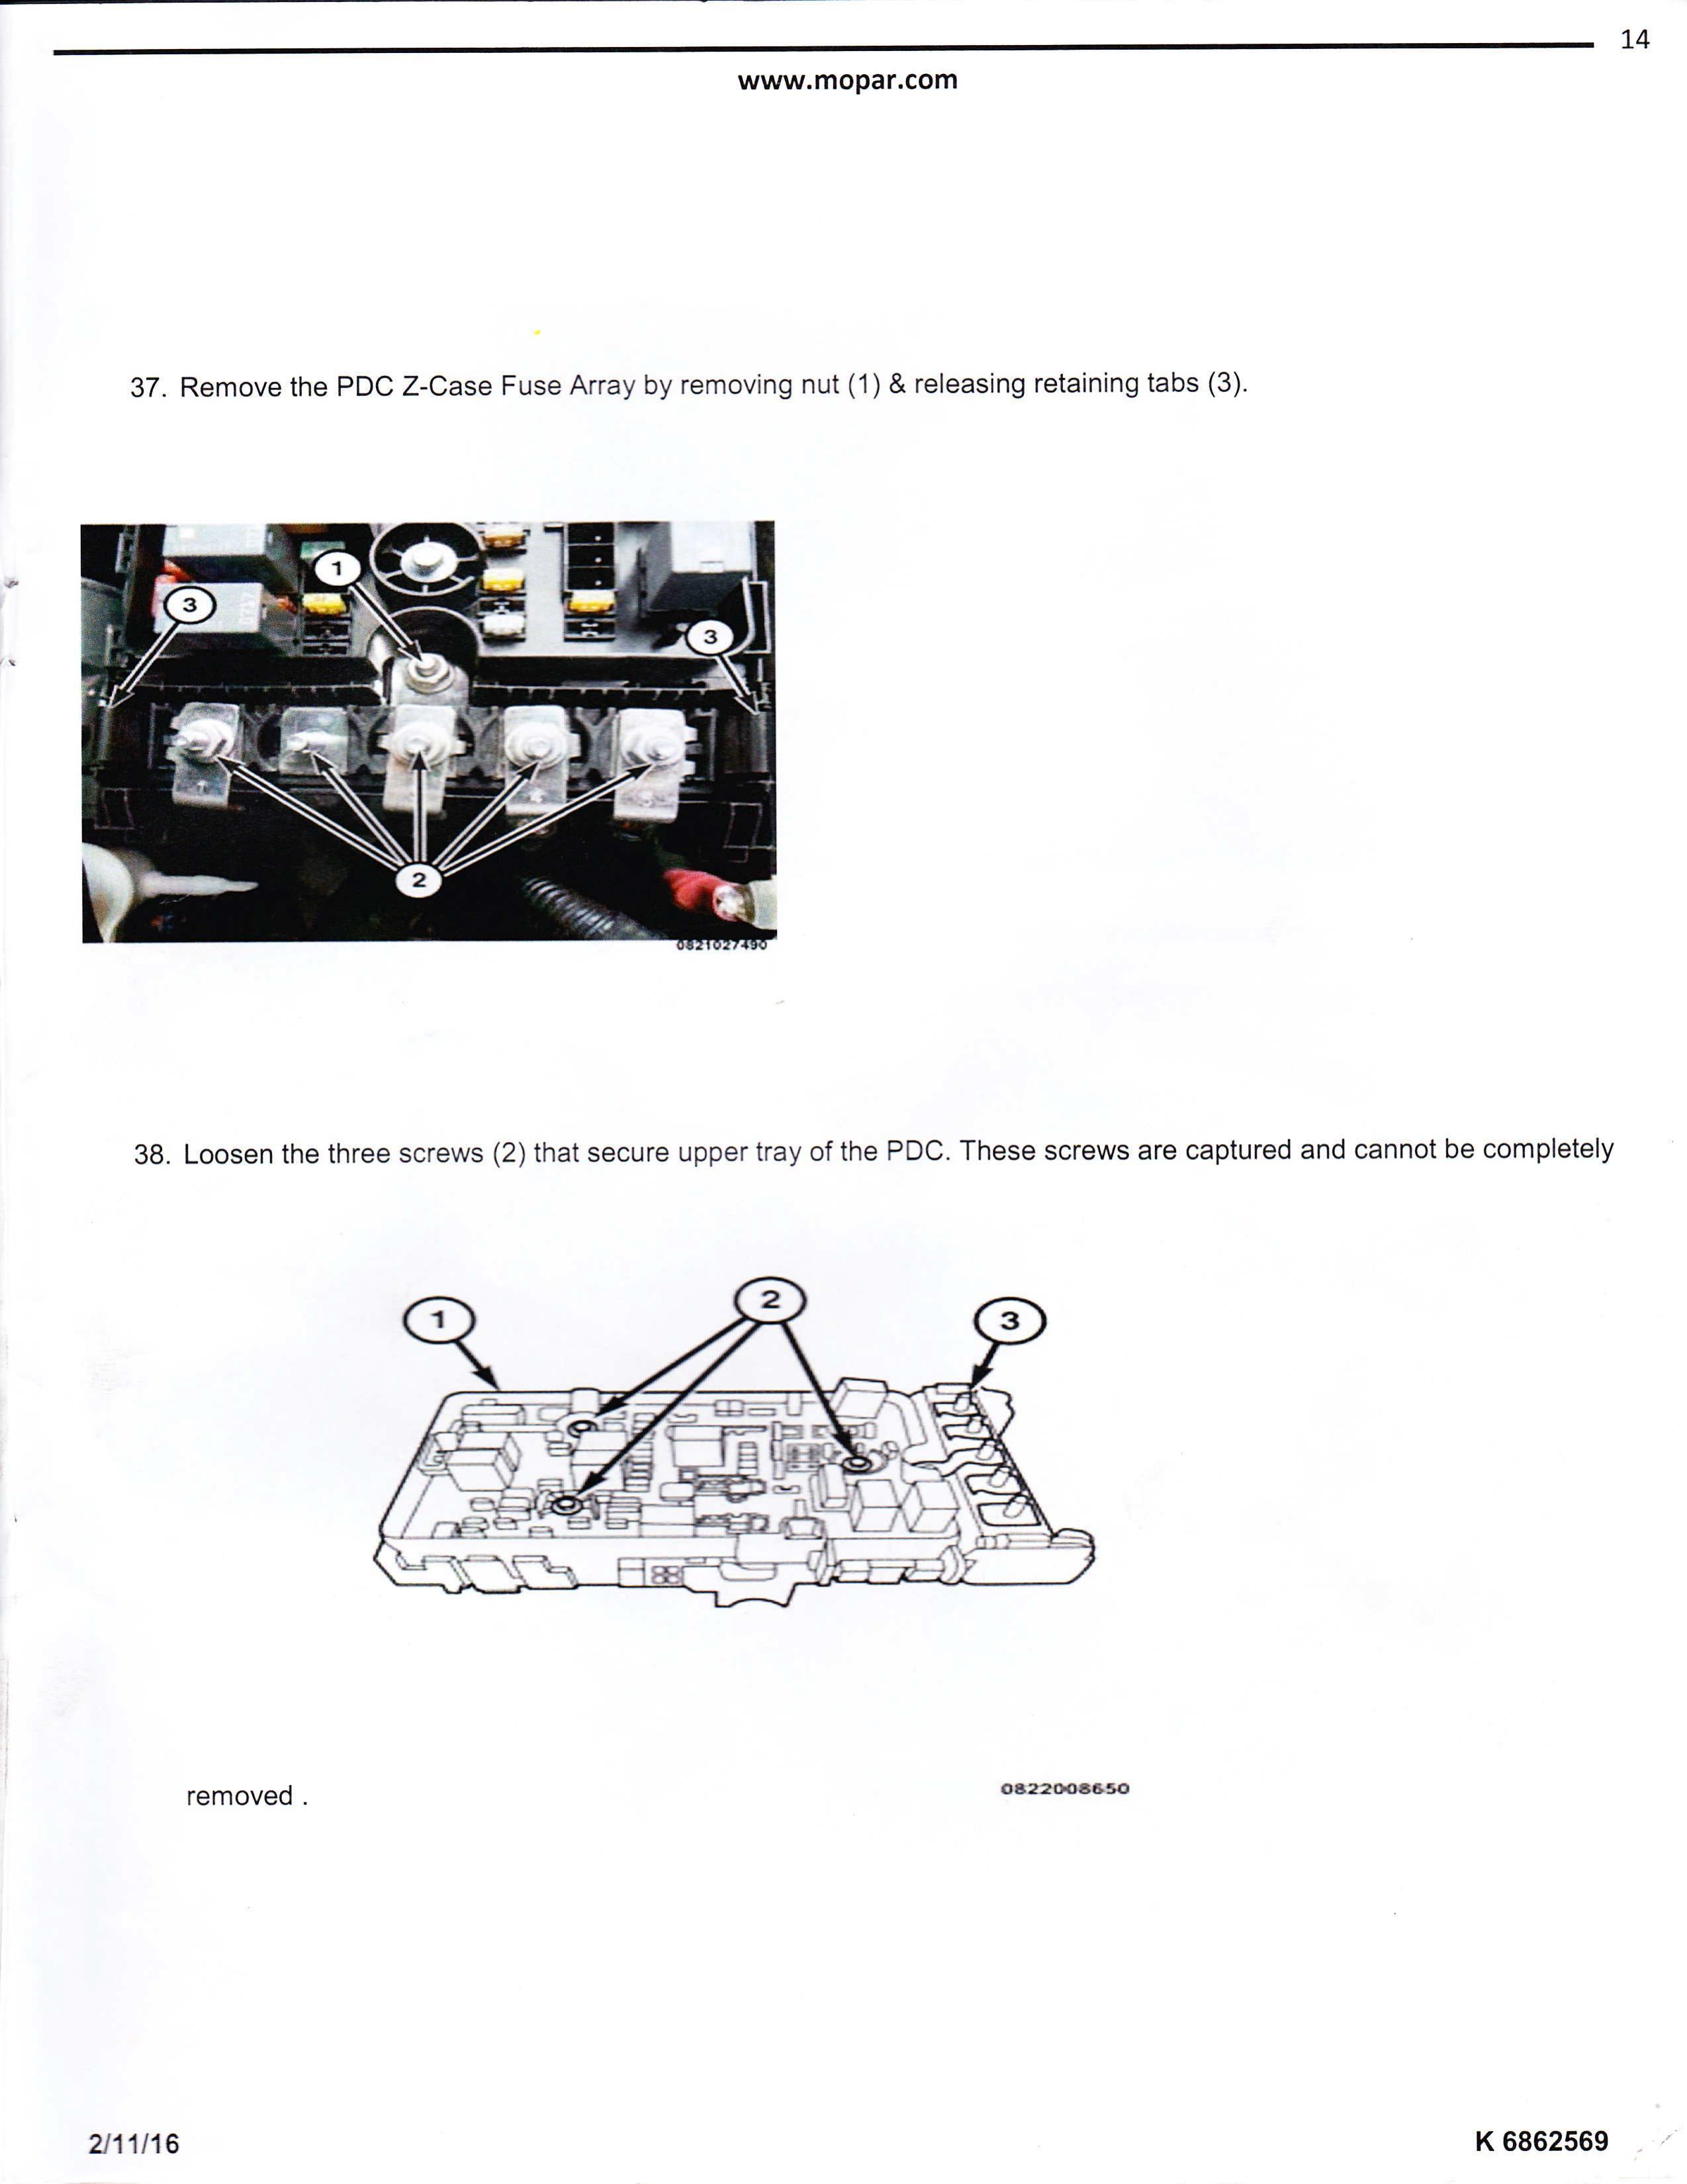
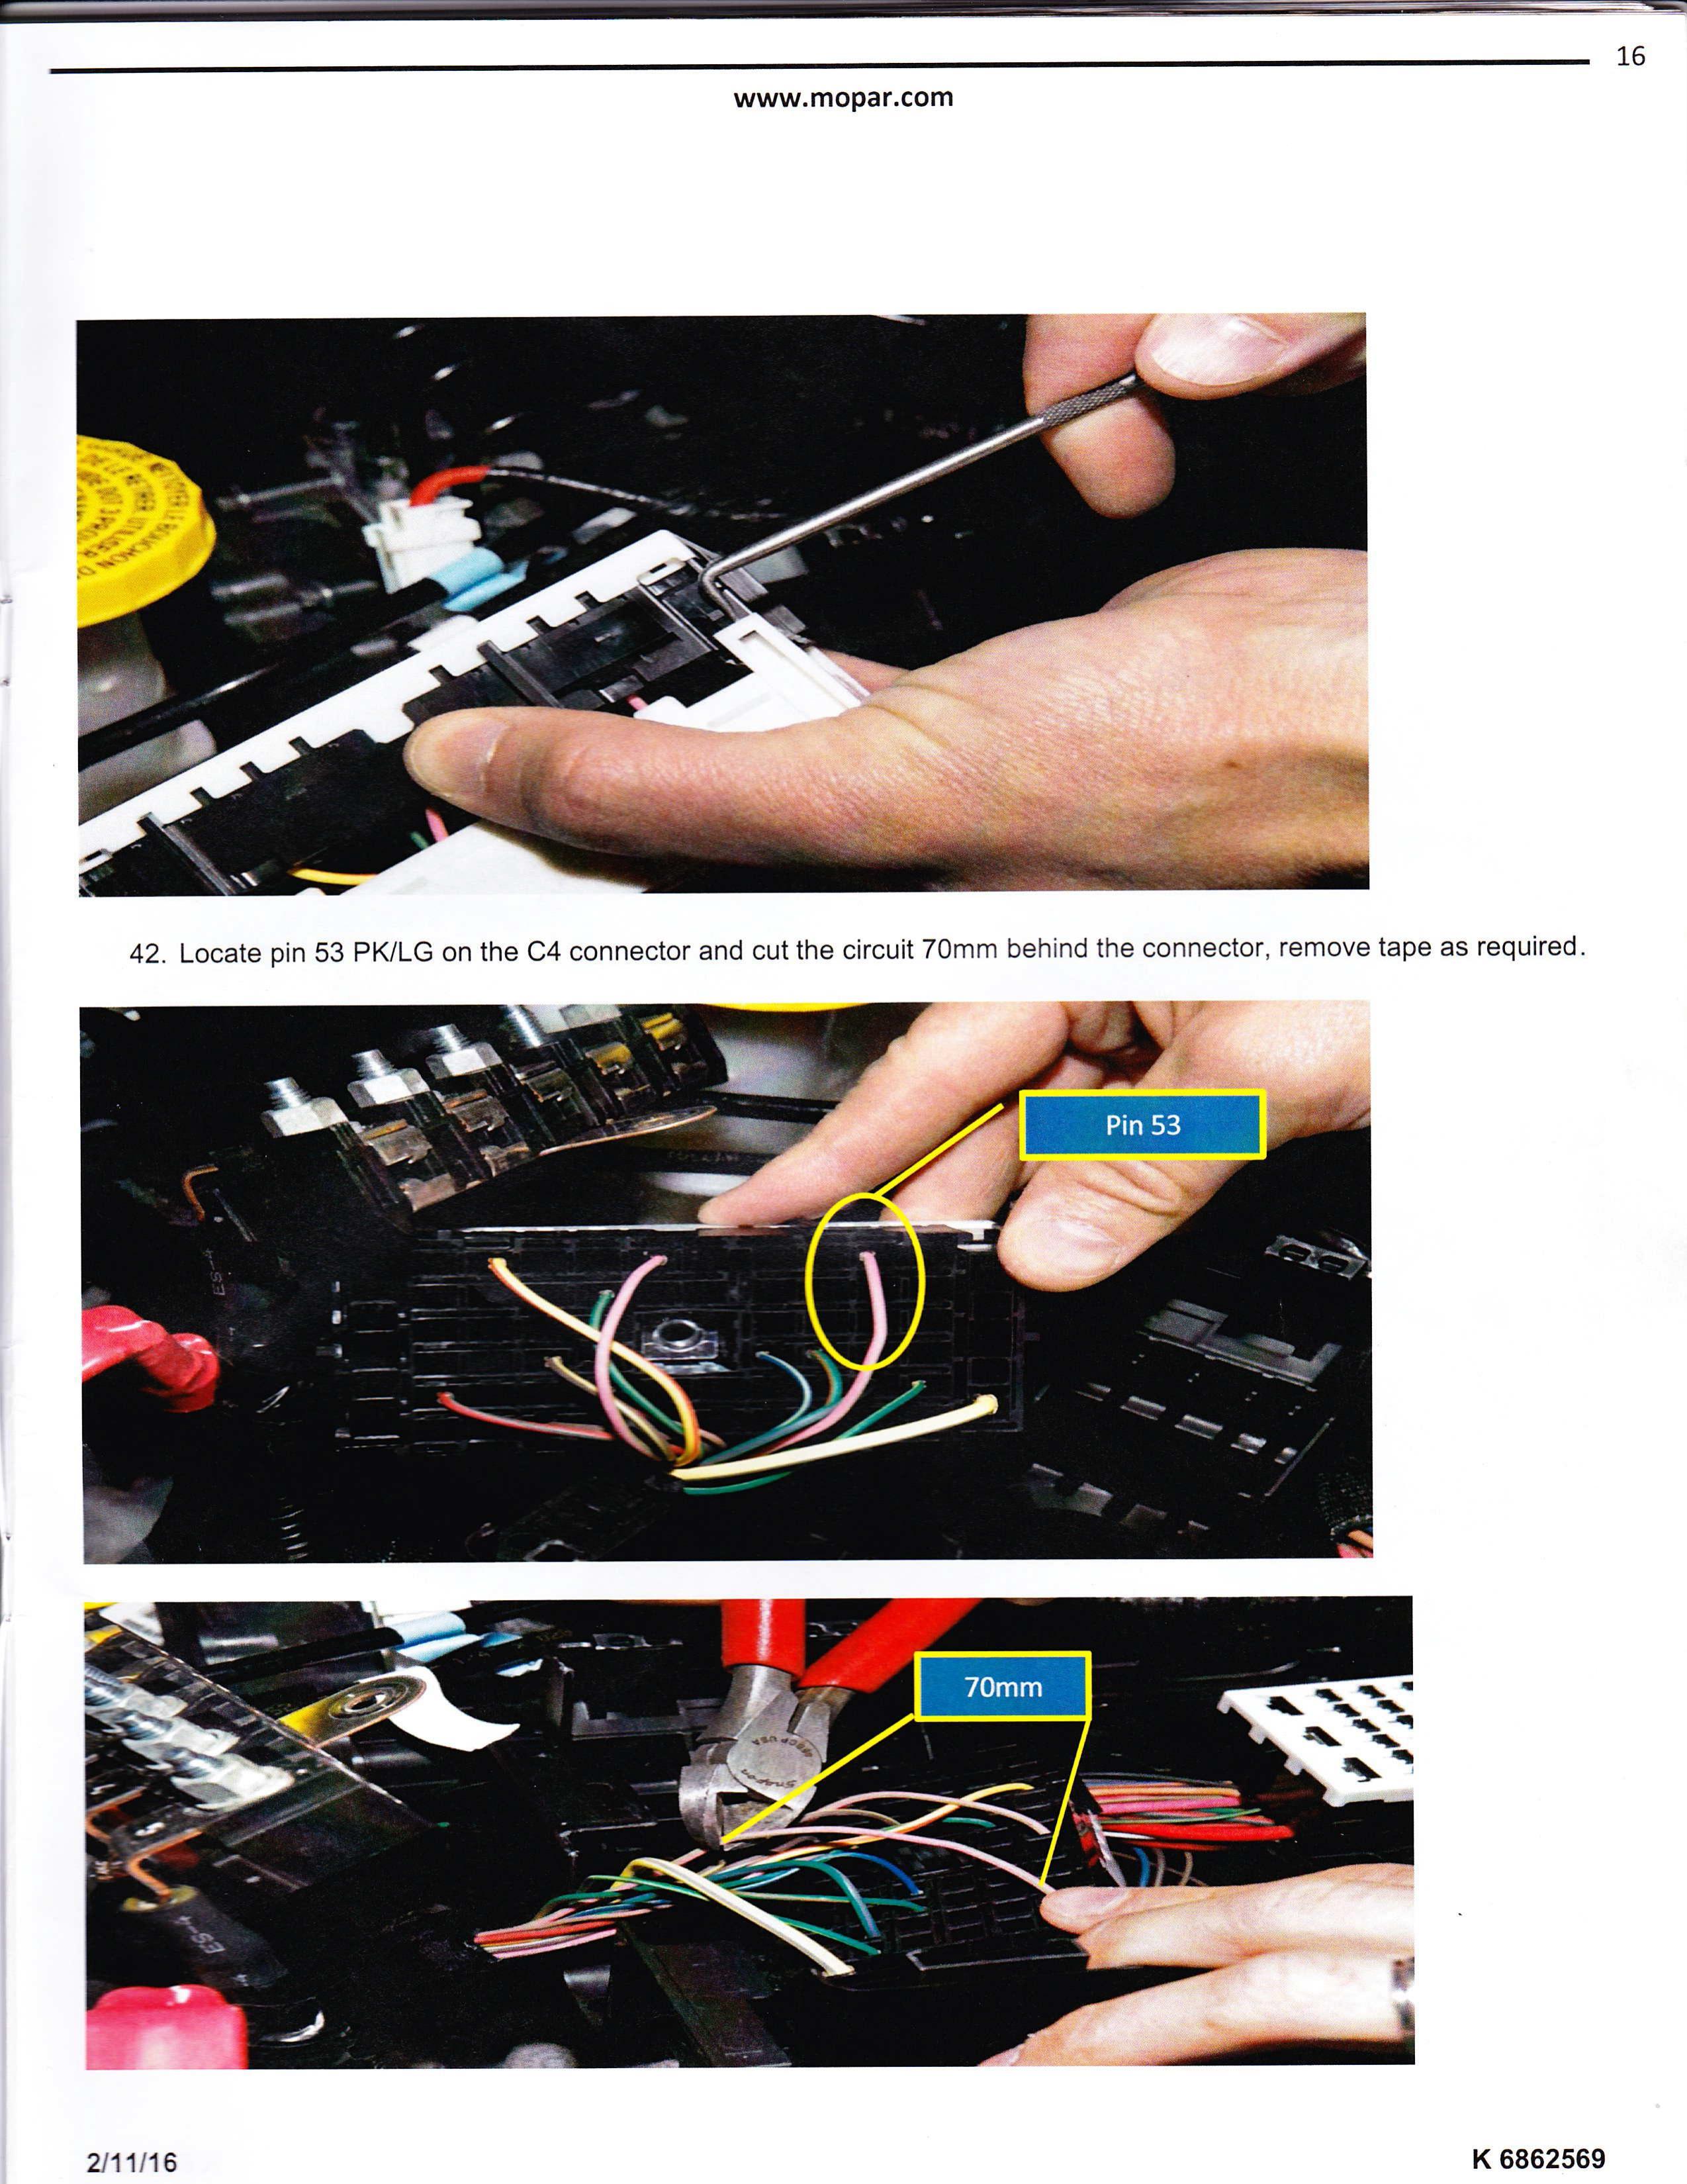
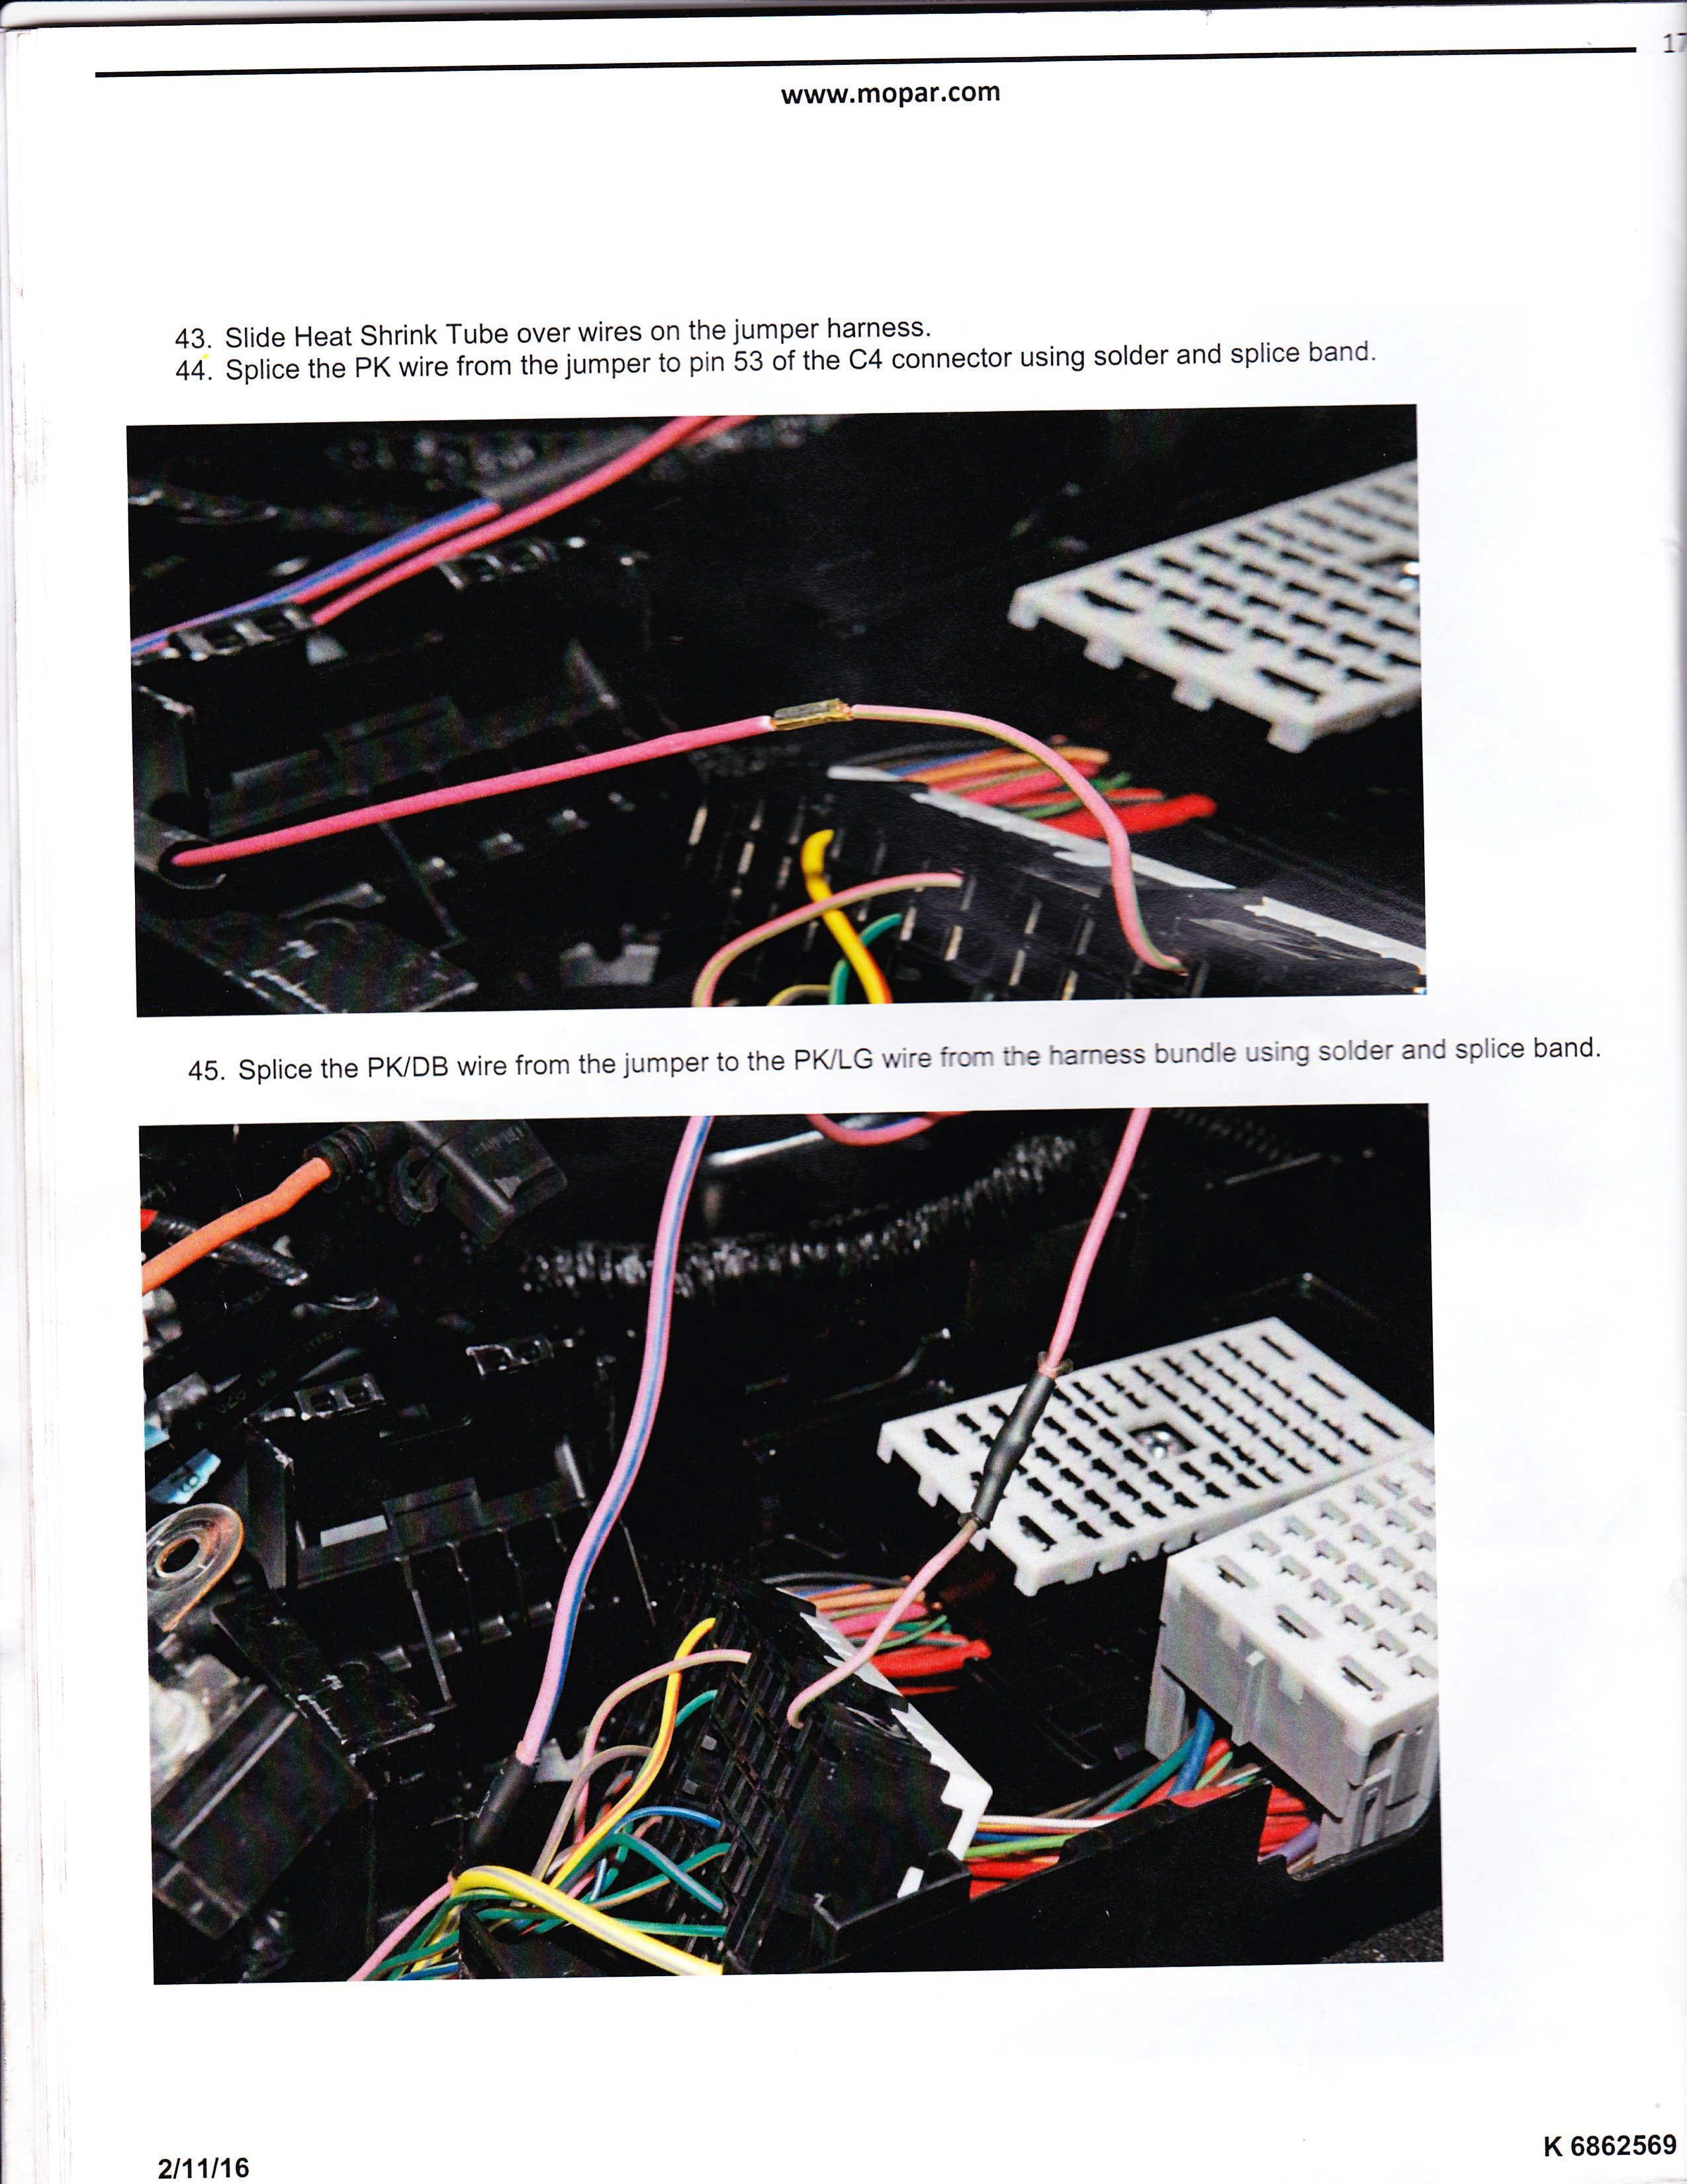
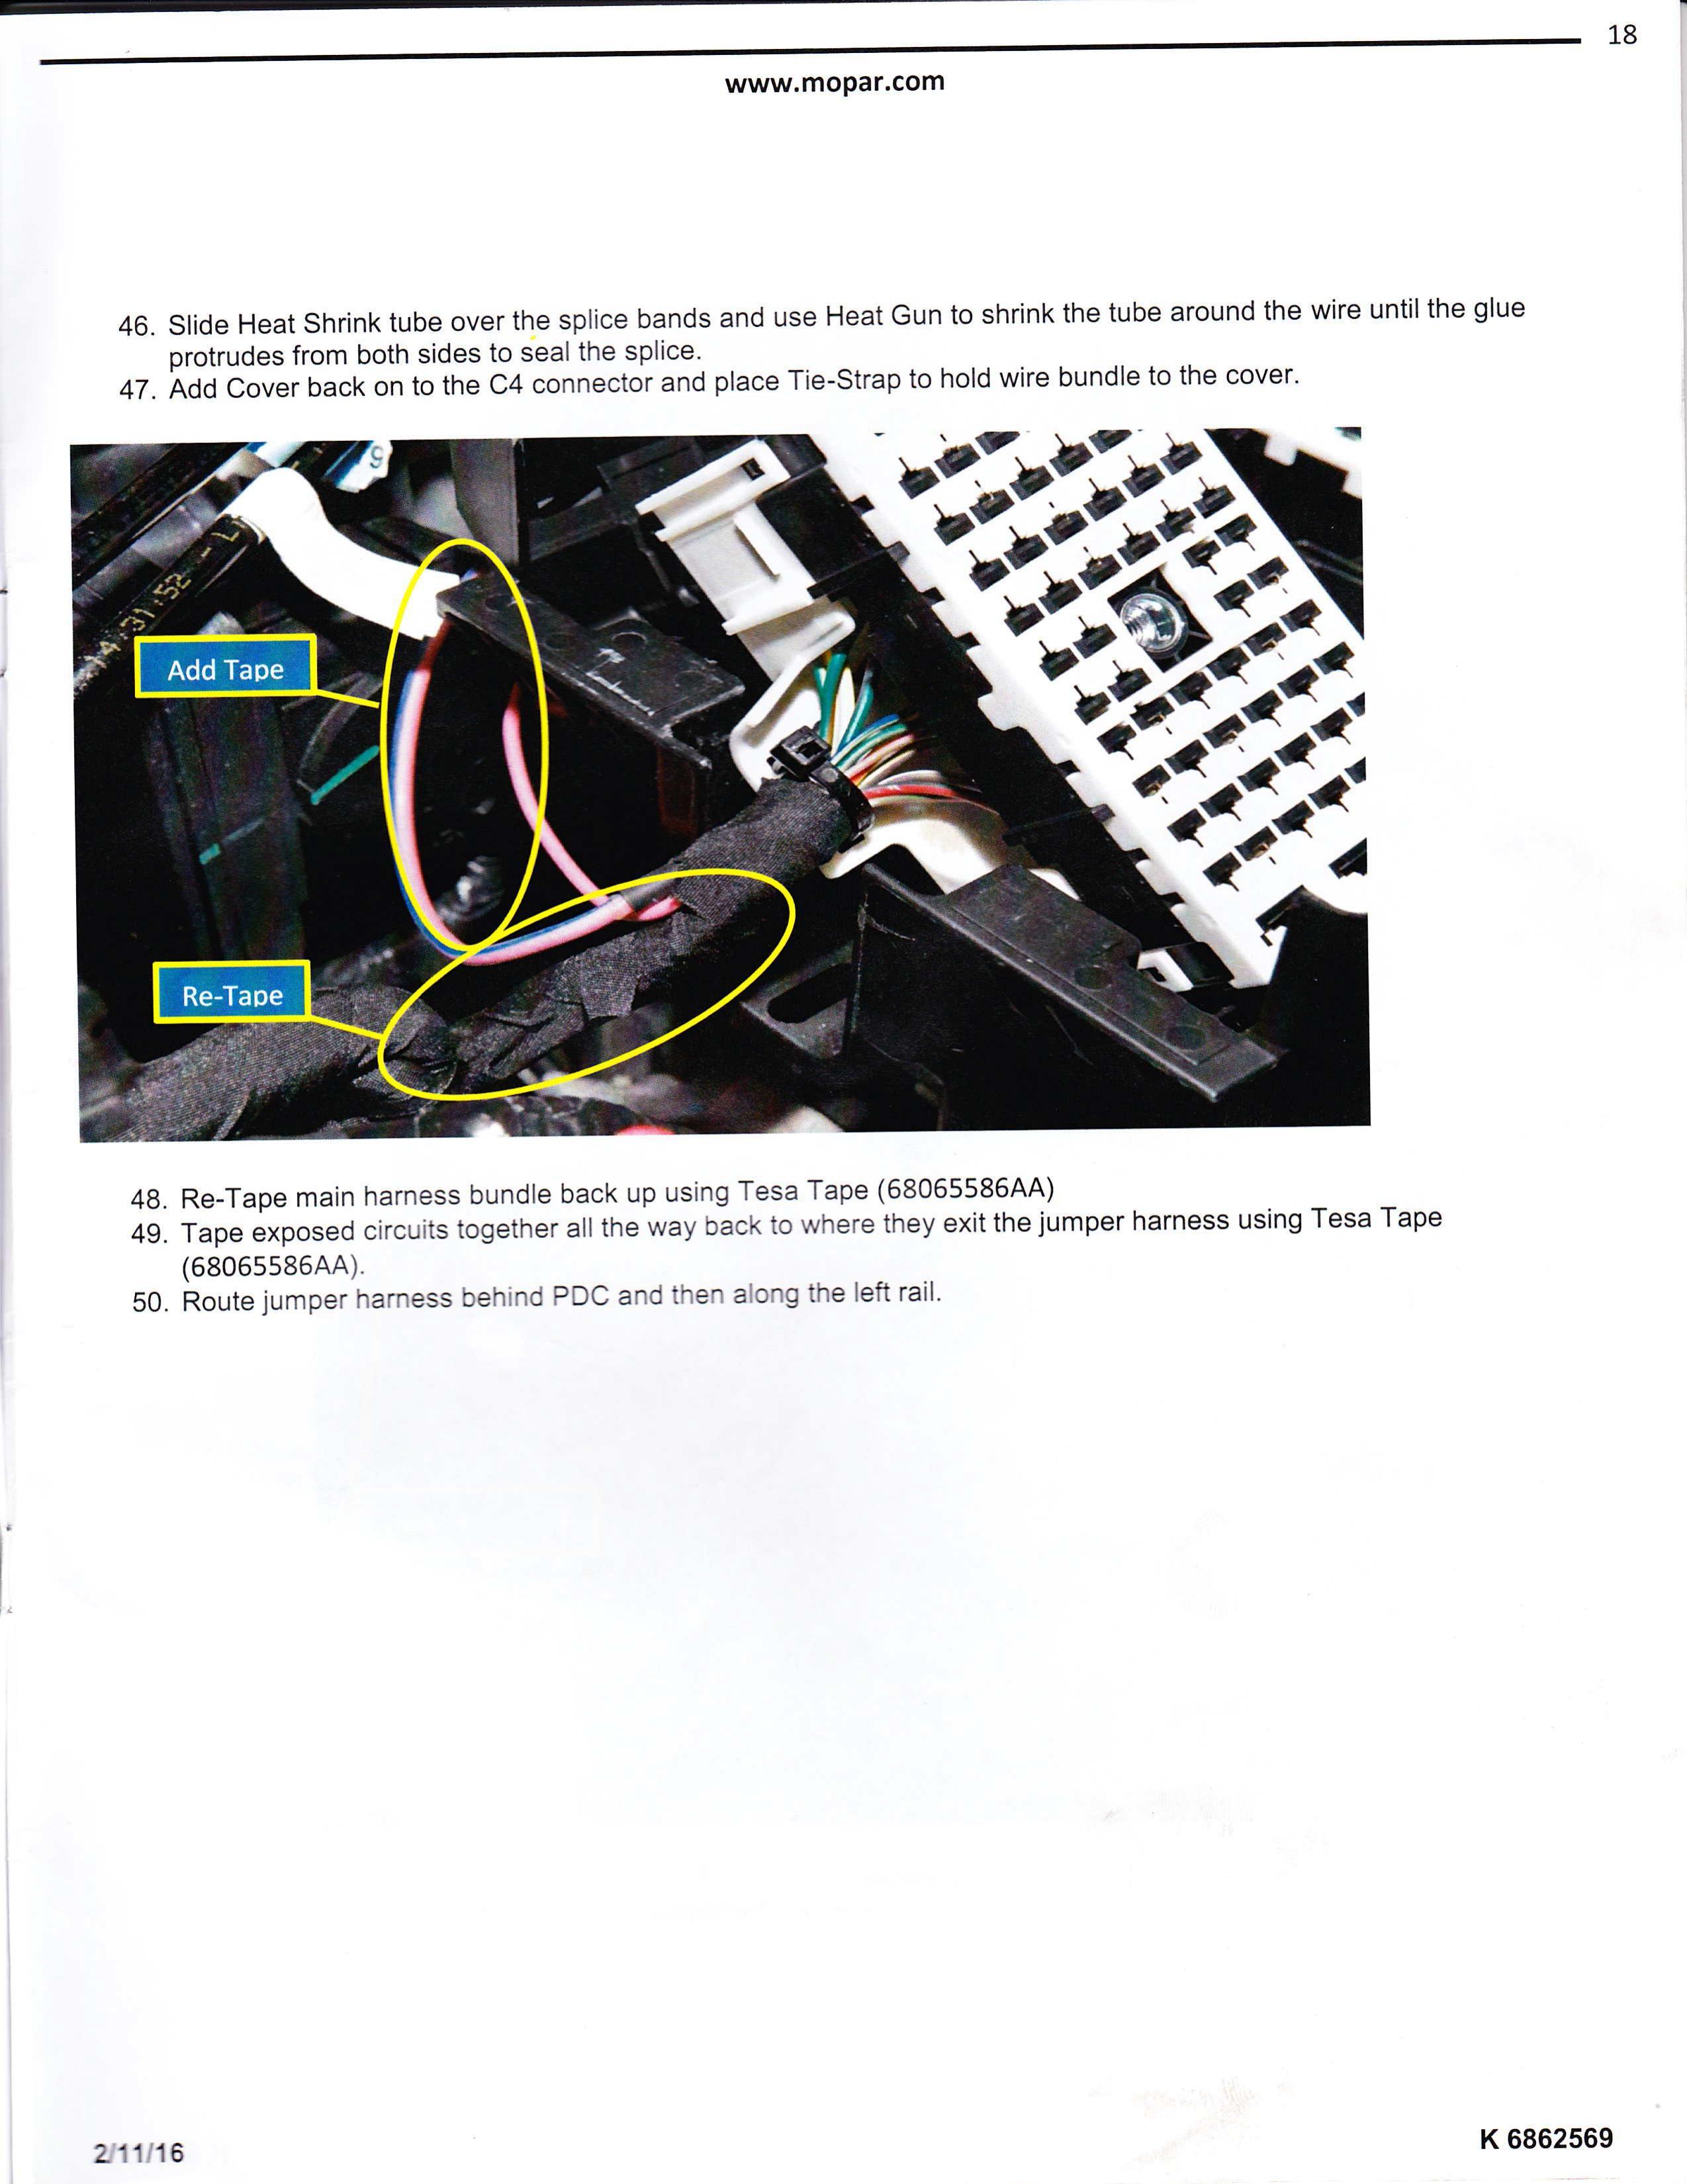
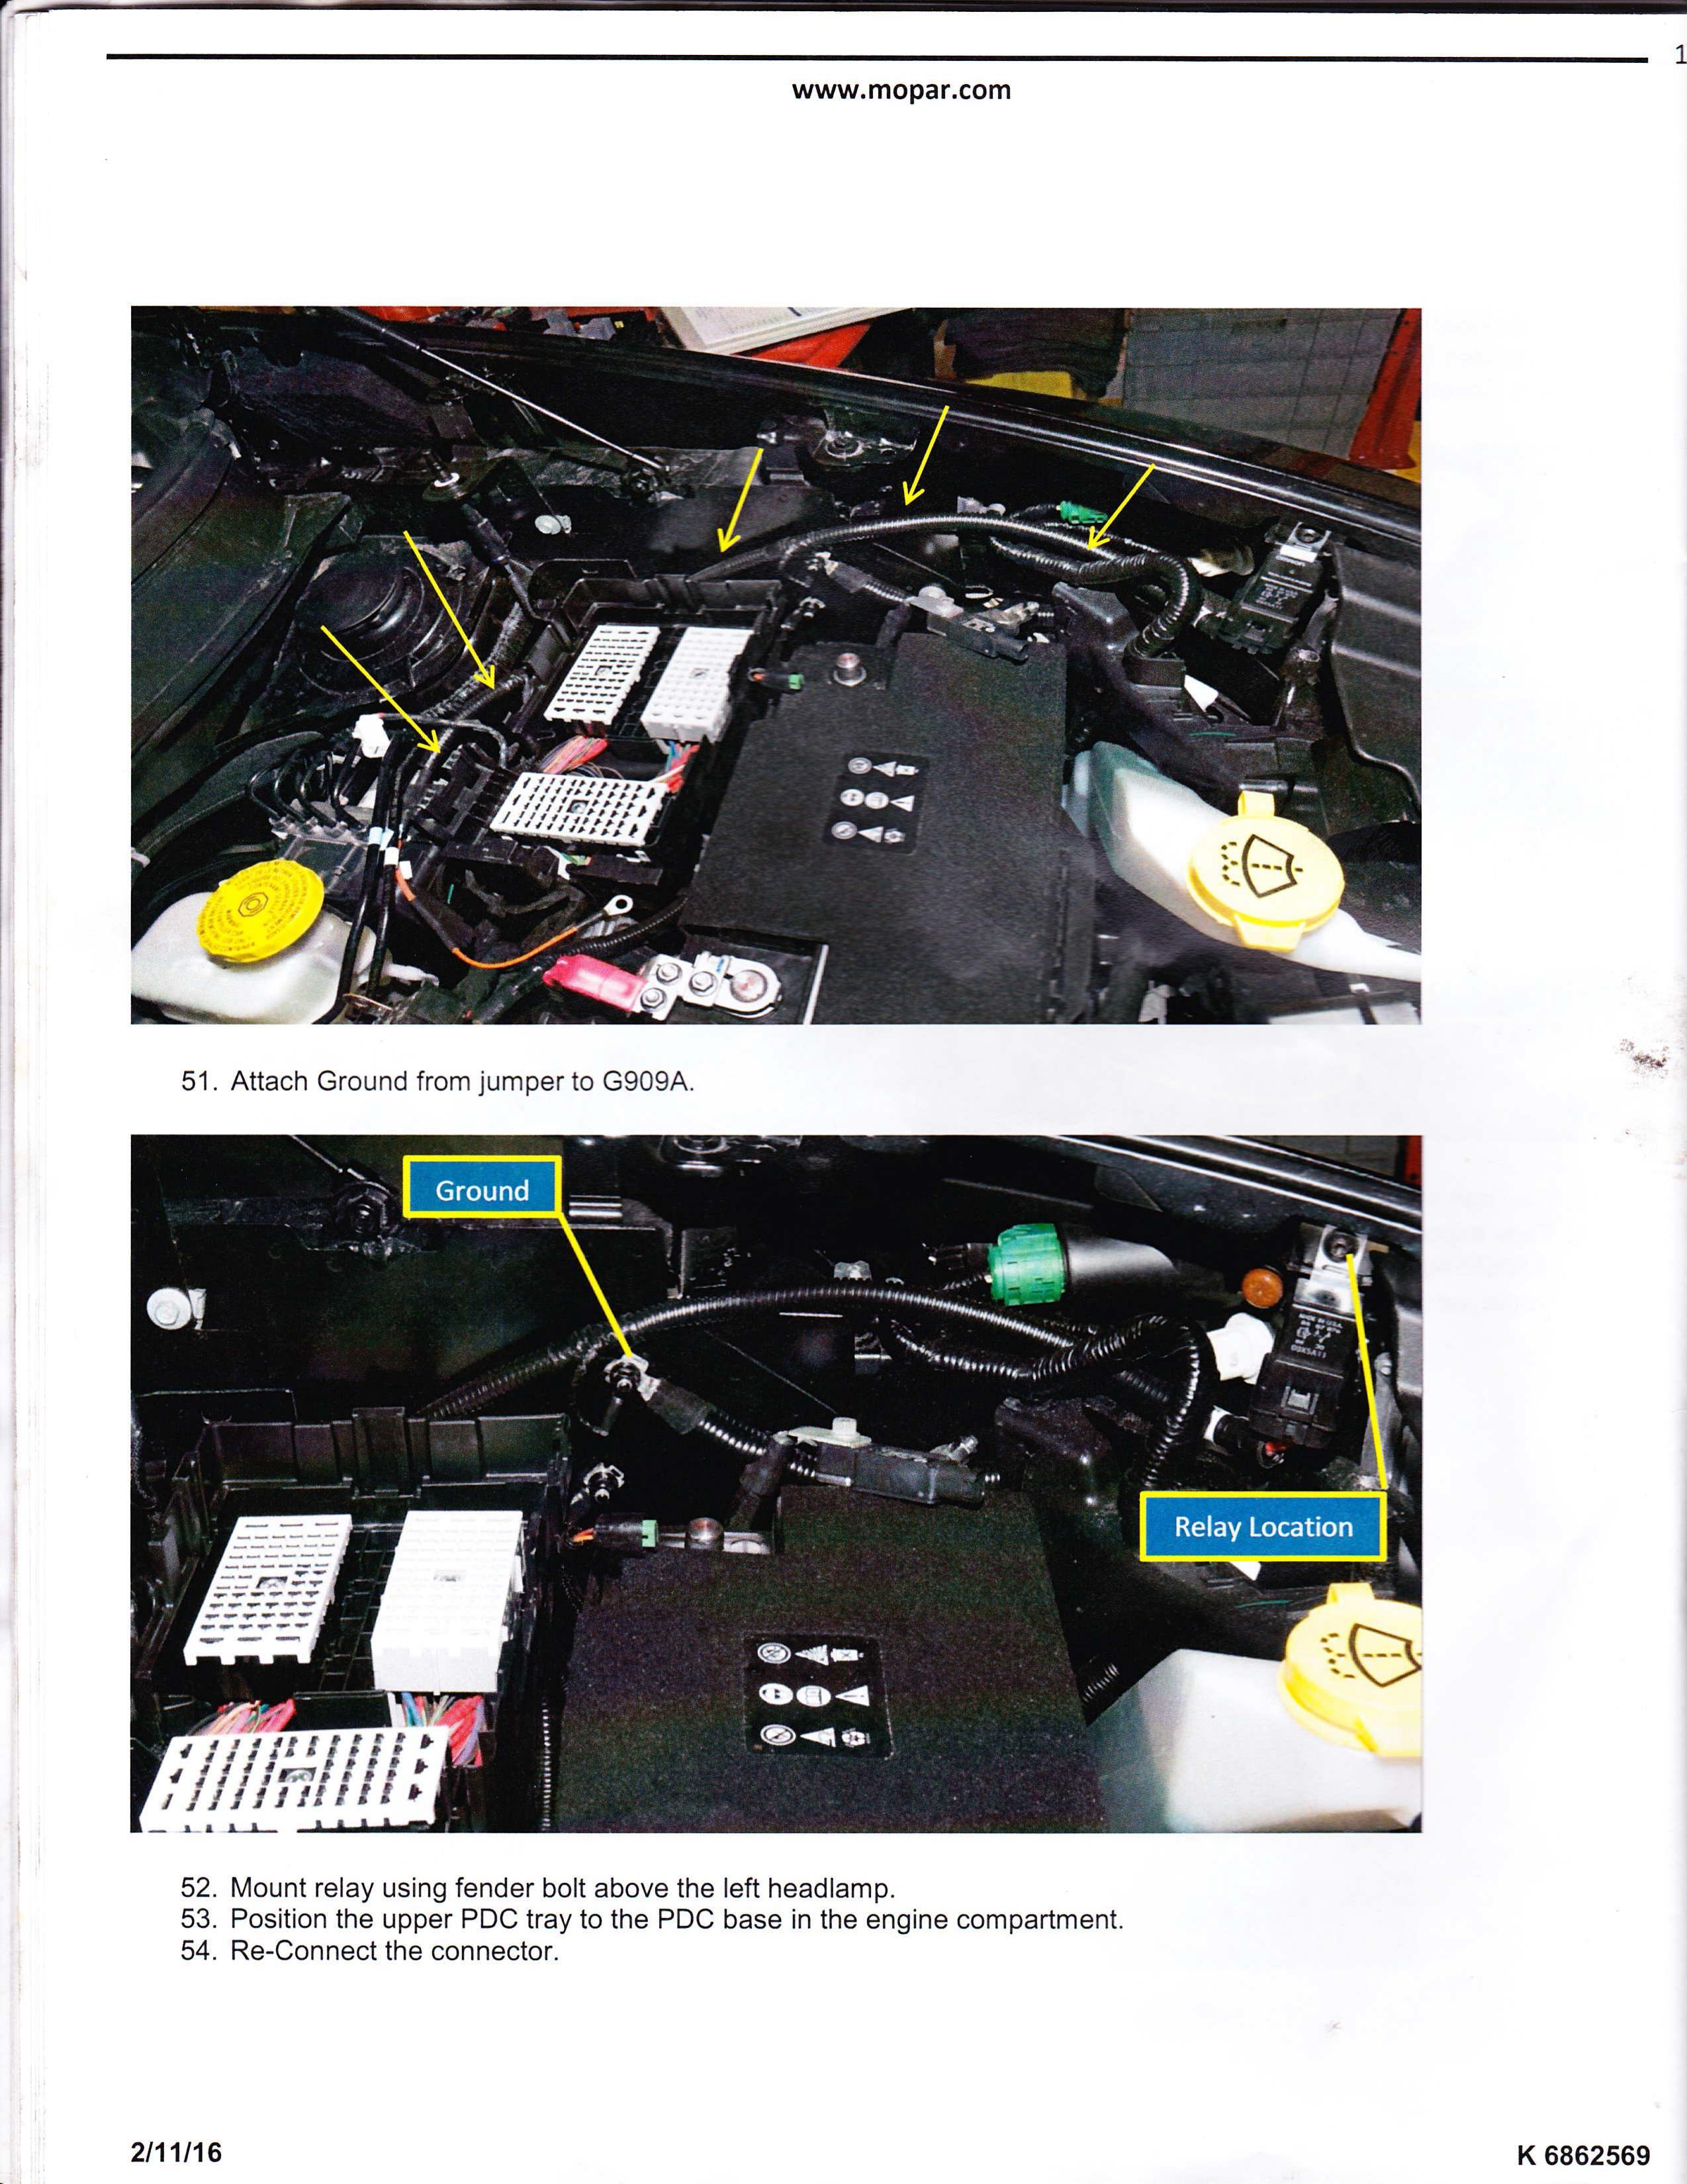
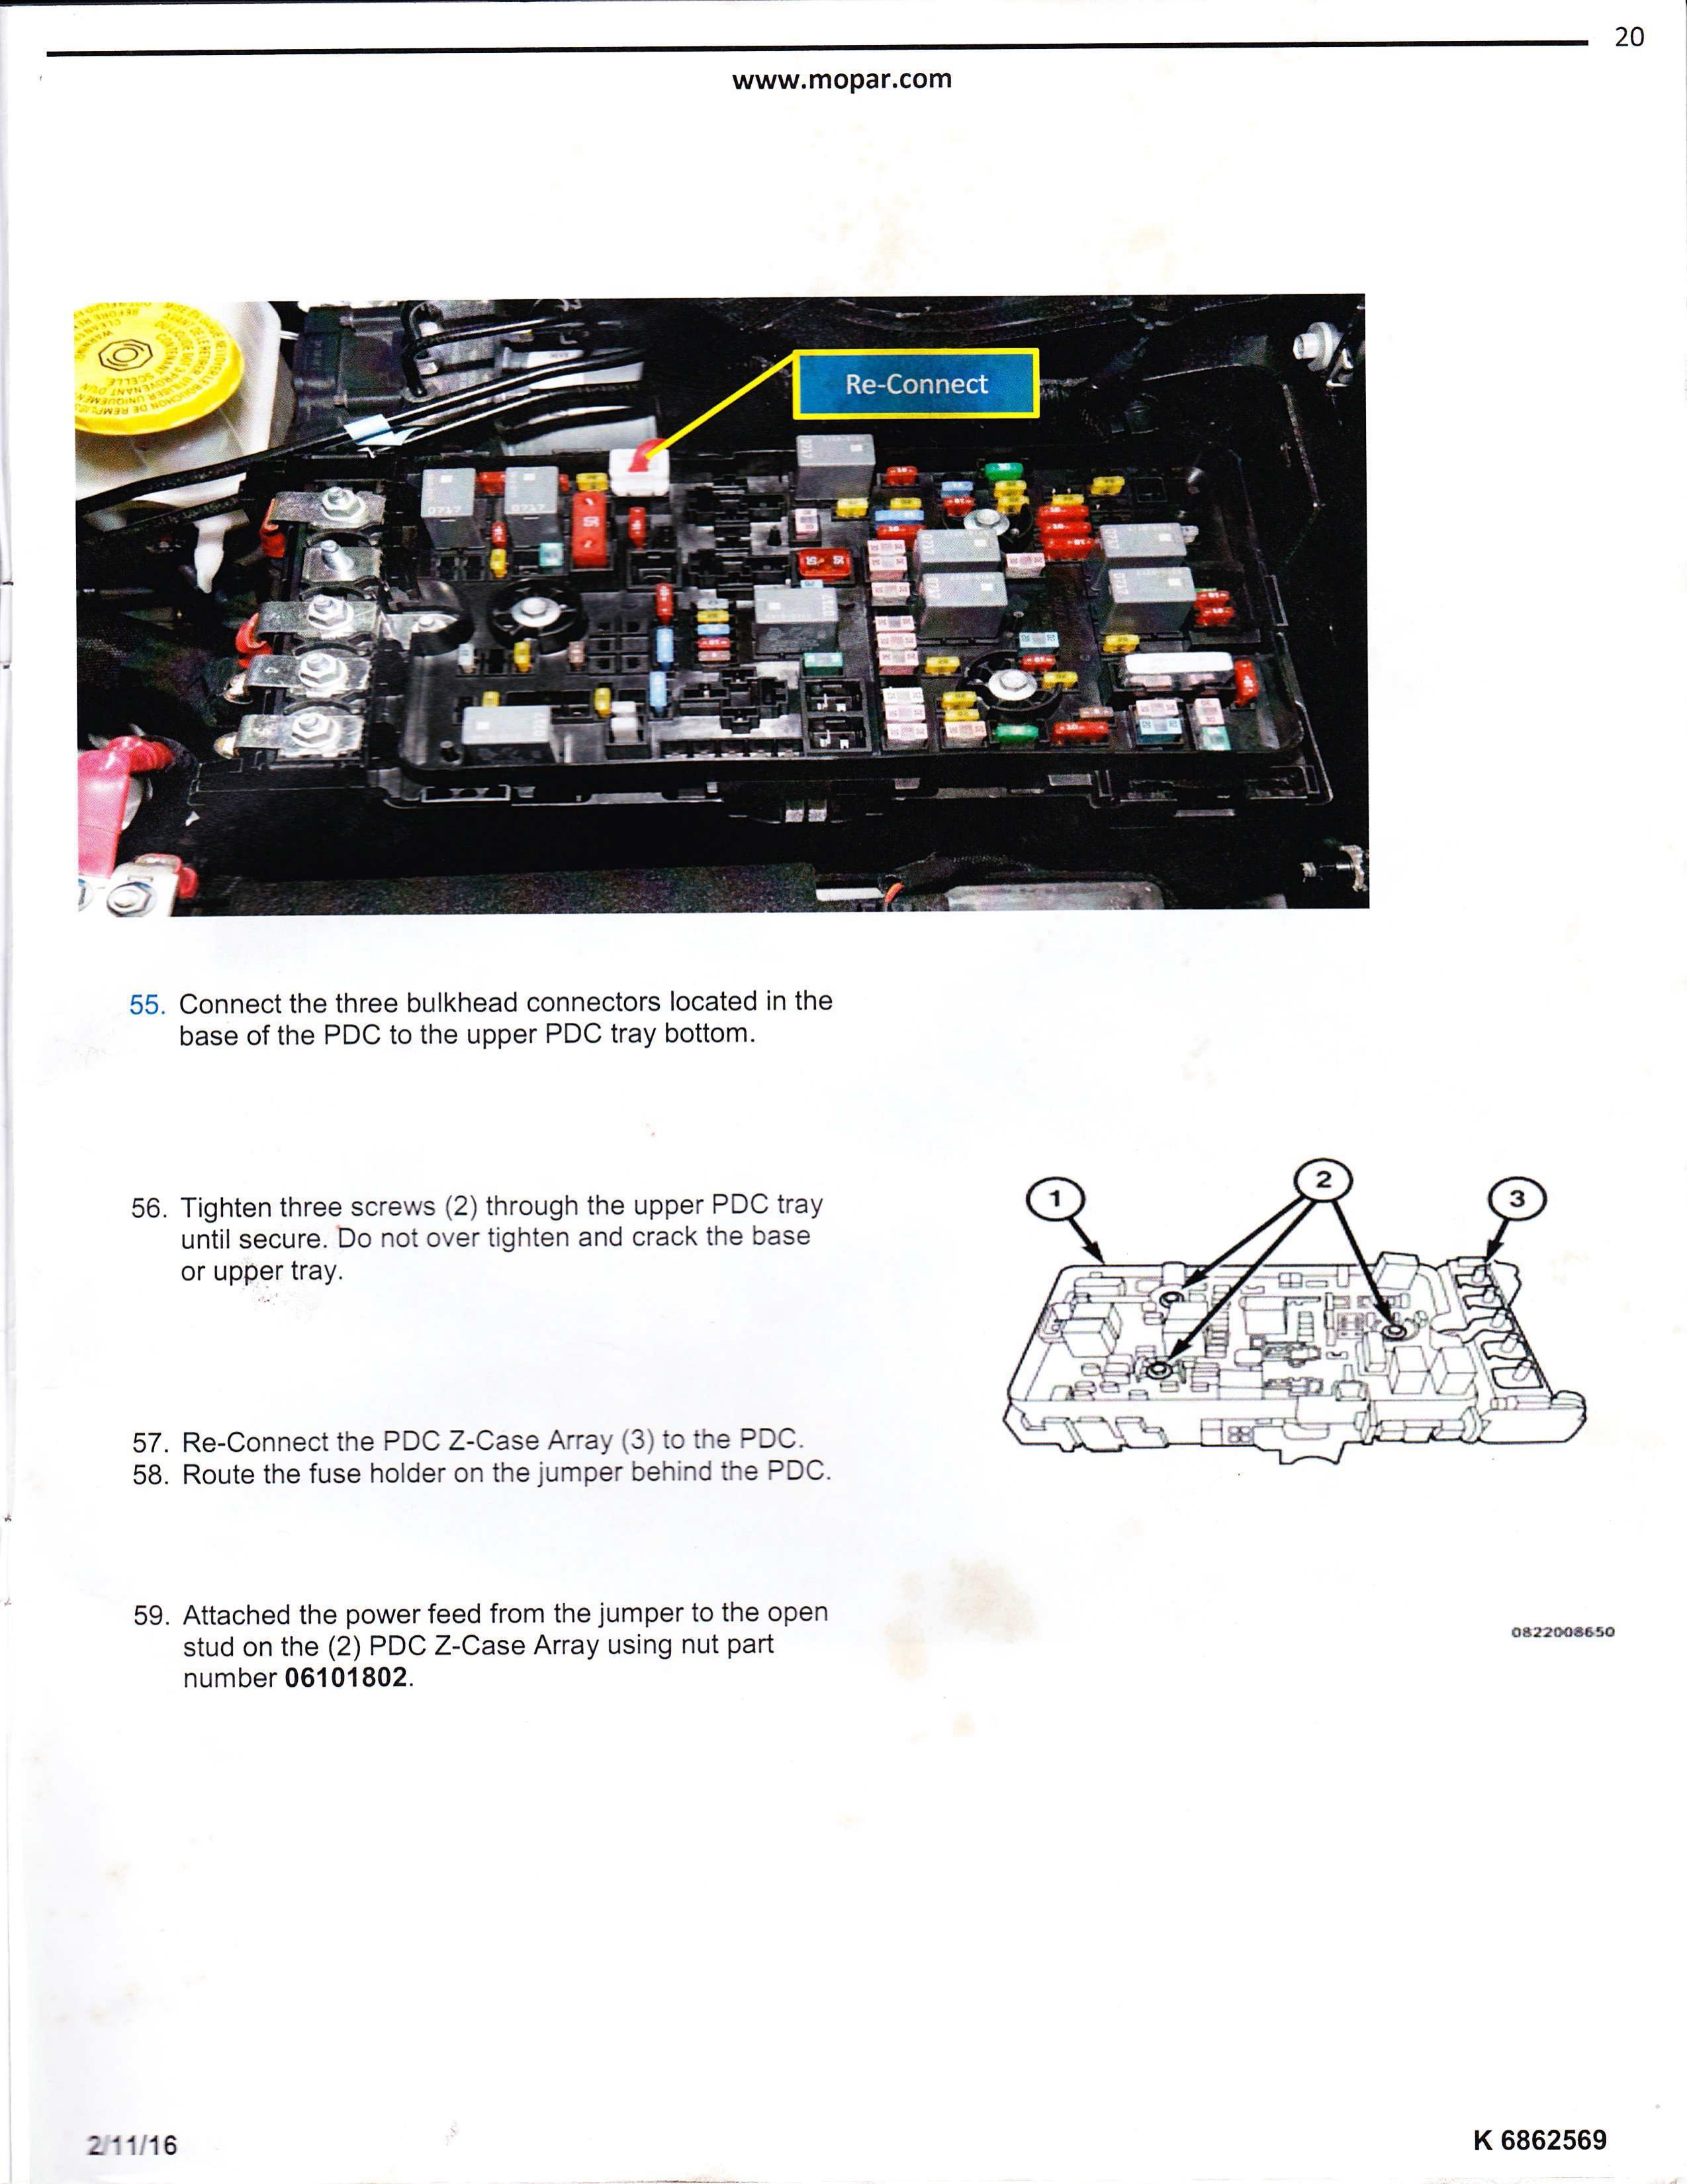
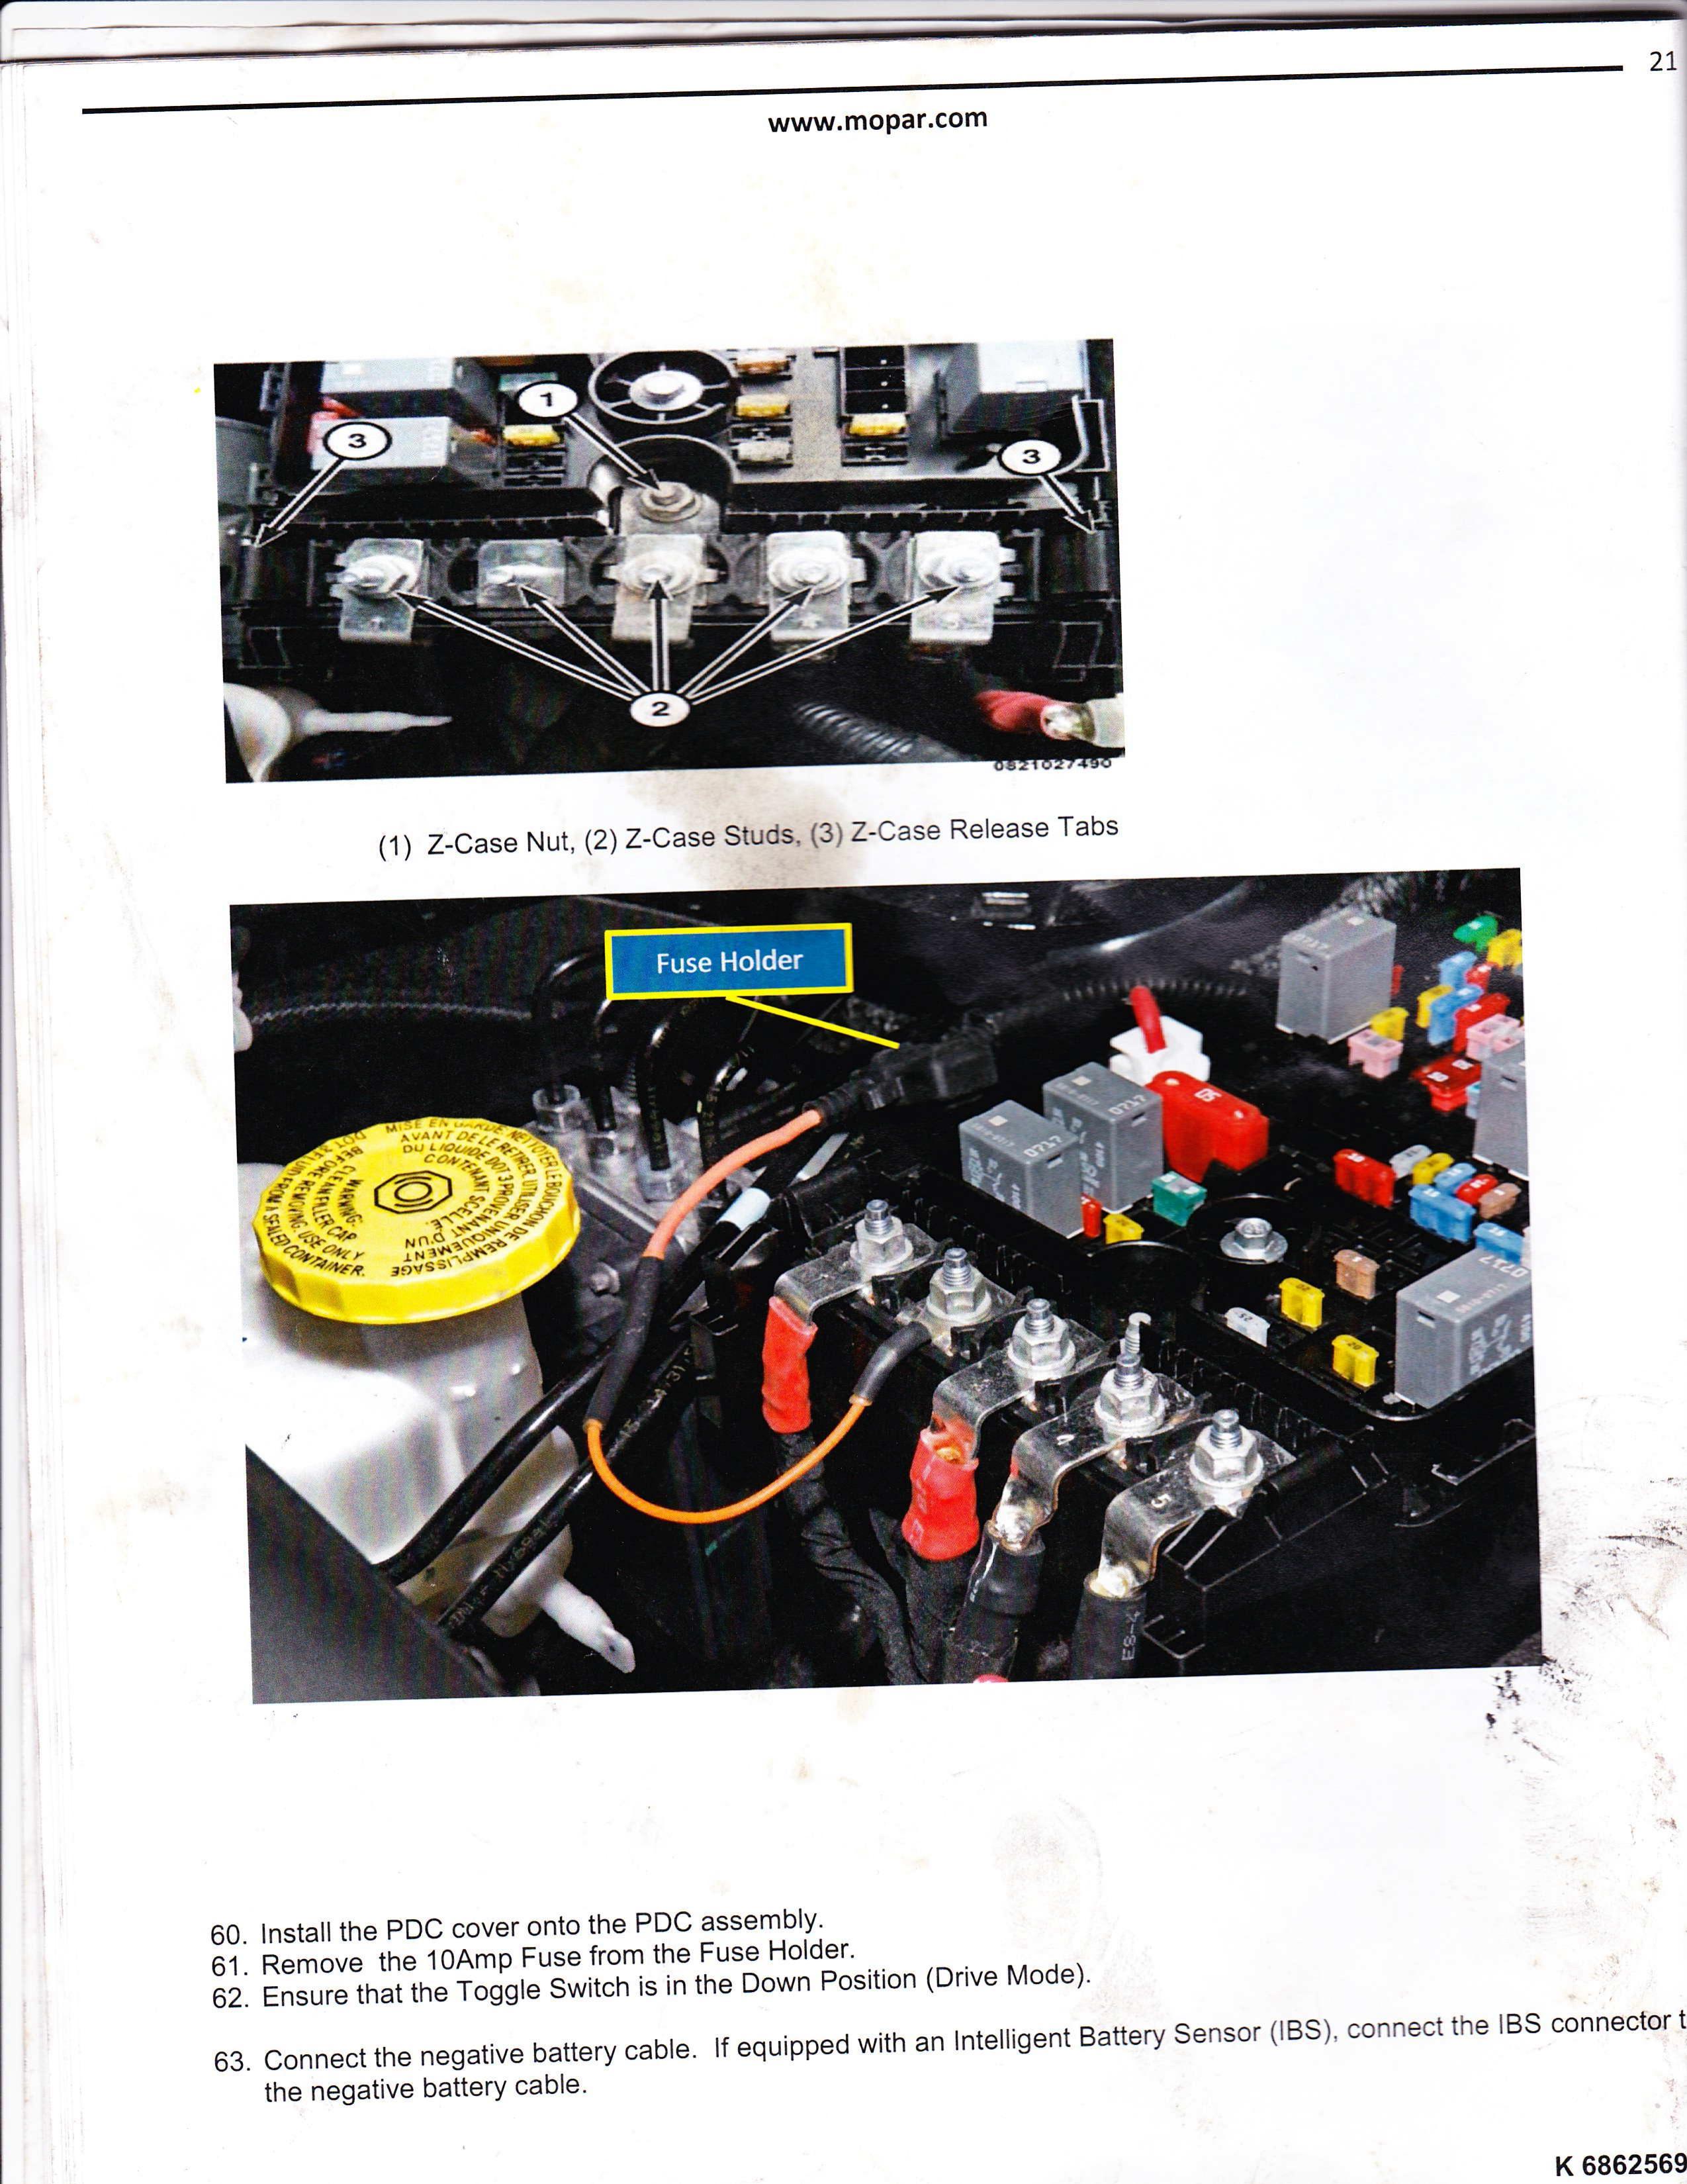
I don't have a dog in this fight but here's some information a link that might help you.
The images were a PDF but that file type wasn't acceptable to the forum so I converted it to jpg images. (very inefficient space wise)
Also try these links for more information:
https://www.jeepcherokeeclub.com/threads/installation-of-the-flat-tow-harness-wa-state.213649/ (This is where I found the a link to the PDF)
https://drive.google.com/file/d/0B_FMSsMCU-3jSGVLN3dFTmVycFU/view (this is a link to the PDF file - MOPAR Instructions for installing the kit)
https://www.etrailer.com/question-363326.html Is The Mopar Recreational Flat Tow Wiring Kit Part 68321424AB Required To Flat-Tow a Jeep Cherokee?
https://www.amazon.com/Mopar-68321424AB-Flat-Wiring-Harness/dp/B07QV2YKSW Buy the harness here. No reviews but the Q&A may be helpful.
https://community.fmca.com/topic/8903-important-towing-information-2014-2016-jeep-cherokee/page/2/ This is a lengthy thread on this subject here on the FMCA forum.


-
There seems to be a little difference between the Flowrite Battery Watering System for Trojan batteries than there is for other batteries. I know for a fact, the ganged tops for Interstate GC2 golf cart batteries and Trojan t-105 batteries are identical because I took the factory original Trojan battery tops off and snapped them onto the Interstate batteries I returned to Costco. The flowrite system I took off the Interstate batteries is working great on my Trojan T-105 batteries I ended up with. Since I bought my Flowrite system, I see they've begun offering ganged tops to cut down on the individual tops and tubing between them. That makes installation a lot easier. Here's what the Flowrite system looks like installed. https://store.flow-rite.com/watering-system-2-6v-fits-all-6v-standard-spacingrv-2000.html $65

The rascals sell the hand pump you need to connect to the tubing separately. You put one end in a gallon of distilled water and squeeze the hand pump till it gets hard meaning the batteries have stopped taking water.
https://store.flow-rite.com/fast-fill-battery-water-supply-for-rvrv-2020.html $20

Or, you buy a battery water can for $12 to $15. https://www.amazon.com/Performance-Tool-W54274-Battery-Filler/dp/B003EHIFE4/
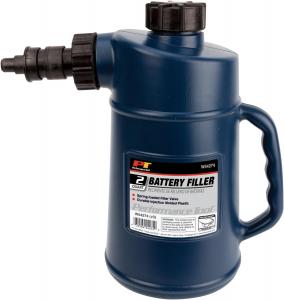
All these products make adding water to your batteries easier. The Flow-Rite system has a float that blocks adding water when there's enough in the cell. The water you put in the battery watering can stops flowing when the water reaches the proper level. I recommend checking and topping off your batteries once a month to prolong their life.
-
Duracell Golf Car Battery - Group Size GC2 ($90)
https://www.samsclub.com/p/duracell-golf-car-battery-group-size-gc2/prod3590228?xid=plp_product_1
BCI GROUP NUMBER: GC2
DIMENSIONS IN INCHES*: 10.38" 7.13" 10.88" LxWxH


House generator not picking up the load.
in Type A motorhomes
Posted · Report reply
Not knowing which model/size generator you have, you might need to open the cover on the generator to access the breakers.