Search the Community
Showing results for tags 'leak'.
Found 8 results
-
I have a 2014 Itasca Ellipse 42QD. (Winnebago Tour) It was raining pretty heavily, and wind was blowing rain at about a 45 degree angle. We began having water leak from 2 lights, side by side, that I now know are directly under the most forward A/C unit. I got on the roof today and can't find any obvious issues that would cause a leak. I took off the A/C cover, then another cover under that and I think I found the issue. If you look in pic 1901 you'll see the hole for wires and air flow for the A/C unit (Unit is a Coleman Mach). There was some water still in that hole. There is no way for water to get into that hole from the A/C unit... HOWEVER, the A/C unit does sit about 2 inches above the roof. There is a foam gasket (about 2" thick) that sits between the A/C and the roof, around this hole. I THINK the rain, when blowing sideways, got under this gasket and into the hole. Has anyone had this same problem. In order to seal that gasket using silicone or caulk, I'd need to find some with a very long applicating nozzle. about 3x the normal caulk nozzle length. Or..... I guess the "right" way to fix it would be have the gasket replaced. My guess is I could do this myself. I'm just wondering of anyone else has had this issue and had it fixed??????
-
We found water coming from under the sinks in our bathroom, about a tablespoon, two days in a row now. I find dampness on a cold water hose but when I dry it it stays dry. We are in a high humidity area and have had a lot of rain these past few days. I’ve checked the fittings and found no leaks. Is it possible that it’s condensation? It’s also been cold so we’ve used the heater a lot (Propane). The pictures show where I put paper towels under the lines so I can check before bed time to see if it happens during the day.
-
Yesterday morning the I heard a hiss when I accelerated only. When I got back home I inspected for a boost leak and exhaust leak. I didn't think it was a boost leak as the gauges show a good 30 psi when acceleration. I saw exhaust stain from the side of number three cylinder where the exhaust manifold bolt to the head. I was surprise because the exhaust manifold is a 2 piece design. I sprayed with Deep Creep and loosen all bolts while engine was still warm. I run to Freightliner and picked up six multi-layer steel exhaust gasket. By time I get back the engine has cooled. I then removed all top bolts from manifold to head and screw them back in a few threads. After that I remove all of the bottom bolts. I then pried the manifold away from the head which gave me about 1/4 inch of space. I then removed one top bolt at a time, replace the gasket and threaded the top and bottom bolt a few threads until all was done. I found one multi-layer steel gasket had split and another had a slot on number three cylinder. That was most likely the source of the hiss noise so I torqued the manifold down knowing I won't have to take the manifold off. Attached to that exhaust manifold is the turbocharger and to the turbocharge is the exhaust brake. This method saved me lots of money and time.
-
'04 Fleetwood Revolution 40C with PowerGear Jacks. Pictured is the top of the fluid reservoir for the jack system. Fluid appears to be leaking from behind the fluid level sensor (the white plastic piece at top center of photo). Is there an easy way to stop such a leak? It looked to me as though merely tightening the sensor housing would be the thing to do, but I felt little or no resistance when I twisted it so I don't think it was getting any tighter. Moreover, the label just below it shows that the sensor is supposed to be set in a particular direction. I didn't want to mess up any existing settings, so I put it back in the same position and came here to ask for opinions. Oh, and I added some Dexron-III ATF since the level was down a bit due to the leak. Thanks for your assistance. --Tim Colburn F428940 Park Forest, IL
-
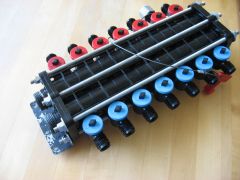
From the album: Manabloc Plumbing Manifold
The Manabloc manifold is now made by Viega, but this model has been taken out of production. It is not designed to be taken apart and maintained; but, I split it open, cleaned and lubricated all O-rings, installed new threaded rod connectors, and torqued the assembly to perfect water tightness. Then, I found small cracks from old freeze damage radiating from the hot water supply... This entire assembly is now a paperweight. -
2001 Monaco Dynasty - fresh water is going into holding tank and valve is closed. Could the valve be defective? Could there be too much pressure? Is the valve hard to replace?
-
From the album: Beaver Maintenance
Lifting the coach off a jackstand on our level driveway in front of its hangar, I inadvertently ran the rear jacks to their full extension, something I avoid doing. When they retracted, the left remained partially extended. By re-extending the right, and initiating a tandem retraction, both eventually came up. But, the left jack pours hydraulic fluid anytime extension is selected, and doesn't move. Today, using Power Gear guidance, I removed the jack from the motorhome and began disassembling the unit, which they recommend doing prior to making any determination about repairs/rebuild. For a good reason, it turns out: After unbolting the leg and extending it manually, it suddenly hung up; forcing extension revealed hideous damage from what appears to be a pin or bolt inside, along with multiple scratches. Either fault demands replacement of the entire unit, says Power Gear. -
We're in the first week of ownership of a 2007 Beaver Patriot Thunder. Lots of small problems, most of the flaws in the coach are purely cosmetic. Until today. We were showing friends the coach, I'd pulled it out into the sunshine and opened the slideouts. In one basement, there was a puddle of water. Strange, since I'd been in the basement several times in the last week and it had been dry. Here is the painful part: the puddle and dripping wires right above it were directly under the toilet! I mopped up the water (about 1/4 cup) with a paper towel, and recalled which plumbing items I'd just used. There'd been just one: the kitchen sink. I blotted up the leakage and gave it a sniff: fresh water. Then, I stretched out dry towels and ran some water through the sink. Sure enough, the towels were again wet. Tracing back along the supply and drain lines with a flashlight, I saw all was dry and snug. The dry lines check progressed along the kitchen cabinet, all the way to the sliding wall section at the end of the slide. Unfastening the moving panel with the help of a friend, we looked into the cluttered area where bundles of electrical lines, the sink drain, and hot & cold water lines all form a graceful loop that plays out when the slide is extended. My buddy dabbed his fingers in dark wet dirt in the bottom of the bay and held them aloft: "there's your problem, it's wet." Indeed, the drain line was wet, probably leaking from where black PVC was joined with white reinforced rubber tubing. We congratulated ourselves and rejoined others in our party. Later, after he and his wife had left, I shined a light on the area. The "dirt" was hundreds of black pellets, each 3/8" long and the diameter of a Cheerio. Oh, oh... I immediately called him, told him to wash his hands and not chew his nails. What took up lodging in that crowded space between kitchen and bath must've been a huge rodent. No signs of hair, nesting debris or extensive damage, just guano. Now, the million dollar question is, did this visitor gnaw into the drain line in search of water? Replacing the tube will be a bugger-bear, further exploration will determine what work is needed. I've been all over this coach with a fine-toothed comb, not a speck of insect or rodent droppings anywhere else. This one caught me by surprise. Take a look at your enclosed spaces, see if you have visitors. Places where they might gain access to water might merit extra attention. Update: I'll post a photo of what I discovered in our album HERE. In short, the "rodent" I suspected was working on the Beaver assembly line. Before bundling the fresh water, drain, and multiple electrical conduits that comprise the "loop" adjacent to our kitchen slide, he/she oriented every hose clamp so that the sharp edges pushed against the underside of our kitchen sink drain hose. A worm-drive clamp tail was the first to completely penetrate the doomed hose, this time-bomb took 12,000 miles of vibration to activate. It is not hard (about thirty minutes' work) to expose the loop and cut away all the zip ties holding it together. If your rig is similarly booby-trapped, the time it takes to discover this time-release failure might be worthwhile. Now, I am removing the damaged section of hose, splicing in a replacement. You betcher bippy my plumbing will be wrapped in some type of anti-chafe cushion material.


