


dickandlois
-
Content Count
4234 -
Joined
-
Last visited
-
Days Won
12
Posts posted by dickandlois
-
-
Thanks for your feedback !
Rich.
-
Chris, Welcome to the FMCA Forum!
Do you have the weight numbers with the coach loaded? 4 corner numbers are the best, but running the coach over a weigh scales and getting the front, total weight and the rear axle weight numbers will help the group pass on the best information to help you.
Brett's request for some information on the chassis builder and millage helps determine information that we can to help determine what is a logical approach to your question.
Rich.
-
Ruffis, Welcome to the Forum !
There’s a 20 amp draw at the chassis fuse panel #62 labelled “modified vehicle”. Shop manual says there is nothing suppose to be hooked up to this circuit but when fuse pulled we loose the power/heated mirrors. So I have fit an on/off switch into chassis - cable to buy time.
The Circuit you referred to is often referred to as a Coach builders circuit. So a chassis mechanics information would not have any info on what is connected.
The items mentioned and the items you mentioned are frequently connected to this type of circuit powered by the chassis batteries.
The Chassis builder should be able to supply you some PDF files that contain the circuit drawings for you coach.
The only other change is the over cab TV, it was always “on” (Power LED illuminated) whether the Xantrex Inverter was on or off. I just used the battery disconnect switch to deal with this.
There are 2 battery disconnect switches, one for the chassis and one for the coach 12 volt systems. The Inverter will not be turned off by the disconnect switches. That function is part of the Xantrex remote control panel.
Rich.
-
Stephen ! Welcome to the FMCA Forum. The recall was issued due to an over heating wire caused by the square potentiometer according to the recall information I have found.
You did post that.There was a recall regarding the potentiometer that was supposedly corrected before I took delivery and that does not seem to be the issue. When the unit was taken to Freightliner, they said all of the components on their side were working properly.
The part exchange would be an issue that the coach builder would be involved. They would be replacing defective part because the controls in question where installed by them and not Freightliner. Freightliner installed the Compressor, drier, condenser and evaporator.
A call to Rev Group might be in order. There could be an issue inside the Heater / AC mixing box involving door seals and or the control servos. The servos control the amount of hot and cold air to reach the desired temperature . The expansion valve installed in the evaporator could be an issue or the relay / or wiring used to control the system.
The potenteometer issue was causing a over heating issue on one of the wires used in the system, the reason for the recall. Might want to contact HR and verify the recall and all necessary work was performed on your coach.
I have experienced temperature issue due to dirt in the expansion valve caused at times from dirt getting into the system during installation, charging or repairing the system.
Good Luck, Rich.
-
Should the noise be a squalling sound, the main problem is the front blower motor bearing. One can clear the problem.
First big question is what are your skill sets? No real electrical skills needed, but if your coach is equipped with a solar panel indicator / indicating the small panel is producing power.
Need to carefully drop the intake cover on the inside of the coach.
With that removed - remove the metal blower cover, most commonly held in place with 4 screws. The plate then slides back slightly and will drop down out of the way. you can now see the squirrel cage fan assembly. The trick now becomes cleaning the bearing where the motor shaft exits the motor.
One does not need to remove the motor or any items requiring working on the roof.
I use one of those long fireplace wooden lighter sticks wrapped with a paper towel or long plastic stick. The remaining portion of the towel needs to be held in a way ----So it never comes in contact with the fan assembly. !!!!!!!
NOW ! start the fan motor only, with a light amount of light weight oil ( WD-40) will work in this case even if it is not a lubricant, IT Is a Water Displacement formulation) Carefully hold the stick or plastic item long enough to hold the paper towel in contact with the shaft. You will see the dirt and even some rust is many cases build up on the tip of the tool. Repeat this process until the towel is clean. NOTE even this might reduce the noise level, BUT the job is not done....
The next step is to spray some CRC onto the area you just cleaned. Repeat cleaning the area with a clean portion of the towel. THIS step might also reduce the noise level, But the job is still not done !!!!!!
Using the tool you have created place some silicon grease on the tip of the tool, Think plumbers Grease. Thin viscosity but will still form a bead. No towel required this time and create layer / silicon bead on the fan shaft AS it is turning. Let it set with the fan off for 2 to 3 Min. Let the fan run for 10 to 15 min. Noise Gone ? If not repeat the process. It might take a few cycles of the whole process, but it should quit down.
I found this process years ago and to date still have not had to replace a Roof AC unit because of a noisy fan.
Good luck and always work safe. IF working in an area with a spinning object makes you nerves - get someone who can work comfortably on the system.
Rich.
Note, Reading you have a screw issue. I remove a number of them with the aid of a pocket knife blade placed carefully between the metal surface and the screw head to add some pressure to ease the screws out while turning the screw.
-
1 hour ago, u8at711 said:broken down,
roadside assistance troubleshooting a bad fuel solenoid and bad ECU, He is unable to reset the ecu codes.
tried to talk to Monaco, they said my 1997 is too old, and they do not deal with any chassis issues.
Who do I get a new computer programmed if the old one is damaged to bad for retrieving old programming. ?
ecu= 3096662-rx
motor number=34830072
engine trouble codes= 254, 434
also Cummings says these are non-valid codes for my motor serial number.
HELP
") stuck here and very far from home, missing work.
stuck here and very far from home, missing work.
Did Cummins mention the series of the engine and engine serial number?
The Numbers you listed for the fault code do come up on the charts, but the codes mean different things for different engine series. Confusing !!!!
A little more information from your end would help. Before and after your model year there where a number of changes to the engines.
Rich.
-
Bill, The fact that you can manually light the flame and it works fine, points to the electronic ignition portion of the circuit board. About the only thing one can check is the continuity of the high voltage wire. The problem sounds like a failed part, but if you have a good soldering skill set - you might look for a bad solder connection.
The igniter circuit voltage will put you right on you butt. Not fun to play with. If the gap is set correctly and you do not get a spark. The circuit has an issue.
Board level drawing are few to none in many cases.
Rich.
-
misterclean 2, Welcome to the FMCA Forum !
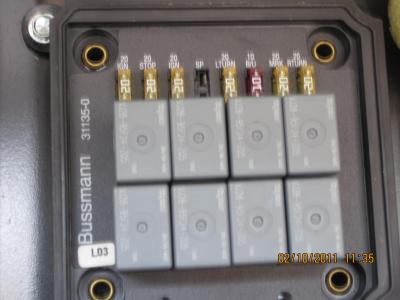
This is a link to the type fuse / relay stile boxes used on a number of coaches to protect the rear wiring of a number of coaches. This information might not match the model or manufacture of the one located in your coach. Other members have offered where to look, but they can be behind a panel or cover in one of the rear cargo bays. Pages 26 plus and page 38 Plus for different layouts and configurations.
https://www.mouser.com/ds/2/87/cbt-cat-7047-cbt-full-line-catalog-2013-258372.pdf
There are other suppliers of this style fuse box.
Winnebago should be able to offer some insight on where it might be located and some information on who's system, they used if there is one in you model and year coach.
Rich.
This is a picture of a typical fuse box taken in 2011.
The PDF file is of the wiring circuit used on a freightliner chassis. drawing is dated 2004 and it is 15 years old at the time and items change over time.
-
Welcome to the FMCA Forum !
Hewebb, Glad you posted your experience for others on the forum !
You should include your Coach Make, Model and Year when posting on the Forum. That helps the members offer information and help that is generally closer to the issue(s) members are exasperating.
Not all service centers are created equal and members often know where and who to contact for service or at least offer suggestions where they have been satisfied.
Rich.
-
5 minutes ago, wolfe10 said:Nightcrawler,
The Freightliner chassis build sheet shows a 160 amp alternator.
https://cdn.fccchq.com/specsheets/5b7abfafcf1da258f28db094/2010-Tiffin-Phaeton.pdf
As long as you don't start with deeply discharged batteries, that should be just fine for running the loads you describe.
If you see voltage dropping below 13.0 on either battery bank while driving at highway speeds, I would suggest having the alternator checked out.
Both on the same thread and your thoughts are equal to mine. found the same size alternator, but he should use the last 7 characters of the Vin and give then a call and ask who supplied the alternator they used on his chassis.
Freightliner service in Gaffney S.C. 1-800-384-4357.
Rich.
-
You might look at this post regarding the Lithium Battery use. If you have not been following it.
Rich.
-
Bill Cox and Rick Keys !!!
Just a heads up in regards to a portion of your post. (driving into the sun will change the situation and I just reach down and hit the generator and all is good.)
The sequence of starting the generator with the Roof Ac unit(s) turned on over time will damage the ATS. When the Delay period activates the ATS with the load required to power the AC units creates an ark at the contacts, this process will cause pitting in the contacts and at some point that will weld the contacts together. At that point you will loose shore power connection. The same thing will happen when connecting the shore power cable to the riser with the Roof AC or any High load equipment powered on.
Best sequence is to connect to the riser or start the generator before turning on the AC units, because the contacts will close with a very limited current load. Reduces the contact damage and per longs the generator circuit breakers life.
Cutting corners will come back and cost some money down the road at some point.
Rich.
-
17 hours ago, POUTRAVEL said:We have a 40 foot, 2005 Santiam with 350hp C7 engine.
A few weeks ago the Alt Chg warning light & alarm came on. A diesel mechanic changed the alternator unfortunately the alarm did not go off. The mechanic checked the connection and said everything was working correctly.
A few days later we tried starting the engine and the chassis batteries were completely dead. We replaced the batteries. We finally called the manufacturer of the alternator and found out that the wrong one was installed.
We had the correct one shipped to us, it was installed by a different mechanic, this time an RV mechanic -Alt Chg warning still on.
He found additional issues with the relay & solenoid.
We replaced both -Alt Chg warning still on.
The bus starts right up and according to the gauges the batteries are charging. We don't know what else to do. Any help with this issue is greatly appreciated.
If with all the alternator work and the chassis batteries are still not charging, what is the condition of the coach / house batteries, Are they charging off the alternator?
With no information on how your battery system is setup to charge, there might be a battery isolator system used on you coach.They look like the ones pictured in this link. https://www.google.com/search?q=battery+isolator&rlz=1C1VFKB_enUS711US716&oq=battery+i&aqs=chrome.1.69i57j0l5.34885j0j8&sourceid=chrome&ie=UTF-8
That could be causing issues.
Page 22 in this link covers some information on the alternator, listed in a portion of the original owners manual.
http://beaveramb.org/Data/PDF Manuals/2005 Beaver Santiam/Section09.pdf
Another option might be to contact the Beaver owners at this link for some information.
Rich.
-
59 minutes ago, 14Fleetwood said:Both original fasteners had indeed sheared. It was not clear why they had sheared (you cite three excellent causes); I noted that the same assembly on the driver's was side completely intact. Since I recently bought this coach used, I am not familiar with how this problem developed. Note that I added 3 screws in place of the two that had sheared.
We are the second owners of our current coach and it was a low mileage unit. Only one long trip, but that trip was to Alaska and when we decided to buy it there was a lot of haggling. What we found was long list and the dealer was not going to sell it for my offer.
4 mounts later we got a call asking if there was any interest in buying it. The person who bought it used the Lemon Law and was able to get out from under all the things that never seamed to end.
Our current coach at the time was in over the road condition and I mentioned I would take it off his hands, but any money made would be made on the trade in. Right or wrong and for most, way over the top. Months later and many hrs. of work it had risen from the dead and with the loving care has and now exceeded 120,000 miles. With that same care it has served us well for years, although not as decked out as the current coaches, one knows the chassis and coach strong points and weaknesses.
We have looked at hundreds if not a thousand coaches and nothing has tempted us. The domestic engineer and the driver are happy. Simple and reliable, enough tools and spare parts to get us home and with only 2 maybe 3 stops for a day or 2 to order parts.
Rich.
-
Dave, Bill's information is on top of the issue for sure.
The item that I would also check on the coach is all the rubber flex lines to the wheel cylinders, just because of there age - if they are still OEM. and the flex link to the park brake system.
Regarding the ABS reset, the system should clear the fault once all the air is out of the system. As bill mentioned it requires a good amount of brake fluid and that is not a bad thing. Hydraulic brake fluid absorbs moisture over time and becomes less effective and damaging to the system because of the moisture.
Rich.
-
2 hours ago, msgtnobody said:When the steps open or closes the motor continues to operate and it makes a sound like the gears are still trying to extend or close the steps. Is there a way to adjust motor/gear to stop after the steps are fully open or closed?? I have a 2008 Monaco LaPalma
There should be a micro switch located to stop travel in both the extended point and the retracted point or there is a loose Allen screw on the motor or the track drive and that is letting the motor to keep running at both ends.
There might be something loose in the mechanical system.
Rich.
-
On 9/14/2019 at 6:35 PM, F353196 said:No trip tek. Unit is a 2002 Triple E Empress Model FW3802. Tried hooking but no luck yet. Possible not sufficient cable length to pull through to camera location if able to hook it. Will talk a picture of end of wire connected to camera and post. Appreciate the suggestions
Fred
Fred,, This is a link to the Factory address and contact information.
they might be able to offer some help regarding the backup camera. It was an option on you model and year coach.
Rich.
-
9 hours ago, wilkiesr said:Looking for someone to repair slide outs on a 2007 Four Winds Magellan. Located at Kerr Lake, Henderson NC
This link might help find some help even if your slide is in so you can drive to a service location.
https://fixonroad.com/home/ Might get you started in the search for different mobile services
Rich.
-
F 353196, Welcome to the Forum!
Could you post the Make, Model and Year of the coach? That information helps because builders use ducts, trim or some other method to run the wiring. Sounds like a splice has failed from your post. Do you have a short piece of wire connected to the camera and an end that was pulled out of a routing hole behind the camera mount?
Can you take a picture of the end the came loose if you have pulled it out of where it was coming from ? Pictures are very helpful because we can see how the bedroom sealing and the cabinets installed for possible wiring paths.
Rich.
-
Suddenly during wet driving ABS light and alarm came on when engine ignition turned off, Shortly thereafter engine wouldn't turn off either.
Sure sounds like a ground connection and with the ABS light coming on at the same time, they maybe sharing a common ground point.
had to disconnect battery cable. What cable did you remove ? positive or ground.
Fuel supply solenoid needs power to maintain fuel flow, but in some systems the injector pumps can still pull fuel from the tank even if the lift pump is not running.
Occasionally now engine won't start - just clicks- What is clicking? The ignition 12 volt supply solenoid or the ignition circuit starter relay that supplies 12 volt high current to the started motor?
In any case it could and sure sounds like a contaminated ground at the frame or a oxidized wire connection in the battery bay.
Rich.
-
12 hours ago, akadeadeye said:Our inside step on our motorhome won't elevate. I lifted the step manually and looked underneath the step and saw that the "piston" had become disconnected from the housing at the step wall. I found four tiny screws loose. But I couldn't get the "piston" extended in order to see if I can fasten it back. How do you release this piston, or is it fried?
Don
Don, The setup looks like one used to position the older receiver dish. As the steps are extended the link gets longer, lowering the steps.
In that case the long black item under the motor is a gear driven gear link, the motor spins and the end connected to the steps should move closer to the end connected to the inside wall where the motor was connected.
The motor appears to have pulled away from the end plate and there are 4 to 5 screw holes that line up with the ones in the motor when the motor is orientated properly. The condition of the screws and the end plate have probably been damaged as things loosened up.
Good luck Rich.
-
Andy, wabco does a good job of hiding the physical dimensions. I have a flexible scale that works to wrap around circular items to get there circumference measurements.
Small and picked it up a a fabric store. Most of the industrial flat tapes cost an arm and a leg. Do not use it very often, but when needed it works fine.
The Lisle wrench's use a 1/2 in. socket extension in many cases and slandered handle .
Rich.
-
A question: what tool is recommended to reach upward 24" through a narrow gap and muster enough torque to loosen the desiccant filter?
Andy, Thinking of something like this, the proper size and a-will it fit up into the space ?Adjustable Filter Wrench
Manufacturer Part No.: 53100
Our Part No.: LIS53100
Adjustable Oil Filter Wrench
For trucks and tractors. Fits John Deere, Case, Caterpiller, Mack, Detroit Diesel and others.- Tough, stainless steel band with special "teeth" for extra gripping power, won't slip.
- Professional quality.
- 1/2 inch square drive.
- Range 4 3/8 inches to 5 5/8 inches.
Rich.
-
1 hour ago, JDOnTheGo said:Hello all,
I'm mostly looking for a sanity check to see if my thinking makes any sense. While I certainly enjoy tossing large sums of money at my coach, I generally like to see some improvement as a result. To date, the results have not been good. Thanks in advance!! 🙂
I've been fighting a fairly significant vibration on an MCI coach (102-EL3) for a couple years now. In general, it starts at 55mph is bad up thru 63 mph and is tolerable at 66-68mph. It may be better when cold - definitely bad after being in operation a while. Up/down hill doesn't matter. Coasting downhill doesn't make any difference. I won't bore you with all the details but will say that I've had every king pin, bushing, rod end, etc... replaced that mechanics have even given a second glance, all eight tires, four wheels, Road Force balanced all eight wheels/tires at least four times each (different shops), replaced tires, used Tru-Balance to mount wheels, etc... I have never tried balance beads and nobody has spent much time looking at the drive shaft.
It makes complete sense to me that my problem is not the wheels/tires (given two different sets of tires and the number of times the wheels/tires have been balanced - perhaps the brake disk or ???). I was looking for a shop that would perform an on-vehicle balance and ran into the threads here about the Centramatic balancers. I haven't yet found such a shop in the NM area so was thinking of tossing another thousand $$ at it with these Centramatic balancers.
Sound like a logical next step? Or, do you know of a really good shop that will do on vehicle balance in the SW (NM but I would go to PHX if there was optimism).
Thank you!!
Wondering if it might be the drive shaft. What year is the MCI Coach? Did it start after some rear end work? or was it tower to a shop for repair before the problem started?
The later question could be in play if the drive shaft required work or was reinstalled out of phase. The second part that could be the ride height being off causing some miss alignment. If one starts moving and the air ride is not up, the shaking will get ones attention very quickly.
Good luck !
Rich.

Lamp replacement roof remote control spotlight
in Electrical
Posted · Report reply
Well, I replaced our Inverter / charger 2 years ago. Installed a pure sine wave unit.
We are still using the OEM refrigerator, have not needed to change it out for a domestic style unit yet.
You might be confusing me with another member.
Sure good to hear that you figured out how to replace the lamp is in you roof spotlight.
Rich.