


richard5933
-
Content Count
1997 -
Joined
-
Last visited
Everything posted by richard5933
-
The box stores (HD, Lowes) sell adhesive specifically designed for bonding foam panels to walls. It might work as well.
-
Login on the regular FMCA site (not the forum) and click on the icon on the right side for 'dashboard'. You'll then see a red link on the left-hand side for membership directory. Once you're in the directory you can search by member number.
-
tow dolly with or with out brakes
richard5933 replied to studebrucer's topic in Toads-Towed Behind Motorhome
The decision would be easy - get the brakes. Do you really want to wake up every day knowing that a decision to save a few bucks caused an accident or took someone's life? -
Or maybe that no one is wearing seat belts? Or maybe that the little girl in the foreground is about to fall out the window? Or maybe that the dog isn't restrained in any way and looks like he's about to jump out? To be honest, I never really gave it a good look until you mentioned it. Now that I see the details, kind of makes one wonder who staged the photo?
-
I couldn't get a good handle on how the front a/c reacted when operated on the generator by itself. Seemed to do better, but to be honest by that time we were so hot and irritated that all we could think about was closing the bedroom door and retreating to the coolness that the rear a/c provided. My initial gut feeling is that the front unit hasn't aged quite as well as the rear for whatever reason. Possibly its location in the bay behind the wheel well caused it to catch more road spray? Who knows, but I'll hopefully find out if there is something going on when I open the cabinet. I'm also going to see what they used for a relay in the circuit that energizes the compressor. It's a mechanical relay/switch, so possibly it's part of the problem. I'll be doing some more testing and inspecting over the next week, including opening the inspection doors to be certain that all connections are tight between the generator head and the control box, as well as in the manual transfer switch. Thought it would be good to eliminate the easy stuff first. Also going to open and inspect all components of the front a/c itself to eliminate obvious problems. Once I have a better idea of the complete situation I'll figure out what to do, hopefully. Additional suggestions are welcome.
-
We had a great trip over Memorial Day weekend, but the temps were extremely hot (for Wisconsin) with daytime temps nearing 100 degrees. We ran the generator a few hours at the end of the day to allow us to run the two basement a/c units and get the coach cooled down for the evening. The rear a/c seemed to work well but the front a/c cycled the compressor off after only 3-4 minutes. It would cycle on again after a few minutes, only to repeat this over and over but never run long enough to actually cool the front of the coach. When we got home I confirmed that both a/c units run fine when plugged into shore power and cool nicely. No short cycling or other issues. Just to be sure, I'm going to pull the cover on he front basement unit to confirm that things are okay inside and that nothing is visibly wrong (coil clogged, fan motor binding, etc.) My hunch was that the problem is with the generator. Generator is a Kohler 12.5 RCOP67 The power coming from the generator is steady at 117 volts 60 hz with no load. As the load increased with the first a/c unit the voltage dropped to about 112 volts, and with both running it dropped again to 108 volts. My thought is that the second a/c unit was having to work too hard to cool at the low voltage level and shut down. The manual lists low voltage as a possible cause of short compressor cycles. Replacing the generator is the long-term goal. Either we'll put a brush-less 13 kw head on the existing Perkins engine, or replace both the engine and the generator with a new unit. Since the remote radiator and associated install of a full replacement would be difficult and too expensive right now, we'd probably opt for the generator head only. Either way, we'd like to push off replacement for now if possible. For now, I'm trying to get information about how to remedy things for the short term. I've read elsewhere that I should set the engine RPM to provide for the proper voltage & 60hz operation at load (instead of at a no-load condition as it is currently set). This would mean a slight increase in the governor RPM speed. Seems like a simple solution which necessitates only turning a few screws. However, my experience teaches me that simple is not always best. Anyone have experience with these older generator that can lend a bit of advice here? Is this a workable short-term solution? If so, should I aim for proper settings at a full-load situation or split the difference and have the unit run at 120v/60hz with half-load? My thought is to set it for half load so that on either end of the spectrum (no load or full load) I'll only be slightly out of spec. If I set this for proper setting at full load I'd be way off when at a no-load situation. Thanks.
-
Update on this issue... We've used the coach a few times since I added the extra valve to the black tank outlet. Today was the first time to dump since the new valve was put in place. (There are only two of us, and we are very frugal with our water use.) I've been running with the end plug on the discharge pipe just in case the new valve didn't cure the problem. It didn't. Glad I took precautions. In spite of the original valve being closed AND the new Valterra plastic valve being closed, there was still about 1/2 to 1 cup of liquid in the pipe downstream from the two valves. Was wearing gloves at the time, and the cap is under the floor of the bay, so no biggie. But, I'd sure like to have this thing work properly and be more sanitary when dumping. Not sure what to think other than the new Valterra valve is just defective, since it obviously should have been able to seal against this liquid since the old valve was clearly still holding back the majority of the pressure from the 50+ gallons of waste water. I do have another Valterra gate valve I could try - this one with a plastic body as well but with a stainless gate instead of the plastic one. Any thoughts? BTW, the combined black/gray dumped with absolutely no issues through the 2" outlet. My guess is that having a combined tank is what makes the smaller outlet possible.
-
Obviously my engine is out of warranty... I was thinking of those that still have a warranty. I'm still not sure I agree with your premise though. Are you saying that anyone whose engine calls for 15w40 can substitute the T-6 at 5w40? Seems to me that they are showing this comparison to make the point that the new product provides excellent protection. I don't see anywhere that they state it can replace 15w40 in any engine. Some engines specify 15w40 (or other grades) for a reason beyond the lubrication itself. For example, a pump may be designed to move oil at a certain pressure based on the viscosity, and if the viscosity drops the pressure might not be the same. I still think it best to check out the manufacturer's recommendations before making a change.
-
This test was done at -34 C. Of course 5w will reach areas of the engine faster at those temps. However, if my engine manufacturer (the people I'm hoping will stand behind their warranty) specifies 15w, then that's what I'd use.
-
This might not require a permit by you, but around here they'd consider that a structure and want a permit. They don't care how permanent it is, just if it is safe and meets code. Put up something around here without a permit and get caught, and they'll charge you triple the fees to get the permit retroactively. That is if they decide that it's a permissible project and allow it at all. The good news is that almost every municipality has posted their codes online, so it's pretty easy to know ahead of time what requires a permit and what does not. Better to check and not assume no permit is required.
-
RV flooring replacement in Las Vegas
richard5933 replied to Vegasmailman's topic in General Discussion
We just had the carpeting in our coach replaced by a good friend who is a certified flooring installer. He has done a number of RV installs in the past. I actually had the conversation with him about finding someone to do the work, since if it wasn't for him we would not have known where to turn. I just checked out the website for the certified flooring installers, and they don't list anyone in your area. That doesn't really mean anything though, since I'm sure that there is more than one place to get training and certification. Seems like the place to start would be to talk to the people who run a couple of the privately-owned flooring stores and ask who they know in the area that have done RV installs in the past. This is a specialized type of installer you're looking for, and word of mouth will probably be the best way to find someone. Probably best to stay away from box stores and chain flooring outlets, as they may not have as deep a resource stack as the smaller stores. Once you find someone and talk to them, then it's just the standard procedure of getting references from other RV owners and check them out. We have a 35-foot coach without slides, and we spent about $450 on the new carpet and then $906 on the install including pad. If you add tile to that it will obviously cost more, but I think that if you find an experienced installer you can do much better than $10K. -
Echoing what has been hinted at and said before by Rich and others, it is vital that every coach owner read and understand the manufacturer's recommendations regarding oil. While many newer formulations might state that they are backwards compatible, it isn't 100% and should not be relied on. Like has been said, a 2-stroke diesel is just one example, and anyone putting the newer oil formulations in an older engine needs to do his/her homework first.
-
Sounds like you created a short between the turn signal circuit and the light circuit. I'm guessing that the ground is the housing of the lamp socket and that the two contacts are for the signal and light circuits.
-
My research showed that Trojan batteries were worth the extra expense. On our first coach we used T-145 batteries since that was all we had room for. Our current coach has much more room so we went with L16. Obviously you'll need to pick batteries that fit the space/setup you're working with. But, keep in mind that there are different capacity sizes available in the same physical size.
-
We'd love to meet up with everyone we met online. Looking forward to it.
-
Sounds great. I'd love to be able to meet everyone.
-
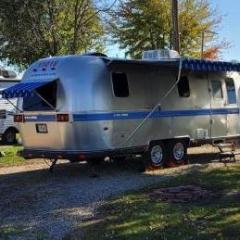
1974 GMC 4108 - Custom Coach Land Cruiser
richard5933 replied to richard5933's topic in RV Photo Gallery
We'd love to get together with others, but we won't be arriving until early on the 18th. We kind of decided to go to Gillette at the last minute, and that's the soonest that we'll be able to pull in. -
1974 GMC 4108 - Custom Coach Land Cruiser
richard5933 replied to richard5933's topic in RV Photo Gallery
You are correct - 8V71. On my trip from NJ to Wisconsin it actually used almost no oil at all. The engine has less than 42K miles (actual original miles, not since rebuild) so it's really still a new engine in many respects. I do carry a few gallons with us, but unless something goes wrong I don't expect the oil use to go up suddenly. -
1974 GMC 4108 - Custom Coach Land Cruiser
richard5933 replied to richard5933's topic in RV Photo Gallery
The chassis system was 24v from the factory and still is. All the bus systems are 24v, including dash lights, headlights, marker lights, etc. The only 12v bus system that I've found so far is the circuit for the daytime running lights which provides 12v to the headlights for daytime half-power use. I haven't had too much trouble finding replacement bulbs for anything yet, and what I cannot get from Amazon I can get from Luke. The other things that I've replaced such as driver fan are available in 24v from truck supply houses. The only 12v thing I've installed for use while traveling is the car stereo, and it is tied to the house battery bank. As originally configured from Custom Coach, about half of the house systems were tied into the chassis battery. With the exception of two pieces (servo for rear window Venetian blinds & actuator for pneumatic step cover) everything has been changed to run on the 12v house batteries. The two remaining pieces were left as 24v because I cannot find 12v replacements for the servo & actuator, and if I did there was no access provided without disassembling cabinetry. Just didn't seem worth the effort, especially since the step cover is only used while on the road and the blinds are usually kept closed since they are behind the TV. All the DC lighting is now LED, and I've added additional lights where there was only 120v lighting installed. Many of these older Custom Coach conversions didn't have a real house battery bank installed at all. They used the generator 8D start battery to provide power to the 12v systems, and were designed to be plugged in or on shore power whenever they were parked. Obviously this setup was not going to work with dry camping and needed to be changed. Apparently things were done much differently in 1974 than they are now. We installed four Trojan L16G batteries for a total of 780Ah. The charger is a Progressive Dynamics 9270 which puts out 70 amps. There is also a Sterling 24v-to-12v battery-to-battery charger which allows the house batteries to charge directly from the chassis alternator while on the road at 70 amps. The Sterling is a modern multi-stage charger and a step above just using an equalizer since it won't over charge. We do not have an equalizer, and if I'm running 12v systems while driving I just turn on the Sterling charger. The last step of the system, which I'm still working on, is the solar. Right now I'm working to make the bus 'solar ready' and installing a Victron 150/85 MPPT charge controller. Panels will follow soon. Since we have over-the-road a/c and don't plan on running the a/c while dry camping (yet) there was no need for a huge inverter. We installed the PSW Samlex which puts out 2000 watts. Due to the configuration of the 120v breaker panel and the use of a manual transfer switch I was not able to tie it into the existing 120v system and opted to install a few parallel outlets from the inverter. We've got outlets front and rear from the inverter as well as one in the wet bay. Eventually we plan to reconfigure the 120v breaker panel to allow for installation of an inverter/charger which is tied to the 120v system with an automatic transfer switch. We're planning to be at Gillette and would love to have you take a look at the setup if you're there, and possibly we can see how your rig is set up as well. -
FMCA Verizon Plan and Type of Phones Used
richard5933 replied to hanknjoyce's topic in RV Internet to Go/Staying in Touch
If your old plan didn't have a smart phone, then you'll probably need to add a data plan in order to bring the smartphone over. You don't need to buy the phone from Verizon, as long as it's one that will work on their network. My understanding that the FMCA plan being offered for MiFi is a stand-alone plan. You'll still need to have a data plan on your phone's plan if you have a smartphone or want to order one. The FMCA data plan through the Jetpack has a much higher data limit than most of the lower-priced phone data plans. If you only use a small amount of data then you' might have no need for the FMCA plan. You might be able to use your new smartphone as a hotspot and connect your laptap & iPad, but of course you'll be using the data allowance in your smartphone's plan. If you connect your iPad and HP laptop through Wifi, then you still won't need the FMCA plan. If, however, you are looking for a way to connect and get online when there is no Wifi and/or use the internet above and beyond what your smartphone's plan allows, then you might find the FMCA plan just what you're looking for. -
1974 GMC 4108 - Custom Coach Land Cruiser
richard5933 replied to richard5933's topic in RV Photo Gallery
Definitely manual. I'm starting to get the hang of it, but the learning curve is steep. The chassis is still 24v. House systems are all 12v. -
Kind of reminds me of all the aptitude tests we took when I was in grade school and middle school in the 60s and 70s. Some people understand basic mechanical design and some don't. Sometimes no amount of explaining seems to be able to bridge the gap between the two camps.
-
1974 GMC 4108 - Custom Coach Land Cruiser
richard5933 replied to richard5933's topic in RV Photo Gallery
On second thought, I think so. Just sent in our registration. It will be our first event, so I'm not sure what to expect. That said, looking forward to it. -
1974 GMC 4108 - Custom Coach Land Cruiser
richard5933 replied to richard5933's topic in RV Photo Gallery
Not sure. Since we just declared the coach ready for prime time we haven't given it much thought till you asked. -
1974 GMC 4108 - Custom Coach Land Cruiser
richard5933 replied to richard5933's topic in RV Photo Gallery
Aside from the rear upholstery and new carpeting, the majority of upgrades and work is behind the scenes. We added a new house battery system based on four Trojan L16 batteries, giving a total of 780 Ah of capacity. There is a Progressive Dynamics 70-amp charger for the house batteries as well as a battery-to-battery charger to allow charging from the chassis alternator while on the road. The last piece will be adding the Victron 150/85 MPPT charge controller and 480 watts of solar panels. The original dimmable 120v fluorescent lighting is still in place and working, and I've added LED 12v lighting throughout. The microwave is the original Thermador which actually works quite well. Two burner electric stove for cooking, and a Norcold DE707 dual voltage (12v/120v) fridge. The fridge will be upgraded to a Vitrifrigo whenever it gets here from Italy. (It was the only one that will slide into the current opening.) We recently took a one-night shakedown cruise, and in a few days we're heading to Black River Falls WI for the Ho Chunk Pow Wow. Free camping (no hookups) and a great chance to test out the dry camping ability of the coach. This will be our first real trip in the coach and we're very excited. We're hoping to make a long trip to the east coast later this spring, and then may head to New Mexico in early fall. Lots of local trips in between if things work out.